Hervé
-
Posts
10077 -
Joined
-
Last visited
-
Days Won
569
Content Type
Profiles
Articles, News and Tips
Forums
Everything posted by Hervé
-
Guides section, 1st thread!
-
Re: TrackPad, all you need to do is set it up through the Trackpad PrefPane. Too many people ignore this basic stuff... Not all gestures will be supported of course, this is no real Mac. Re: sleep/wake, you experience issues because you're not using any patched DSDT nor any DSDT patches for _PRW methods in ACPI devices GLAN (LAN interface), HDEF (audio) and EHC1/EH01, EHC2/EH02, XHC (USB controllers). You can give the attached patched DSDT a try knowing that I've only patched it for those above _PRW methods, USB ports power inection and support for keyboard brightness keys. Patched_DSDT.zip Sleep and wake should then work on the basis that you have: CPU power management properly in place Hibernation disabled (i.e. fallback on plain old sleep); you'll find details relating to this in our FAQ section I've also revisited our Clover config which was partially incorrect and non-optimum. You may place it "as is" alongside your existing Clover config file in your EFI/CLOVER folder and manually call it at boot time from Clover's main menu->Options->Configs revised_config.plist.zip You're also missing a few other essential stuff such as the SSDT-PNLF required to fully support brightness control and kexts required for proper USB operations (all available off Rehabman's repo if you google for them): USBInjectAll (to get all your USB ports working) FakePCIID + FakePCIIDXhciMux (to get USB2/USB3 multiplexing) All in all, why didn't you use the existing Clover packs already provided in guides for this laptop model?
-
Define "latest Clover". Did you enable/activate the AppleRTC fix in Clover? Please note that if you run Mojave 10.14.4 or later, you also need to update Clover to, at least, r4911 as explained here. You may also see Dids' GitHub repo.
-
Revised High Sierra & Mojave packs #2 uploaded. The packs contain an updated DSDT that fixes the auto-wake issue when laptop runs on mains. It was a simple matter of properly applying the well-known _PWR 0x06D patch to devices GLAN, HDEF, EHx1, EHx2 and XHC. It's all visible in the DSDT.dsl source code.
-
You can look this up in the FAQ section. Alternatively, just post new IOReg output + zipped Clover EFI folder or list of kexts you cache from /L/E or /S/L/E.
-
Please post new debug package. From experience, I've always had to run with USBInjectAll and HPET fix before I could generate the proper USBPorts kext. I noticed that Hackintool needs to detect all USB controllers and ports properly. Failing that, not all USB ports/features work. Than, you've got to make sure to only use: 1) Hackintool-generated SSDT-UIAC + Rehabman's USBInjectAll kext or 2) Hackintool-generated USBPorts kext
-
DW1560 does not work OOB, it requires patching. You can look this up in our dedicated R&D->Wireless section. Occasionally, TouchPad won't work and may require a few reboots to be recovered. Never really investigated this further because I'm using an external mouse 99% of the time. But feel free to have a go at it.
-
You change nothing if there is no difference... You may also try that set of patched tables (keep a backup of yours).
-
That should obviously do. Compare your current DSDT and that of the other member, looking for the PWR methods. Adjust as necessary. Use MaciASL to that effect.
- 52 replies
-
- 1
-

-
- sleep/wakeup
- mojave
- (and 3 more)
-
Definitely sounds like a USB-related issue. If your laptop has older USB2.0 controller, temporarily boot with USBInjectAll kext before running Hackintool so that you do not miss any controller/ports.
-
And you'll find them on the forum if you search correctly in the Wireless section...
-
Here are BIOS settings that are known to work on the 7250 (5th gen CPU with Intel HD5500 graphics) under High Sierra and Mojave. These settings were tested and verified with BIOS A21. General . Boot Sequence: * Boot List Option = UEFI (-> Boot Sequence list will be set accordingly) . Adanced Boot Options: * Enable Legacy Option ROMs = On (required to boot legacy external devices such as USB media or SD cards) System Configuration . Integrated NIC = Enabled . Parallel Port = Disabled . Serial Port = COM1 . SATA Operation = AHCI . Drives: * SATA-0/1/2/3 = On . SMART Reporting: * Enable SMART Reporting = On or Off . USB Configuration: * Enable USB Boot Support = On * Enable USB3.0 Controller = On * Enable External USB Port = On . USB PowerShare: * Enable USB PowerShare = On . Audio: * Enable Audio = On . Keyboard Illumination: * Bright = On (or any desired value) . Keyboard Backlight on AC: * Keyboard Backlight with AC = On or Off . Unobtrusive Mode: * Enable Unobtrusive Mode = Off . Miscellaneous Devices: * Enable Microphone = On * Enable Camera = On * Enable Media Card = On Video . LCD Brightness = Whatever settings you prefer Security . Admin Password = not set (or whatever) . System Password = not set (or whatever) . Internal HDD-1 Password = not set (or whatever) . Strong Password = Off . Password Configuration = default settings . Password Bypass = Disabled . Password Change: Allow Non-admin Password Changes = on . Non-Admin Setup Changes = Off . TPM Security = Off . Computrace(R) = Deactivate . CPU XD Support = On . OROM Keyboard Access = Enable . Admin Setup Lockout = Off . Master Password Lockout = Off Secure Boot . Secure Boot Enable = Disabled . Expert Key Management: * Enable Custom Mode = Off * Custom Mode Key Management = PK Performance . Multi Core Support = All . Intel SpeedStep = Enabled . C-States control = On . Intel TurboBoost = Enabled . HyperThread Control = Enabled Power Management . AC Behavior: * Wake on AC = Off . Auto On Time = Disabled . USB Wake Support: * Enable USB Wake Support = On or Off . Wireless Radio Control: * Control WLAN radio = Off * Control WWAN radio = Off . Wake on LAN/WLAN = Disabled . Block Sleep = Off . Peak Shift = Off . Dock Support on Battery = Off . Advanced Battery Charge Configuration = Off . Primary Battery Charge Configuration = Adaptative (or any other choice) . Intel(R) Smart Connect Technology = Off POST Behavior . Adapter Warnings = Enabled . Keypad (Embedded) = Fn Key Only . Mouse/Touchpad = Touchpad/PS-2 Mouse . Numlock Enable = Enabled . Fn Key Emulation = Enabled . Fn Lock Options: * Fn Lock = On * Lock Mode Disable/Standard = On . MEBx Hotkey = Enabled . Fast Boot = Minimal . Extend BIOS POST Time = 0 seconds (or any other choice) Virtualization Support . Virtualization = Enabled . VT for Direct I/O = Off (otherwise use Chameleon/Clover option dart=0) . Trusted Execution = Off Wireless . Wireless Switch: * WWAN = On * WLAN/WiGig = On * GPS (on WWAN Module) = On * Bluetooth = On . Wireless Device Enable: * WWAN/GPS = On * WLAN/WiGig = On * Bluetooth = On
-
No need to specify "inject Intel" + layout-id in the Graphics section of your Clover when you run with recent/latest Lilu + WEG kexts.
- 4 replies
-
- 1
-
-
- latitude e5540
- mojave 10.14.6
- (and 1 more)
-
Looking good overall. I would just say that if you're dropping SSDT CpuPm + SSDT CpuI0st and injecting the CPU PM ssdt table, then you should not have PluginType parameter checked. It's either or. But that should not impact battery life in any way. I did not see anything relating to a dGPU so I can only presume there is none and your config is optimum as far as CPU power management and battery life is concerned.
- 4 replies
-
- 1
-
-
- latitude e5540
- mojave 10.14.6
- (and 1 more)
-
I don't have any E5450 at hands but I have an E7250 until the end of the week. I don't have a mini-DP cable and a DP screen for testing but I can try DP output through my E-Port dock out to HDMI via an adapter. You may need to change the default FB #/port# of the BDW frame buffer for your DP output port to work although it's unlikely. You use BDW layout 0x16260006 which defines the following output ports: 06002616 01030303 00002002 00005001 --> layout 0x16260026, 3 x output ports 00000060 D90A0000 D90A0000 00000000 00000000 00000000 00000800 02000000 30020000 --> FB #0/port #0, built-in LCD 01050B00 00040000 07050000 --> FB #1/port #5, DP output (but usually HDMI port) 02040B00 00040000 07050000 --> FB #2/port #6, DP output Looking at your posted IOReg outputs, I can clearly see your external display attached to FB@2/port #6. As such, I guess your problem is highly likely to be a 4K-related problem more than anything else. I don't have a 4K screen myself so I've never had any 4K-related issue to resolve but I believe the issue of black screen on 4K displays is quite common. I also understand there is an existing fix (or fixes?) for it, like using boot parameter -cdfon. https://www.insanelymac.com/forum/topic/334899-intel-framebuffer-patching-using-whatevergreen/ Now, looking at the EFI folder of post #1, I could see 2 x Clover config files: config.plist (which is the default name of Clover's config) is empty and therefore I assume you cannot be using it. config_ok_ref.plist contains the following typo in the Graphics properties injection: <key>framebuffer-unifiedmem</key> <data> AAAAgA== </data --> typo! it should be "</data>", the final ">" is missing <key>enable-hdmi20</key> <data> That same typo is also found in the 2 x Clover config files of the EFI folder of your 2nd post... You need to correct this with a text editor like TextEdit or Clover Configurator; whether it'll fix the issues you encounter, that I cannot say for sure but I certainly smell a fish...
-
Please report your info in the following manner: Card model Hackintosh model macOS versions tested Patch used the successful Kexts used when successful Tricks used when successful If you could not get a card to work, just specify card model, Hackintosh model and macOs version "NOk". We'll assume it just didn't work no matter what. Example: Card: DW1820A, #0VW3T3, 1028:0021 Hackintosh: Latitude 7490 macOS versions: High Sierra Ok, Mojave Ok Patch: "compatible pci14e4,4353" property injection in Clover Kexts: none Boot parameter: none Tricks: none Card: DW1820A, #0VW3T3, 1028:0021 Hackintosh: Lenovo P50 macOS versions: Mojave Ok Patch: "compatible pci14e4,4353" property injection in Clover Kexts: BrcmAirportFixup Boot parameter: brcmfx-driver=1 Tricks: pin-masking
-
/!\ TOPIC NOW DEPRECATED & CLOSED /!\ By popular demand and building on the guide I wrote for those cards some time ago + the subsequent extended feedback (mostly poor) on users experience, I thought it'd be useful to list those cards and laptops combinations that work or not. People may then opt for BCM450 cards with the best of knowledge. I invite all those who tested such cards to report their conclusions in order to build-up the registry. Important note: This is not a troubleshooting thread, there's already one here. This thread is only to report success or failure stating card model + computer model in order to complete a registry. Non-compliant posts will be deleted without any notice. DW1820A #0VW3T3 1028:0021 DW1820A #0VW3T3 1028:0023 DW1820A #096JNT 1028:0021 DW1820A #096JNT 1028:0022 DW1820A #08PKF4 1028:0023 T77H649 #00JT494 17aa:075a WCBN808B #00JT493 ? Dell Latitude 7490 Y Y Y Y Dell Latitude E7250 Y Y Y Dell Latitude E7450 Y Dell Latitude E7470 Y Dell XPS 9360 Y Dell XPS 9560/9570 Y* Y* Dell Inspiron 7x72/7x60 Y* Dell Inspiron 7460 N N ? Dell 3040 micro Y Lenovo M900 mini N ThinkPad T440p/T440s N Lenovo P50 Y* Intel NUC8I7HVK Y Asus Zenbook UX410UQK Y* Latitude E5570 Y Lenovo R70 Y Acer Swift 3 SF314-54G Y* ASUS UX410U Y Lenovo Air IWL Y* Y* Y* Lenovo Y7000 81V4 Y* ASRock Deskmini 310/COM Y Asrock Z390 Phantom Y Lenovo Thinkpad 450s Y N N * with pin masking Notes: - - - - - DW1820A #08PKF4 1028:0023 reported to work Ok with: pin masking (3pins @front, 2pins/3pins @rear) (there's one report stating masking makes wireless unreliable but Bluetooth work) BrcmAirportFixUp kext brcmfx-driver=1 boot option (or brcmfx-driver=2 to gain Auto Unlock as described here) - - - - - Edit: 06Jan 2020 Further to recent information posted by Hugotai on another forum, it appears that additional device property injection setting pci-aspm-default to 0 fixes all stability issues. Full details of the property injection available here.
-
Regretfully, I can only agree with JakeLo. These cards only work Ok on a few laptop models.
-
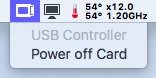
Try it, there's a power off option in the menu of the Finder's bar EC icon. Will be much simpler than a DSDT/SSDT patch if it works!
-
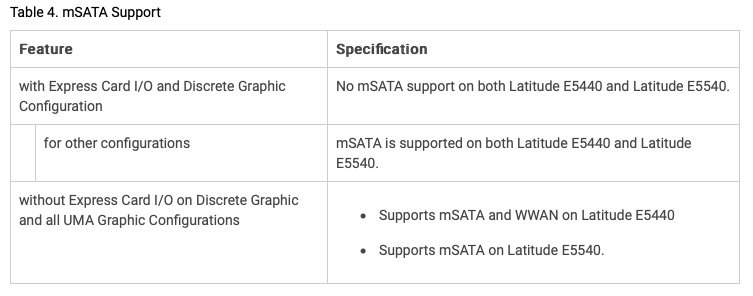
An ExpressCard is normally an external add-on card that you insert in a dedicated EC slot. When not used, it's fitted with a 34mm plastic plate, like for SD card readers. I guess this must be linked to the nVidia (Fermi) dGPU I see attached to PCIe root bridge RP05@1C,4 and which is not disabled. Looking at the E5440 documentation available here, I read this:

-
Sorry for the short off-topic, but what kind of hardware is that in the EC slot?
-
Erm... that's the icon for an ExpressCard card! You must have a card inserted in the EC slot of your laptop... "Display Controller" is meant to represent what you currently have in place. What is it? My E62x0 laptops will show this when fitted with my GMYLE BC620 USB3.0 EC card.
-
nv_disable=1 boot parameter only instructs the OS to ignore the nVidia GPU so that no drivers are loaded; but it does not disable the hardware (i.e. turn it/power it off) so the dGPU still draws current off the battery. The dGPU can be disabled through ACPI patching. Can you please take a screenshot for that "display controller icon" ? [CMD][SHIFT][3] or [CMD][SHIFT][4], following by [SPACE] + left button mouse/touchpad click.
-

[SOLVED] Latitude E6440 macOS Mojave with Clover r4934
Hervé replied to magnitu's topic in The Archive
User Dr Hurt's VoodooPS2Controller kext r6. Works perfectly on the E6440. -
You would need to make up your own "Mojave" legacy QMI kext (in case you wondered, the Sierra part of skvo's kext means Sierra Wireless, not macOS Sierra); any legacy QMI kext made for another OS X/macOS version probably won't do because the inner syntax of the CellPhoneHelper kext it's based on will probably have evolved again. Apple has a strong tendency to change this version after version. Consider the Legacy_Sierra_QMI kext as an injector. All that it does is define a profile for the target WWAN module based on an existing Sierra Wireless module natively supported by OS X/macOS. Obviously, things that you change in your new hardware definition profile are the module's PCI ids. Of course, you still need the CellPhoneHelper kext and make sure you keep this fully vanilla in /S/LE/. An alternative to the Legacy_Sierra_QMI kext is to inject the new profile in FakeSMC. I've detailed this in previous WWAN module threads several years ago.