Hervé
-
Posts
10082 -
Joined
-
Last visited
-
Days Won
569
Content Type
Profiles
Articles, News and Tips
Forums
Everything posted by Hervé
-
No. It's also already been discussed at great length on the forum as you must have seen... Those Fermi chips are not properly supported in macOS so the buck stops at El Capitan. NB: Please don't post in Sierra threads that have been dead for 3 years to share about your High Sierra experience. Thank you.
-
We already have this covered on the forum, including a full installation guide and a High Sierra Clover pack for E6420/E6520 with NVS disabled through patched DSDT/SSDT. Please use the forum Search facility with the obvious keywords that you seem to know already (tags).
-
Since it's not I2C and that the driver also applies to older Ivy Bridge/Haswell Latitude laptops, it's fair to say you can give Dr Hurt's VoodooPS2Controller R6 kext a try. You'll find it in our R&D->kexts section.
-
What kind of TouchPad/TrackPad is this model fitted with? Keyboard brightness control is more a matter of DSDT than PS2Controller kext. I've detailed the patch I use in my E6230/7490/E7250 in each relevant guide. Patch info comes from the post made by @jpz4085 in Dr Hurt's PS2Controller thread. Works well in those laptops and will probably be relevant to your laptop too. No harm in trying, at worse it'll change nothing...
-
If you still have it, sure. But, here, I was able to boot my USB installer with pack #6, leaving the DSDT aside. Mojave is now installed and bootable without the DSDT.
-
It's the patched DSDT causing problem; I need to investigate. You should be able to boot if you select BIOS.aml rather than DSDT.aml through Clover's main boot menu->Options->ACPI patching.
-
Hold on, I added the device properties for my DW1820A and I'm getting KP all the time now when booting the USB installer. Same if I remove those DW1820A properties. Let me check...
-
I get to the Mojave installation screen without issues with my Clover pack #6. There must be something you've not followed in the process detailed in the guide...
-
I've got a new NVME SSD; let me put it in my 7490 and try a fresh Mojave installation on it with my pack #6. I'll let you know if there's something odd with it.
-
 Is this a vanilla installation or a distro?
 -
If HDEF (or whatever other audio device name) is not defined by default in your DSDT, maybe it is in an SSDT. You can dump all raw BIOS tables by pressing F4 at Clover main menu and then check things out. All extracted tables will be saved in EFI/CLOVER/ACPI/origin folder. But you probably already know that...
-
You boot your current config (which includes the Broadwell DVMT adjustment) with iGPU fake id and ig-platform-id set to 0x12345678 Once at the macOS desktop, you open up Terminal and repair permissions + rebuild your cache according to the instructions published in our FAQ section You then reboot without the iGPU faked-id or ig-platform-id set to 0x12345678 You can read about the DVMT settings and the associated requirement in Firewolf's original blog. Of course, if your BIOS permits it, set DVMT accordingly (between 64MB and 128MB). https://www.firewolf.science/2015/04/guide-intel-hd-graphics-5500-on-os-x-yosemite-10-10-3/
-
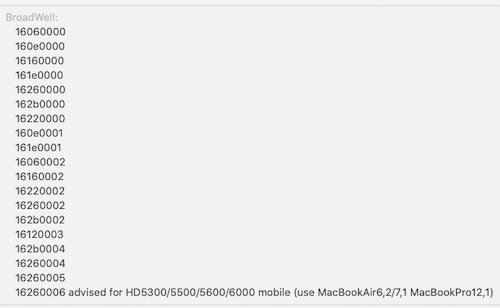
A layout in a Framebuffer kext can be described as a table that defines display output's properties throughout many parameters including, video memory, number of output ports, type of outputs, etc. You can find these tables in the binary files of framebuffer kexts through a simple Hex editor such as HexFiend for instance. You can then search those layouts in hexadecimal reverse order. For layout 16260006, which is what you would normally use for a laptop with HD5500 graphics, you would conduct a hex search on "06 00 26 16" which would lead you to the following code: 06002616 01030303 00002002 00005001 00000060 D90A0000 D90A0000 00000000 00000000 00000000 00000800 02000000 30020000 01050B00 00040000 07050000 02040B00 00040000 07050000 FF000000 01000000 40000000 0B0B0000 01010500 00000000 05000000 00000000 04000000 00000000 00000000 00000000 00000000 00000000 C8000000 If you were to conduct a search for "06 00 16 16", you'd get nothing because it's not an existing layout; as such, injecting ig-platform-id 0x16160006 in Clover (or trying to) will not lead anywhere. I'm surprised you find it referenced in a guide on a forum because that's totally incorrect.... Anyway, try the attached Clover config. config.plist.zip
-
You can and should get rid of NullCPUPowerManagement kext. That kills all CPU SpeedStep and affects performance... I'm a little lost because i3-5005U carries the same HD5500 id 0x1616 as the i5-5300U I recently played with on a Dell Latitude E7250 and for which graphics worked OOB with the above arrangements. Can you please post: a zipped saved output from IORegistryExplorer a zipped copy of your Clover EFI folder (when you boot, press F4 at Clover main menu in order to dump all your raw BIOS tables) Which version of Clover are you running with? In your 1st post, your Clover config showed that you were incorrectly trying to fake id 8086:1626 for your HD5500 iGPU (you entered "0x016268086") and injecting BDW (Broadwell) layout-id 0x16160006; that's an unknown layout to me and I would have expected that you'd inject layout-id 0x16260006 instead, as recommended in Cover Configurator. That certainly is the layout I saw reported in IOReg on the E7250 I had and I was not injecting anything, just letting Lilu + WEG do their job... But, by all means, you may try to fake id 8086:1626 by entering "0x16268086" and injecting recommended BDW layout (ig-platform-id) 0x16260006.

-
Keep a backup of your current config (just in case), then open your Clover config in Clover Configurator app and try the following : in Devices section, remove that id faking you've configured for your iGPU in Devices section, inject the required DVMT adjustment properties: in Graphics section, remove "Inject Intel" + ig-platform-id 0x16160006 in SMBIOS section, change your profile from incomplete and unsuitable Haswell MBA6,2 model to Broadwell MBA7,1 or MBA7,2 or MBP12,1 model in Kernel & Kexts Patches, you may also remove the AppleIntelCPUPM patch which is irrelevant to Broadwell platforms (it's only for Sandy & Ivy Bridge systems) Then, let latest version of Lilu + WhateverGreen kexts take care of graphics. For battery monitoring, use Rehabman's latest version ACPIBatteryManager kext. For your ELAN TouchPad, you may give this a try (no guarantee). NB: in, case you ignored it, your Intel wireless card is not supported and will have to be replaced by a support model (compatible with your Lenovo) or a USB dongle. See here.
-
7240 i7 Mojave working.. but need some extra/basic information
Hervé replied to faruktuef's topic in The Archive
Your E7240 is 4th gen Haswell platform. You should set it with: MacBooPro11,1 SMBIOS (iMac is to really suitable) Rehabman's ACPIBatteryManager kext (Google for it and use latest version) Latest Lilu + WhateverGreen kexts (and get rid of any other Intel graphics fixing kexts) AppleALC + correct layout-id injection for your audio codec With regards to the messages you're getting for add-on kexts when rebuilding your cache, please note that they're all perfectly normal. Since OS X Mavericks or Yosemite (I forgot which one it was), Apple requires signed (i.e. validated) kexts. Of course, this is not the case for many of our Hackintosh-related add-on kexts but, provided they're set with the correct permissions, they can still load and be cached nevertheless. So, nothing to worry about. Don't hesitate to Google on "kext signature" if you want to know more on the matter (and/or any other). -
7240 i7 Mojave working.. but need some extra/basic information
Hervé replied to faruktuef's topic in The Archive
Why don't you use the guide for your model that exists on this forum along with the associated Clover pack? I would also ask that you search the forum before posting. The Search button is at top of the forum page. Had you used it, you'd have obtained this for your trouble: -
Yes, given the nature of the signal (short waves), 5GHz networks will work better with 2 x antennas. I don't think it'll work properly on a single antenna. If you want to force your card on 5GHz, I guess you could try and split your SSIDs and have one for 5GHz and a different one for 2.4GHz.
-
Ok, it's perfectly clear. You must be the 1st person for whom the DW1820A actually works nearly OOB!
-
@riskyrismawan, you forgot to specify the boot parameter you're using with AirPrtBrcmFixup, if any at all. If you're not using any, what's the purpose of AirportBrcmFixup since BCM4350 14e4:43a3 is natively controlled through AirPortBrcmNIC kext?
-
That's my very recent guide so I can vouch for it... Maybe your Mojave installation package is corrupt. Try and re-download a new copy.
-
If this is systematic/repeatable, I can only suspect a corrupt USB installer. Try and wipe out your USB key and start afresh. Mac sure you setup your BIOS parameters properly. Which guide are you following, if any ?
-
Can you go to Disk Utility and check current disk status?
-
I don't know, I never really looked into the Touchpad settings; I'm using an external wireless mouse all the time.
-
@thangpc, what do you mean by "stuck here"? System unresponsive/hung/frozen? Mouse or touchpad not responding? Or you don't know what to do next?