Hervé
-
Posts
10077 -
Joined
-
Last visited
-
Days Won
569
Content Type
Profiles
Articles, News and Tips
Forums
Everything posted by Hervé
-

DELL PRECISION 7510 (SKYLAKE) - SHORT BATTERY LIFE
Hervé replied to nickelnoff's topic in The Archive
No. You inject the layout-id along the rest of the properties you inject in the Devices section of your Clover config. -
Did you follow the minimum requirements? It's directly available from main page -> "Our Picks" column on the right...
-
Looks like it. You should report it to Slice.
-
Repair permissions/rebuild cache: same as with previous versions; please check our FAQ section; it's there for a purpose... HDMI tint: you have to inject HDMI properties to the framebuffer to override DP settings. It was mentioned just a few days ago in a 7490 thread. Fix also detailed in my Latitude 7490 guide.
-
Arf, seems I spoke too soon; a day later, it's back to unreliable mode...
-
[SOLVED] E7450 stuck at "The recovery server could not be contacted."
Hervé replied to mre417's topic in The Archive
You could try and play with the setting applied to Legacy Option ROMs. Can you also post your Clover elements (EFI + kexts folders, Config.plist file)? -
Folks, re: Bluetooth, I installed Mieze's latest drivers published at InsanelyMac. It's loading FW version 4689 and works great! I've finally recovered Bluetooth full operations with the DW1820A (#0VW3T3, 1028:0021) of my 7490 running Catalina after caching the following kexts (from /L/E) from her latest V2.3.0d3 driver package: BrcmBluetoothInjector BrcmFirmwareRepo BrcmPatchRAM3 I invite you all to try Mieze's drivers and let her know of your results at IM.
-
Clover builds can be found at the following locations: Dids Github repo CloverHackyColour (Slice) Github repo Clover Configurator app can be found at the following location: Mackie100 repo
-
Card: DW1820A, #0VW3T3, 1028:021 Hackintosh: Lenovo Thinkpad 450s macOS versions: Mojave Ok Patch: compatible pci14e4,4353 Kexts: BrcmAirportFix (or Clover FixAirport ACPI fix) to inject ARPT device under PCI root bridge Boot parameter: none Tricks: none
-
latitude 7490 Dell lattitude 7490: method to install Catalina
Hervé replied to Tubardus's topic in The Archive
Oh yes, agreed but we're not in installation phase here. The alternative would be to boot without cache but, afaik, Clover no longer supports this. -
latitude 7490 Dell lattitude 7490: method to install Catalina
Hervé replied to Tubardus's topic in The Archive
We have a dedicated thread re: difference between injecting kexts and caching kexts in the FAQ section; I invite you to refer to it. I always recommend caching kexts (once they've been validated with Clover injection) since this is the normal/expected mode of operation of OS X/macOS. Kext injection is like an unnatural forced load. -
[SOLVED] E7450 stuck at "The recovery server could not be contacted."
Hervé replied to mre417's topic in The Archive
The Latitude E7450, like its E7250 smaller brother, is equipped with Intel i218LM Ethernet card. That's supported with the IntelMausiEthernet kext that you'll find in the Clover packs available in the models' respective guides. Make sure you've setup your BIOS parameters according to the recommended settings. These are available at top of the E7xxx support section. -
Was there a reason why in your clover config, Devices section, audio injection was set to "No"? I should be left blank, knowing that you inject layout-id 12 in the Properties for HDEF device @1B...
-
Thanks, well you sure are running on AirportBrcmNIC; if stable, you must be the 1st! Will try your solution with FakePCIID, kexts on my 7490 laptop.
-
@checked, please post saved output from IORegistryExplorer app. Please note that placing kexts in C/k/O AND /L/E is obviously not necessary since you should only be using one or the other. Seems like you do not fully master this...
-
Well you are obviously using AirportBrcmFixup kext but, that aside, you've done everything correctly. Bad luck, card is not compatible with your HP laptop, change it for a DW1560 (preferably) or DW1830 (if it can fit in and you have 3 x antennas). NB: if you want to unlock your Catalina system partition to generate debug files, refer to our FAQ section.
-
Dell Latitude 7490 Mojave 10.14.6 dw1820 boot problem
Hervé replied to Gemini44's topic in The Archive
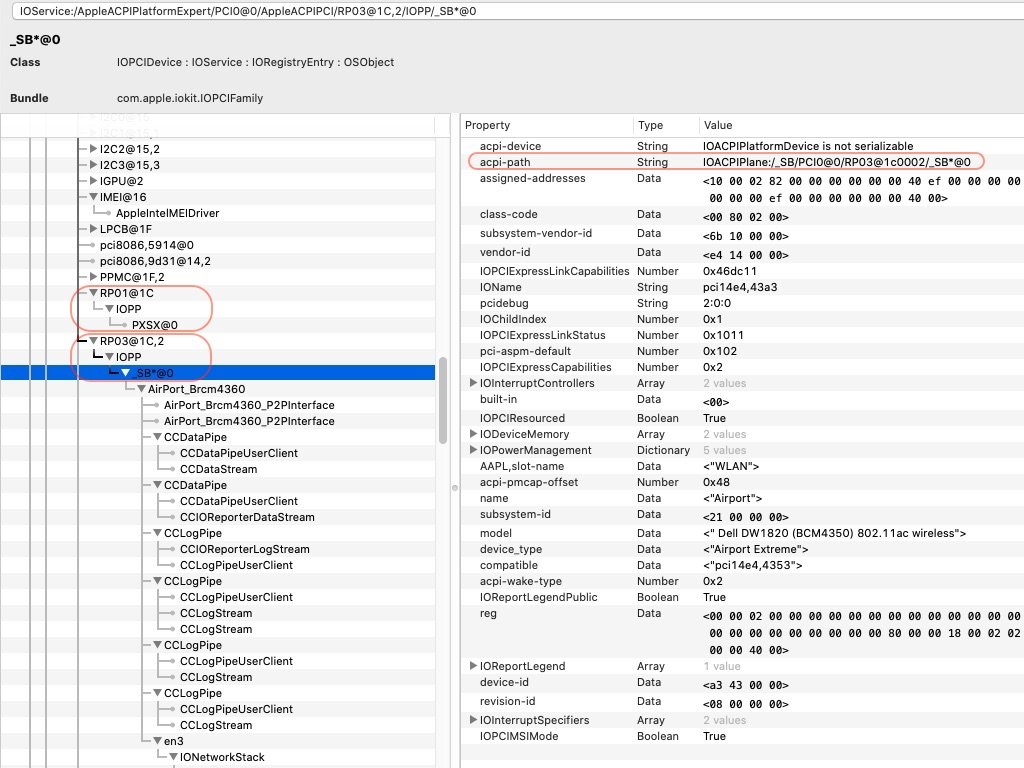
I'm not sure I understand what you mean... Obviously, the above relates to the M.2 WLAN slot and its location in I/O (and/or ACPI defined device attachment if you prefer). This is why, I've even added the "WLAN" slot name in the properties injection... So, no it does not vary by device, i.e. wireless card; of course not. This identifies/specifies the WLAN slot as found in IOReg and where the DW1820A card (or any other to that effect) physically goes. According to the last debug info you posted, your WLAN slot is at the exact same I/O location as that of my 7490. Not a surprised, all this is defined in DSDT... The only thing I've noticed is that your IOReg shows device PCI0@0->RP03@1C,2->_SB*@0 instead of default's PXSX@0 (you'll see this in your patched DSDT). This leads me to believe you've applied some device renaming of some sort or some ACPI patch that I don't fully understand and have not identified yet. I can't say if this could be the root cause of your issue but there's definitely something I would strongly recommend you try and identify here...
-
DELL PRECISION 7510 (SKYLAKE) - SHORT BATTERY LIFE
Hervé replied to nickelnoff's topic in The Archive
KP on SKL framebuffer; DVMT patching applied correctly? -
As stated in other threads/posts, it doesn't work.
-
If you update from Mojave directly, all you need to do is follow the requirements posted here. 'done it on 3 x different Hacks with 100% success each time...
-
Well, everything looks Ok on that front too.
-
Please post compressed copy of your Clover EFI folder + compressed saved output from SysInfo. Never heard or seen Wireless die when BT was in used..
-
What's your hibernation status? please type the following in Terminal pmset -g ls -la /var/vm and post results.
-
There are many other people in the same situation I believe and I guess we'll just have to wait until research work on the matter makes progress...
-
Which config file are you using? I understand that the Embedded Controller device of the E7470 is called "H_EC" but can you try and dump your ACPI tables by pressing F4 at Clover's main menu and then search your dumped DSDT (in ACPI/origin folder) for "PNP0C09"? Then, although it's not going to affect starting up Catalina, your add-on kexts needs adjusting: AppleBacklightFixup is obsolete and necessary with WhateverGreen; remove it either use USBInjectAll OR USBPorts_E7470, not both!