Hervé
-
Posts
10080 -
Joined
-
Last visited
-
Days Won
569
Content Type
Profiles
Articles, News and Tips
Forums
Everything posted by Hervé
-
Use the attached pack; needs nothing further, it has everything... D630i_LoRes_Lion10.7.5.zip
-
Well, can you give us the specs of the LAN port and Wifi card (PCI vendor and device ids at a minimum)?
-
In my case it were indeed unecessary: I just patched the Info.plist file and it worked on my E6440. Less hassle... Otherwise, please note that all kext binary contents are normally in .kext/Contents/MacOS subfolder and the binary file usually bears the name of .
-
Don't use the MBR patch of myHack v3.3.1, there's a bug. It's detailed in several posts in the myHack section.
-

Explain it like I'm 5: Latitude 5540 with 720m (Yosemite)
Hervé replied to CheckeredDots's topic in The Archive
It's a Haswell CPU, so there's a good chance your sudden laptop reset is due to the unpatched kernel if you're not booting with the Haswell-patched version. -
The idea is not to patch the binary, but the Info.plist of the kext so that it matches the id of your own SD card reader. https://osxlatitude.com/index.php?/topic/7346-applesdxc-sd-card-driver-on-e7440/
-
DELL Latitude D830 problem installing OS X Mavericks 10.9.5
Hervé replied to Konstantin's topic in The Archive
Sleep requires hibernation to be turned off. EDP normally has an option for that, well it certainly used to! Open up Terminal and check hibernatemode through Terminal command sudo pmset -g. It's probably set to 3. Change that to zero through command sudo pmset hibernatemode 0. Then remove the sleep file previously created through command sudo rm -f /var/vm/sleepimage. That's it, on reboot Sleep/Wake should work perfectly. -
There is no specific guide that I am aware of. Just use the regular installation process detailed in the EDP-Documentation section of the web site. If by X1300 you mean an ATI Radeon Pro X1300, it'll work with a bit of tuning/patching and only with SL; it's not supported beyond. I wrote how to get it to work either in my Vostro200 guide or somewhere in the Dell-Desktop section in an Optiplex 755-related thread. Just do a search on the forum and you should find it somewhere. For later versions of OS X, you'll need to change your card for a supported one. Again, a GeForce G210 is a cheap and cheerful solution and exists in passive cooling form.
-
You may want to give my E6440 guide a shot in terms of kexts and DSDT patching. It's for Mavericks at the moment and Chameleon based but kexts + DSDT patches should still apply.
-
Difficult to find instructions to transfer from Microsoft to OSX?
Hervé replied to JuanVBueno's topic in The Archive
In your particular case, I know some ways to install OS X on your D630 without needing a Mac or a Hack. I'll give you details of a legitimate method that does not involve distros and piracy but requires you possess a retail Mac OS X installation media. It basically consists of good old Nawcom's modCD + Snow Leopard retail DVD 10.6/10.6.3/10.6.8. SL 10.6.8 could still be purchased from Apple not that long ago, I posted a thread about it: https://osxlatitude.com/index.php?/topic/5561-buying-older-mac-os-x-versions At less than $20/20€, not much hesitation to be had, it's less than a poor man's spending on a basic saturday night... Nawcom's modCD comes as an ISO image you can restore to a bootable CD. You can make such a CD from Windows. The CD provides a Chameleon-based bootable Snow Leopard installer. Once booted, the installer will expect a media with the Snow Leopard installation app. Eject the modCD, insert the Snow Leopard DVD, press F5, select the newly inserted SL media and proceed with Mac OS X installation. This particular SL installation does not have to be fully tuned therafter; the idea is that it serves as a temporary base for you to create full vanilla USB installers with tools like myHack for instance. You would then be able to re-create a fully vanilla installation on another partition of the HDD and that installation could be Lion or Mountain Lion or Mavericks (whatever your D630 model actually supports). You'll have probably understood that your temp installation will become that (infamous) pre-requisite Mac or Hack that'll become eligible to full deletion once you made a subsequent fully tuned OS X installation. If you're happy with SL, you can of course keep that modCD installation and tune it up. -
Difficult to find instructions to transfer from Microsoft to OSX?
Hervé replied to JuanVBueno's topic in The Archive
There are many reasons why a Hack or a Mac is the recommended intermediary step to create a OS X installer. A PC cannot natively boot an OS X media, it needs a special bootloader for that. Today, the 2 main ones are Chameleon and Clover. Apple does not ship bootable OS X media any more; I think last time they shipped DVDs was for Snow Leopard. When Lion came out, Apple initially offered it on USB keys, then it was a downloadable dmg image only. With a bootable DVD or USB key, you could use DVD-based boot loader/vanilla installers such as Nawcom modCD. Nobody makes that anymore, especially as kernels sometimes have to be patched to boot the targeted system (e.g.: some Haswell laptops). Even if such tools existed, the trouble is that a PC can't simply boot the OS X installation application to install OS X. It does not work that way unfortunately, that'd be too easy... As a result, making a bootable OS X installer is not just a simple matter of restoring that OS X install application dmg image to a bootable HDD or USB key. First, the OS X installer media has to be formatted to the OS X format. You can't do that from Windows. Then, packages or sub-images have to be retrieved from deep inside the installation package and mounted for restoration to the installer media. Then additional packages and hidden files have to be extracted and copied, etc. It's not exactly like a fly-through installation. There are no readily-available tools to do all this with sufficient ease from within Windows. As an alternative to a real Mac or an existing Hackintosh, virtual machines are often a much better alternative. All newcomers to the Hackintosh world have trouble understanding these matters initially, it's perfectly normal. Why would anyone need a Mac or a Hack to build a Hack? It does not make easy sense... However they understand this much better after a few OS X installations once they get more familiar with the internals of the installation process and of OS X. In the early days and for several years, distros attempted to support Mac OS X installation through a directly bootable DVD or media. However, this was considered piracy since they actually contained illegal (i.e. not paid for) copies of the OS X software and often also included uncontrolled additional stuff (drivers or patches or apps) that would work only on some systems, not others. That's why distros, despite their claimed generic status, often caused more trouble than good. Distros somehow got a bad name because users can't fully control the installation and do not necessarily know what's actually installed. In the Hackintosh world, it's very important to know and control that. With the advent of Mavericks, the piracy aspect has gone somehow (OS X is now free) and only one or two distros remain today. They aim to be as vanilla as possible but I don't know how well they can be considered vanilla these days. I don't use distros, haven't since Leopard 10.5. All my Snow Leopard, Lion, Mountain Lion, Mavericks and Yosemite installations have been vanilla. Look at it this way: newcomers (newbies) love distros because things look easy, experienced hackintoshers do not (for reasons stated above) and prefer fully controlled vanilla installations by far and large. -
There are 2 other tools you can use to decompile a DSDT: 1) DSDTEditor -> you load the .aml file directly from the app and you can save the resulting .dsl source file 2) Chameleon Wizard -> you use the compile/decompile button in DSDT tab to open up your .aml file and obtain a .dsl file. In both cases, the .dsl file is readable in a texteditor.
-
Sounds like Snow Leopard will be your best possibility on this 10yr old server due to legacy single-core Irwindale CPUs. Vanilla kernels will not be supported, only legacy versions like Nawcom's. You'd need early dual-core Xeon CPUs for Lion and later, but it does not look like they made it on the PowerEdge 1800. Have a look at my Precision 670 guide, you can use the provided SL pack to build your own. Start without a DSDT of course, don't use the Precision 670's. The embedded ATI Radeon chip will be extremely low-spec'ed (embedded graphics always are on servers) and is probably not supported at all under Mac OS X... Not the greatest machine for Hackintoshing in that case to be honest, maybe just as a Snow Leopard server. It seems the server has two PCIe x8 physical slots, one rated at x8, the other at x4. As such, you can't physically plug a x16 graphics card, unless you dremmel out the end of a slot but it looks like there's a heatsink in the path... Your could look for a PCIe x4/x8 graphics card supported by SL, if that exists (it's a big if)! I know the nVidia GeForce G210 and 8400GS existed in PCIe x1 format so you could envisage that as PCIe x1 cards fit and work into in PCIe x4/x8 slots. Radeon have some too, like the HD 4350. Those are all supported in SL. Otherwise, it's probably not worth the hassle: it's old, big, probably noisy and quite power-hungry though it'll certainly replace the heater in your room (Irwindale are 110W TDP... each)! My Precision 670 does.

-
Did you try to remove the VoodooSDHC kext and patch AppleSDXC kext instead?
-
Yosemite (Final) on E5540 I5-4310U (Haswell) using Clover
Hervé replied to rykerza's topic in The Archive
Yes, getting the same loud noise on the E6440. -
DELL Latitude D830 problem installing OS X Mavericks 10.9.5
Hervé replied to Konstantin's topic in The Archive
No, apply the performance tuning modifications. http://www.osxlatitude.com/tuning-performance-with-fakesmc-smbios-plist/ https://osxlatitude.com/index.php?/topic/2673-performance-tuning-with-fakesmc/ Did you search as advised? -
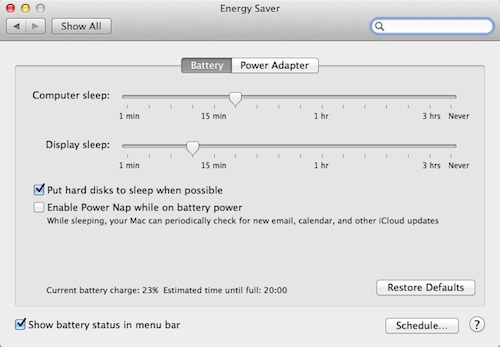
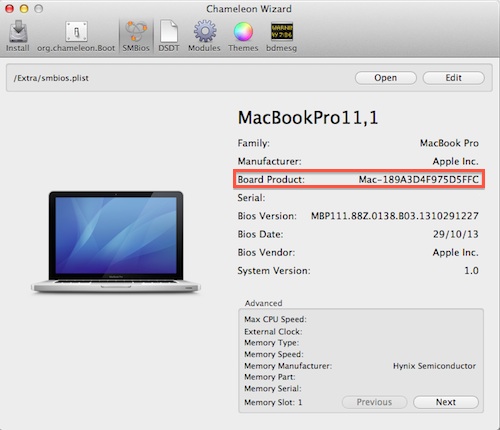
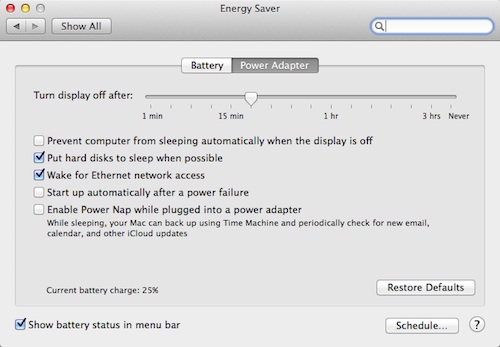
Apple having unified display and computer sleep for Haswell platforms, the Energy Saver preference panel only shows one sleep bar: To revert to the traditional separation, the Mac model platform plist needs to be edited to turn off this sleep unification. In plugin kext X86PlatformPlugin of /S/L/E/IOPlatformPluginFamily, a list of Mac model plists is found in the Resources subfolder. Each Mac model corresponds to the board number specified in the SMBIOS plist of a Hackintosh. In the present case of a MacBookPro11.1, the Mac model is 189A3D4F975D5FFC as displayed in Chameleon Wizard for instance: As such, the plist Mac-189A3D4F975D5FFC.plist should be modified as follows: -> before <key>UnifiedSleepSliderPref</key> <true/> -> after <key>UnifiedSleepSliderPref</key> <false/> Once the plist is changed, the kext cache can be rebuilt. On subsequent reboot, the Energy Saver panel will be back to its traditional form and can be adjusted as desired (otherwise, it's command lines only... ) :
-
DELL Latitude D830 problem installing OS X Mavericks 10.9.5
Hervé replied to Konstantin's topic in The Archive
Search about "performance tuning" and look for a complete /Extra pack I must have posted somewhere in this forum subsection. You clearly have an incorrect /Extra kexts+plists setup. Or try the EDP package, see if it works these days. -
802.11ac+wireless(bcm94360cd) to mini pci-e or pci-e 1x
Hervé replied to tobesuper2014's topic in The Archive
Have a look a RampageDev's blog; he's done that already and published his findings and recommendations here in the article section of the web site. PS: Please post in the right section. This one is about feedback on the site. -
Ha, you did not say, so difficult to guess... If it's a Core2Duo CPU, then forget what I said about Intel HD. With a nVidia GPU, you should use GraphicsEnabler=Yes. There are plenty of posts and threads here about Mavericks/Yosemite on this nVidia E6410; the /Extra folders should be reusable straight away in Yos. Just do a search.
-
Unicrap has its own web site for support... But in all likelihood the system is not auto-detecting the correct Intel HD framebuffer so you have to inject it; either through DSDT or through bootloader.
-
I confirm it works (verified on E6440 with O2 Micro SD controller pci1217,8520), so should also be Ok on E6320.
-
Please post your zipped /Extra.
-
Please do a search on the forum as this matter has been discussed many many times before.
-
I'm sorry, but you're mistaken. I have never written any tutorial to install Yosemite (or any other OS X version) on Dell Optiplex 780.