Hervé
-
Posts
10077 -
Joined
-
Last visited
-
Days Won
569
Content Type
Profiles
Articles, News and Tips
Forums
Everything posted by Hervé
-

Optiplex 5040 - Intel HD530 graphics: can't get DisplayPort output
Hervé replied to mefflecakes's topic in The Archive
@mefflecakes, beyond the suggestions above, all I can offer is that you experiment with what I suggested in that post at IM and that I linked in my last post on the previous page. -
Optiplex 5040 - Intel HD530 graphics: can't get DisplayPort output
Hervé replied to mefflecakes's topic in The Archive
Your IOReg shows exactly what would be expected: SKL platform 0x19120000 with 3 x display ports (dummy connector at FB@0 and DP connectors at FB@1 + FB@2). Interestingly enough, but as I thought, your HDMI screen registers against FB@1, i.e. connector 0105; it's got the wrong connector type so you'd never get any audio out but it seems to work Ok on the video front. ideally, you'd inject HDMI type (00080000) to that port/connector (con1). Given that, connecting a DP display to a DP physical port gives you no video, it'd be fair to assume that FB@2 (con2) has the wrong characteristics for your needs. We already know that it's got the correct type (00040000) so that leaves 2 x things to play with: it's own id (Index + Bus id) or pipe. Normally, you never have to modify the flags. I'd replace the connector's id from 0204 to 0306 using the index + busid properties. So, try to inject those properties under PciRoot(0x0)/Pci(0x2,0x0): framebuffer-con1-enable 1 NUMBER framebuffer-con1-type 00080000 DATA framebuffer-con2-enable 1 NUMBER framebuffer-con2-index 3 NUMBER framebuffer-con2-busid 6 NUMBER -
Precison 7510: unable to boot after updating Clover
Hervé replied to nickelnoff's topic in The Archive
Try to boot via single-user mode to rebuild the cache. -
Optiplex 5040 - Intel HD530 graphics: can't get DisplayPort output
Hervé replied to mefflecakes's topic in The Archive
Use your USB installer key to boot into macOS. Sigh... Clover was so useful in that respect with its ability to choose all sorts of options, including config files, at boot time. -
Optiplex 5040 - Intel HD530 graphics: can't get DisplayPort output
Hervé replied to mefflecakes's topic in The Archive
You said you had HDMI output... so use that! No need to wipe out anything or reinstall from scratch. Just experiment with properties injection in your config file. -
Optiplex 5040 - Intel HD530 graphics: can't get DisplayPort output
Hervé replied to mefflecakes's topic in The Archive
No wish to repeat myself but you could try what I listed here. Your current properties injection apply to the framebuffer general parameters (StolenMem, FBMemSize), not the connectors (i.e. video output ports) themselves. That's what you need to work on. And, very obviously, if you want to add a 4th output port, you don't just stop at increasing the count to 4, you must also inject/define the 4th connector. -
Optiplex 5040 - Intel HD530 graphics: can't get DisplayPort output
Hervé replied to mefflecakes's topic in The Archive
What does Hackintool show for graphics details? Try and post a compressed IORegistryExplorer output to check what you have under the IGPU device. -
CPU model is of no influence here, except if you made use of a CPU-specific power management SSDT. But that's not the case in the pack posted by JakeLo where the generic SSDT-PLUG is provided instead. Post your full hardware specs, including model of wireless card. You may want to reset your BIOS to default and set it up again to be on the safe side of things. Thereafter, the 2 x essential settings are UEFI BIOS mode and disk in AHCI mode. Refer to this thread for guidance.
-
Precison 7510: unable to boot after updating Clover
Hervé replied to nickelnoff's topic in The Archive
I think you may need Clover r510x minimum to boot later versions of Catalina. Certainly never used anything lower than Clover r505x with any of my Catalina installations. @nickelnoff, you should be able to replace the Clover boot files (bootx64, cloverx64) and .efi drivers from any computer/OS (even Windows) on your USB key. The hidden EFI partition is normally FAT32... Here are files for r5107 for instance (boots 10.15.7 without issues): r5107.zip -
Precison 7510: unable to boot after updating Clover
Hervé replied to nickelnoff's topic in The Archive
Try single-user mode (-s). Or through your USB installer if you still have it. Or the Recovery partition. -
Precison 7510: unable to boot after updating Clover
Hervé replied to nickelnoff's topic in The Archive
When you get to the Clover main menu, press F11 to reset NVRAM before you try to boot your macOS partition in verbose mode. -
Precison 7510: unable to boot after updating Clover
Hervé replied to nickelnoff's topic in The Archive
How about stating which Clover versions you went from and to? Not a good idea to go beyond r5122. -
Dell Vostro 5568: freeze on wake & no headphones - Big Sur
Hervé replied to fndklm's topic in The Archive
Try and add NoVPAJpeg kext to fix the freeze issue; you'll find it on the web or in the packs I posted in my Latitude 7490 guide. -
[Solved] E7470 - Opencore having issue booting, DSDT issue?
Hervé replied to Crumbling's topic in The Archive
As usual, please post your system's specs. -
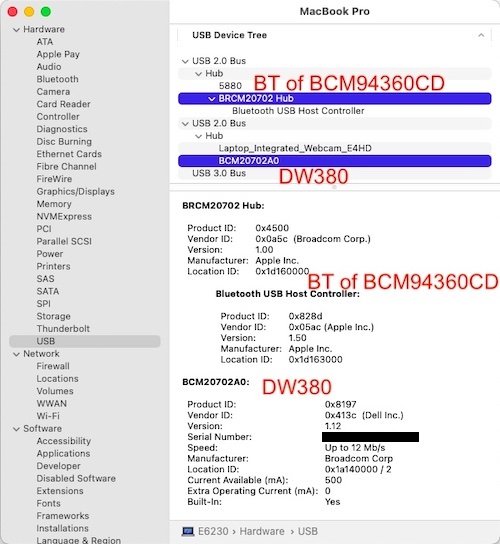
Oh yes! The very absence of a bluetooth card/module in the laptop... As JakeLo said, DW1510 is not a combo card and so, carries no BT module. I've modified your thread's title as a result... You may not be aware that, like many of its D Series or E6x20 predecessors, E6x30 laptops had an optional Bluetooth card too. It's a tiny flat rectangular part of approximately 40x10mm hooked by a cable to one of the motherboard's small pin connectors. I invite you to consult the owner and/or maintenance manual pertaining your laptop on Dell's web site (support section) to check out the matter. I expect your E6230 laptop to be fitted with such a module (DW380 carrying id 413c:8197) when your E6430 isn't. You'd quickly see this by consulting either your SysInfo->USB page or browse your IOReg with apps such as IORegistryExplorer. If you disable Bluetooth in BIOS, that applies to the built-in Dell module, not to any combo card that may be fitted to a mini-PCIe port. So, if you did that, you'd soon find out too... For instance: 'shows how much it pays to know the hardware specs of one's Hackintosh in details...

-
Dell Vostro 5568: freeze on wake & no headphones - Big Sur
Hervé replied to fndklm's topic in The Archive
No reason to include any drivers related to any wireless card, we'll never know what these laptops are fitted with when people come to Hack them... As such, don't expect any. Re: headphones, have you cached CodecCommander kext from /L/E? The kext didn't use to support being injected... -
As I said, the connector properties, not the framebuffer properties. I suggest you read the WEG documentation to familiarise yourself with the matter. https://github.com/acidanthera/WhateverGreen/blob/master/Manual/FAQ.IntelHD.en.md
-
It' been mentioned before: you need to inject the HDMI connector properties to the HDMI output port... https://osxlatitude.com/forums/topic/11410-dell-latitude-7490-with-i7-8650u-intel-uhd-620-and-1920x1080-lcd-mojavecatalina/?do=findComment&comment=94753
-
An OpenCore Configurator app is available from same place you'd download Clover Configurator but it's been reported to corrupt the config file. From memory, Dortania recommends not to use it. Keep that in mind if you choose to use it...
-
It doesn't look like you used the E7x70 pack for Sierra. Using Clover Configurator app, in Devices tab, add the following property injection to your iGPU device located at PciRoot(0x0)/Pci(0x2,0x0) : AAPL,ig-platform-id 00001B19 DATA I'm not sure about that injection you have that sets port count to 4. Remove it unless required.
-
That or you mount the existing EFI partition of your disk, delete all of its (Clover) contents and paste/place the OC EFI folder in there. It's as simple as that...
-
You're not making much effort... What does my Big Sur guide say about wireless and bluetooth? Please identify your wireless card and consult our FAQ section where you'll find all the necessary answers.
-
You've not followed the guide... Your OC setup contains no CPU power management SSDT (but that's ok, you just need to re-use the SSDT you had before or generate a new one) and you've erroneously installed CPU Friend kexts that do not support Ivy Bridge CPUs (it's for Haswell and later CPUs). Please use the OC pack provided in my guide and adjust as necessary but without adding unnecessary or inappropriate stuff.
-
Yes, the version of OC is driven by the OC binaries in the EFI folder of the EFI partition. With OC, it's not like Clover for which we had installation apps, you simply replace the binaries.
-
@futureorkun, a step-by-step proven OpenCore/Big Sur guide was very recently posted. Please follow that. If you want assistance, please post your OC EFI as screenshots are not entirely useful.