-
Posts
10069 -
Joined
-
Last visited
-
Days Won
569
Content Type
Profiles
Articles, News and Tips
Forums
Everything posted by Hervé
-
You meant Latitude 5480, right? If so, I don't believe anyone has found a solution to date.
-
Maybe, no way to say for sure.
-
Core2Duo P7350 is Penryn-3M and GeForce 9300M GS is Tesla G98. This kind of platform should fully support El Capitan but also Sierra and High Sierra since the CPU has SSE4.1 instructions set. I'd go for the latter. You could even push for Mojave with Tesla-specific special patches and Catalina with Dosdude1's patcher. You can read about those in our Graphics section. But that's maybe for a future stage as it gets a little complicated when High Sierra will fully and natively support your graphics card. Download a copy of High Sierra off Apple (via AppStore or Apple download links) and make your USB installer with basic settings. Look at "Our Picks" side panel on forum main page for that. You can look at fine tuning your build for Ethernet, wireless, audio, card reader, etc. once you've finished the macOS installation. You may consult these old guides for general guidance in the process; obviously the pack are not for you but you can extract the core kexts from them (FakeSMC, Lilu, WEG). https://osxlatitude.com/forums/topic/12479-dell-latitude-d630-with-core2duo-nvidia-quadro-nvs-135m-el-capitansierrahigh-sierramojavecatalina/ https://osxlatitude.com/forums/topic/10370-dell-latitude-d830-with-core2duo-and-nvidia-quadro-nvs-135m-mavericksyosemiteel-capitansierrahigh-sierramojave/ The one thing that will not be supported for certain is your Intel wireless card and it'll have to be replaced by a supported model. Plenty to choose from and you may consult our inventories published in the Wifi section to that effect. Good luck.
-
Big Sur brought significant changes to the way kexts operate with the kernel and further tightened filesystem protection. It's now most difficult for anyone to make any changes to /S/L/E folder. As such, kexts should be considered cacheable only from /L/E. To repair permissions after any any kext addition, removal or modification in /L/E, type the following Terminal commands: sudo chmod -Rf 755 /L*/E* sudo chown -Rf 0:0 /L*/E* sudo touch -f /L*/E* ` To rebuild the cache, type the following Terminal commands sudo kextcache -i / -> will invoke the required kmutil command sudo kcditto For additional information on the commands: man kmutil man kcditto
- 1 reply
-
- 1
-

-

itlwm kext for intel cards: Installation Issue (OpenCore 0.6.3)
Hervé replied to plenue's topic in The Archive
Please consult the available documentation. Thank you. -
No, E5550 is a Broadwell platform when your E5540 is a Haswell one. So they're of different chipset families, different CPU families, different iGPU families. As such, the EFI meant for an E5550 will contain configuration elements not suitable for your E5540 (graphics property injection SMBIOS, etc.) and your Hack would not work. On the other hand you can seek inspiration from existing packs and threads relating to other Haswell Latitude laptops such as the E6x40 or E7x40. By far and large, all these will share similar not to say near-identical configuration, the only differences being on the hardware accessories side (eg: LAN, audio, card reader, etc.). I strongly recommend you start here...
-
We'd all be grateful if you'd go easy on the permanent quoting; it really isn't necessary and quite messy. I gave you packs, obviously without the CPU PM ssdt since I could not guess what CPU you had. As clearly stated, they're not full OC EFI folders! If you tried to boot with nothing else, you indeed must have failed miserably... All you have to do is make your OC EFI folder following Dortania's current documentation and then, update it with the stuff in the packs I gave you. Then add your CPU PM ssdt and update the config accordingly. I thought it would have been common sense and easily understood. With OC 0.6.3, your default EFI updated with my pack's contents and SMBIOS MBP10,2, you'll be able to install Big Sur 11.0.1 as shown in my E6230 detailed guide. Good luck!
-
I can assure you that there is nothing in the kexts folder of the packs I posted that could be specifically for Clover. You know, kexts are the same whether you boot with Clover or OpenCore and the same goes for caching kexts from /L/E. On the other hand, the OC EFI you posted contains many incorrect items. ACPI: No patched DSDT. SSDT-EC which is Ok for older systems (up to Broadwell) such as your Ivy Bridge E6430. SSDT-EC-USBX which is for newer systems (Skylake and later) and therefore irrelevant for you. Delete this. SSDT-PM is for a quad-core i7-3740QM, I assume this is the CPU you have, therefore correct CPU PM SSDT; if not, you know the drill... Drivers: No need to include them all. You only need to use and declare those drivers you need: Audio (if you want startup chime), OpenRunTime, HfsPlus and, if you use the OC GUI, OpenCanopy. Kexts: Several conflicting drivers here... AirPortBrcmFixup vs. FakePCIID+FakePCIID_Broadcom_Wifi. Remove the latter 2, they've been kind of obsolete for some time now. USBPorts_E6430 vs. USBInjectAll. Remove the latter; it's either USBPorts or USBInjectAll+SSDT-UIAC (which you don't have). OC Config file: calls for a DSDT that's not there. does not call for the CPU PM SSDT that's in the ACPI folder. Therefore no CPU power management... Device Properties: injects correct properties for HiRes LCD but retains limitations to single display port (built-in LCD) only. Further properties are required if you want additional display ports, at least HDMI. Kernel: properly selects desired kexts and removes any contradictions mentioned above Drivers: setup only selects those you want but I don't know if you should have ApfsDriverLoader.efi rather than HfsPlus.efi. I actually wonder where your ApfsDriverLoader module is coming from. Clover? PlatformInfo: there is absolutely no reason why you would use the SMBIOS of Haswell MacBookPro11.1 when you should be using SMBIOS of Ivy Bridge MacBookPro9,2 or MacBookPro10,2. NVRAM: applies -igfxnohdmi. May be you want to revise this once you inject properties that'll support HDMI output. I can only suggest you use the packs I provided above given that current setup looks quite incorrect to me. A particular aspect to pay attention to is your CPU model and the CPU PM SSDT that you need to use or generate accordingly. I also strongly recommend that you post your E6430 specs so that we avoid wasting time on trying to provide assistance in the dark. It's highly desired to post such specs in signature...
-
You don't "patch ssdt". You generate your CPU-specific power management SSDT through well-known/good old Pike R Alpha's generator script. See here.
-
You have an i5-3340M but use the CPU power management SSDT generated for a quad-core i7-3630QM. remove that SSDT and generate your own one. remove that CpuTscSync kext too. It's not required. Adjust your OC config (Kernel section) accordingly. You'll find things will work much better afterwards...
-
I have repeatedly been able to install Big Sur on my E6230 with SMBIOS of unsupported MacBookPro9,2 and MacBookPro10,2 with -no_compat_check boot arg. The issue at hand must be something else. @leppy700m, post a zipped copy of your EFI folder so that we check it out. You may also refer to my E6230 guide for general guidance though I've left out some properties injection out of the OpenCore config given that they were already in the patched DSDT (ECDV->EC, EHCx->EH0x, IGPU properties, etc.). You may use these E6430 HD4000-only packs for your OpenCore setup; just copy the files and folders of the packs to the OC folder of your EFI partition/folder and replace any existing stuff. EFI_E6430_LoRes.zip EFI_E6430_HiRes.zip For an E6430 with nVidia graphics, enable Optimus in BIOS but disable the dGPU through DSDT/SSDT patching. JakeLo posted the necessary stuff in several E6x20/E6x30 NVS x200M threads. JakeLo will correct me if necessary. Meantime and/or in the interim, you may just boot with boot arg -wegnoegpu added to the NVRAM section. See here for more details.
-
What laptop? What setup? Please post a zipped copy of your OC EFI folder. Add your Hackintosh specs in signature.
-

Optiplex 5040 - Intel HD530 graphics: can't get DisplayPort output
Hervé replied to mefflecakes's topic in The Archive
@mefflecakes, Mario and I played on his Skylake Optiplex 7050 (i5-6600 CPU) with HD530 graphics. We 1st got HDMI + DP working with standard SKL platform-id 0x19120000, then HDMI+DP+DP, i.e. 3 x displays after injecting 4th connector 0306... Secret was to bypass restrictions imposed by AppleGraphicsDevicePolicy kext (a PlugIn of AppleGraphicsControl kext) with boot arg agdpmod=pikera. All details posted here. -
LCDs with resolution up to 1440x900 require Capri platform-id 0x01660003 LCDs with resolution at or greater than 1600x900 require Capri platform-id 0x01660004 Other than that, outside the need to disable the nvidia dGPU (through a specific DSDT patch or, better, a specific SSDT), there should be no difference of settings to run any version of OS X/macOS supported on these laptops.
-
Graphics glitches affecting HD4600 usually are fixed by patching the Cursor Memory Size. By default, it is set to 6MB in platform id 0x0a260006 and needs to be changed to 9MB: framebuffer-cursormem 00009000 DATA See here as linked in the WEG manual. If you've not already done so, remember to disable your dGPU since it's not supported and will use battery power if left enabled/powered on...
-
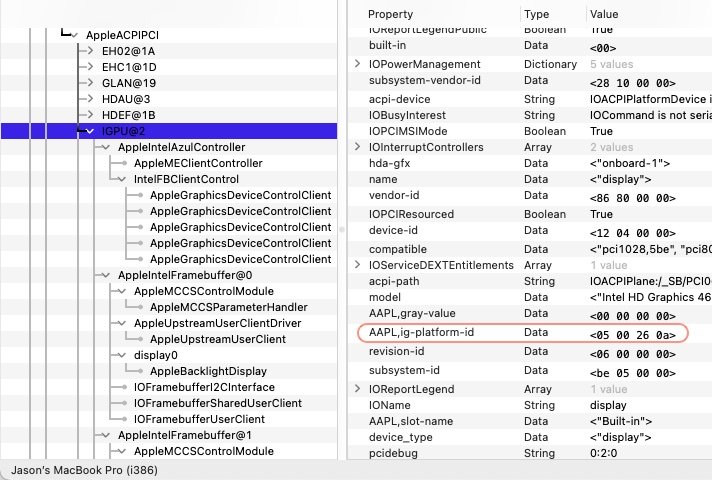
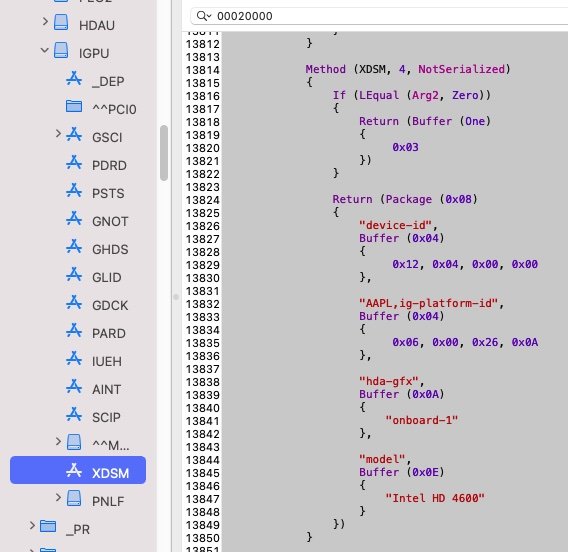
Conflicting settings... IOReg shows you've injected Azul platform id 0x0a260005, which ain't really the expected value: (I'm also a little baffled by the 32bit ref in IORegistryExplorer status bar) This Azul platform injection is confirmed in your OC config in which you've also enabled your patched DSDT. In this patched DSDT, there is an XDSM method under the IGPU device in which HD4600 properties are injected, including the expected Azul platform id 0x0a260006! So choose the correct values and avoid mixing/duplicating things... If you inject properties through DSDT, don't redo it (and redo it with different values) in your OC config; and vice versa.
-
In IORegistryExplorer menu bar: File->Save As... !
-

[Solved] Dell 7370 - M5-6Y57 CPU: can't upgrade from Mojave to Big Sur
Hervé replied to NTHT1MD's topic in The Archive
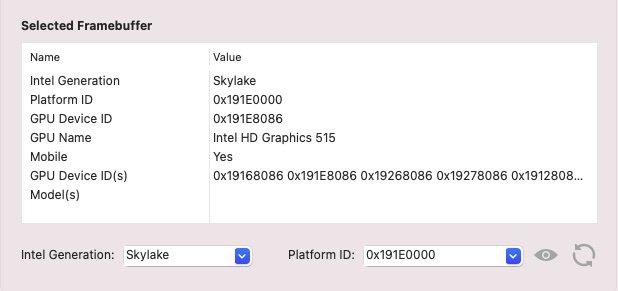
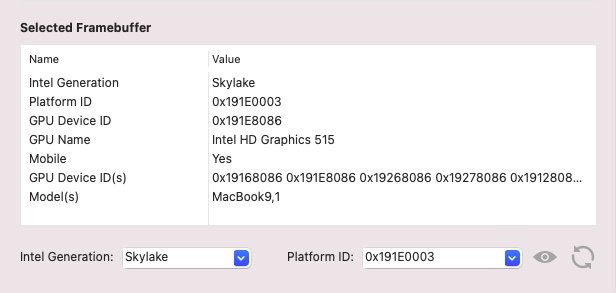
Your E7370 is fitted with: low-end Intel Skylake M5-6Y57 CPU Intel HD515 iGPU (id 0x191e) As such, you should be using SMBIOS of similarly spec'ed MacBook9,1, not MacBookPro13,1 (i5-6360U / i7-6660U + Intel HD540 graphics). Hackintool lists 2 x possible SKL framebuffer platforms for the Intel HD515 graphics but only 1 of them for MB9,1: ID: 191E0000, STOLEN: 34 MB, FBMEM: 21 MB, VRAM: 1536 MB, Flags: 0x0000050F TOTAL STOLEN: 56 MB, TOTAL CURSOR: 1 MB (1572864 bytes), MAX STOLEN: 124 MB, MAX OVERALL: 125 MB (131608576 bytes) Model name: Intel HD Graphics SKL CRB Camellia: CamelliaDisabled (0), Freq: 1388 Hz, FreqMax: 1388 Hz Mobile: 1, PipeCount: 3, PortCount: 3, FBMemoryCount: 3 [0] busId: 0x00, pipe: 8, type: 0x00000002, flags: 0x00000098 - ConnectorLVDS [1] busId: 0x05, pipe: 9, type: 0x00000400, flags: 0x00000187 - ConnectorDP [2] busId: 0x04, pipe: 10, type: 0x00000400, flags: 0x00000187 - ConnectorDP 00000800 02000000 98000000 01050900 00040000 87010000 02040A00 00040000 87010000 ID: 191E0003, STOLEN: 40 MB, FBMEM: 0 bytes, VRAM: 1536 MB, Flags: 0x002B0702 TOTAL STOLEN: 41 MB, TOTAL CURSOR: 1 MB (1572864 bytes), MAX STOLEN: 121 MB, MAX OVERALL: 122 MB (128462848 bytes) Model name: Intel HD Graphics 515 Camellia: CamelliaV2 (2), Freq: 1388 Hz, FreqMax: 1388 Hz Mobile: 1, PipeCount: 3, PortCount: 3, FBMemoryCount: 3 [0] busId: 0x00, pipe: 8, type: 0x00000002, flags: 0x00000098 - ConnectorLVDS [1] busId: 0x05, pipe: 9, type: 0x00000400, flags: 0x00000181 - ConnectorDP [2] busId: 0x04, pipe: 10, type: 0x00000400, flags: 0x00000181 - ConnectorDP 00000800 02000000 98000000 01050900 00040000 81010000 02040A00 00040000 81010000 I would recommend that you try the latter SKL framebuffer platform and switch SMBIOS to MacBook9,1. Failing that, SKL platform 19160000 of HD520 would be your next target given that HD515 iGPU is just a slower, otherwise identical, version of its bigger brother. -
What you ought to do is follow Dortania's guide and stay away from OCC; latter's been known to corrupt OC config. Of course, you should re-use the SMBIOS values from your previous build, that's actually the clever thing to do for very obvious reasons! An alternative to GenSMBIOS tool is to use Clover Configurator to generate the data.
-

EFI folder? Optiplex 3020 BigSur OpenCore (i5-4590 HD4600)
Hervé replied to osxosx's topic in The Archive
Why don't you have a go at it ? -
You may also use Clover Configurator and its SMBIOS + RtVariables tabs to generate your SMBIOS data. Or OpenCore Configurator too.
-
@Hai Karate, sounds like you've no graphics acceleration at all so it'll be due to a config/setup problem. As Jake said, attach a zipped copy of your OpenCore EFI folder + zipped saved output of IORegistryExplorer. That'll allow us to check what you've got in place and what's possibly incorrect.
-
This is something that most of not all people should be able to do on their own; it's basic information seeking through Google and manufacturer's web site. People rely far too much on spoon-feeding and other people's assistance for the most basic stuff...
-
You may of course remove it if you wish; no need to pop questions for such trivial and obvious things.
-
EFI partitions can be mounted with apps such as OpenCore Configurator or EFI Mounter or Clover Configurator or a few others. But it's just as quick and easy to use Terminal... Just identify the partition disk/volume and mount it! diskutil list sudo diskutil mount /dev/<identified disk> Example: lat-7490:~ admin$ diskutil list /dev/disk0 (internal, physical): #: TYPE NAME SIZE IDENTIFIER 0: GUID_partition_scheme *512.1 GB disk0 1: EFI BOOT 523.2 MB disk0s1 2: Microsoft Reserved 134.2 MB disk0s2 3: Microsoft Basic Data Windows 398.0 GB disk0s3 4: Windows Recovery 972.0 MB disk0s4 5: Apple_APFS Container disk1 112.5 GB disk0s5 /dev/disk1 (synthesized): #: TYPE NAME SIZE IDENTIFIER 0: APFS Container Scheme - +112.5 GB disk1 Physical Store disk0s5 1: APFS Volume Mojave - Data 53.2 GB disk1s1 2: APFS Volume Preboot 154.5 MB disk1s2 3: APFS Volume Recovery 529.0 MB disk1s3 4: APFS Volume VM 1.1 MB disk1s4 5: APFS Volume Macintosh 11.3 GB disk1s5 lat-7490:~ admin$ sudo diskutil mount /dev/disk0s1 Volume BOOT on /dev/disk0s1 mounted


