Hervé
-
Posts
10081 -
Joined
-
Last visited
-
Days Won
569
Content Type
Profiles
Articles, News and Tips
Forums
Everything posted by Hervé
-
I don't understand what problem you now have, sorry.
-

Dell Precision M4600 with Nvidia Quadro 1000M - Blackscreen with driver.
Hervé replied to Cyclib's topic in The Archive
Problems all resolved last night and M4600 now fully operational under latest 10.10.5 (14F1509): Chameleon bootloader full graphics acceleration OOB with nVidia Quadro 1000M and full built-in LCD resolution (1920x1080). Black screen issue sorted AICPUPM kext patched (usual Sandy/Ivy Bridge binary patch) i7-2820QM SSDT generated to support CPU SpeedStep + Turbo boost to 3.4GHz (FakeSMC tuned to MBP8.2 SMC keys) Audio working (with VoodooHDA + AppleHDADisabler kexts) DW1550 wireless working LAN working (with Intel1000e kext) SD card reader not working due to unsupported hardware model. -
Here's a detailed procedure to install SL with good old Nawcom's ModCD (or ModUSB). Follow it to the letter and it should get you through.
-
You've mentioned "rootless", so I assume you're running El Capitan. Did you configure your Clover plist to disable SIP? That's your likely issue I guess... Don't you have to rename AppleHDA_IDT.kext to AppleHDA.kext for it to load instead of the vanilla kext found in /S/LE?
-
If all you have at hand is your D520 under Leopard 10.5.8, here's what you can do: Insert your Snow Leopard retail DVD (if you have a DMG image of retail SL, that'll work too) and open up Disk Utility. Format your USB key as Mac OS Extended (Journaled). Keep it MBR partitioned, though it should work too if GPT partitioned. Restore tab your your retail SL DVD (or SL DMG image) to your USB key and make sure to erase the key in the process. Download a known working Chameleon version such as r2401 from InsanelyMac and install it on your USB key Copy the D430 SL pack or D620 GMA950 SL pack to the root of your USB key (you should see it as Extra folder) Now try and boot your USB key using the -f -v bootflags to install SL on your target system's HDD. If you reach the OS X installer main screen, make sure to run Disk Utility from Tool menu and format your target disk as "Mac OS Extended (Journaled)" on a GUID Partition Table. Proceed with installation. When it reaches completion, run Terminal from Tool menu before countdown expires and use the following commands to copy the Extra folder to your target HDD df -> to identify target partition name, should be something like /Volumes/<SL disk partition name> cp -Rf /Extra /Volumes/<SL disk partition name> -> to copy Extra folder from USB key to target system's disk Then try and reboot your installed SL partition via the USB key. It does not matter if that SL installation is not fully complete; it should allow you to create a myHack USB installer, from which you'll get to fully working SL-based Latitude D Series Hackintosh.
-
Look no further if you don't have an Extra folder at the root of a myHack installer/build. It means you've not followed the regular process and your build is not finished, hence highly unlikely to work. How do you make your USB installer and how do you install SL on that D520?
-
Indeed, it's best to stick to an older 32/64bit version such as v5.2.678 for instance. It's available here.
-
Dell Precision M4600 with Nvidia Quadro 1000M - Blackscreen with driver.
Hervé replied to Cyclib's topic in The Archive
I'm going to prepare a dedicated thread on EDID injection and will post the link. It'll be nothing new, just a copy of existing stuff readily available on the web... Your problem sounds similar to something I previously encountered with an old HP G72 laptop... You could check your graphics acceleration status despite LCD screen issue by sharing your screen. Boot with GE=No and go to System Preferences...->Sharing and activate Screen Sharing. Your system is then available through vnc at its assigned IP address (vnc://x.x.x.x). If graphics acceleration is indeed running when booting with GE=Yes, you should be able to see GPU model and VRAM in About this Mac + all supported features in DVD Player help menu->show supported features through the VNC access. -
Dell Precision M4600 with Nvidia Quadro 1000M - Blackscreen with driver.
Hervé replied to Cyclib's topic in The Archive
What if you put the computer to sleep and wake it? Assuming you've disabled hibernation of course... You may need to obtain the EDID info for you screen, then inject it into OS X. -
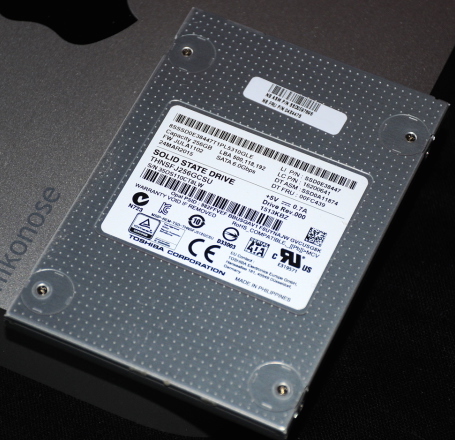
Dell Latitude E6230 with Toshiba THNSFJ256GCSU 256GB SATA-III 2.5" 7mm SSD (SATA-III connection @6.0Gbps):

-
Complete set of files (Clover/Enoch) for El Capitan/Sierra
Hervé replied to polyzargone's topic in D8xx
Enoch load kexts from /E/E as long as you remember to use a kernel.plist file in /Extra that contains the option KernelBooter_kexts set to Yes. -
Dell Precision M4600 with Nvidia Quadro 1000M - Blackscreen with driver.
Hervé replied to Cyclib's topic in The Archive
Try the nVidia Web driver. You can also remove the PCIRootUID=0 from your boot plist, that's the default value used by all bootloaders. -
Complete set of files (Clover/Enoch) for El Capitan/Sierra
Hervé replied to polyzargone's topic in D8xx
Lid sleep and wake works Ok with Enoch Chameleon branch. I've got no problems on my D630... Regarding the power button, action menu is obtained by pressing [CTRL-PWR] and Sleep by pressing [ALT-CMD-PWR] (or [ALT-Win key-PWR]). -
Ok, well, that's really weird. How's your FakeSMC kext tuned with SMC keys?
-
Dell Precision M4600 with Nvidia Quadro 1000M - Blackscreen with driver.
Hervé replied to Cyclib's topic in The Archive
This is a SandyBridge platform, not an Arrandale one. As such, MBP8.1 or MBP8.2 SMBIOS is better suited. -
Dell Precision M4600 with Nvidia Quadro 1000M - Blackscreen with driver.
Hervé replied to Cyclib's topic in The Archive
Again, remove generation of C States and P States and try without nvda_drv=1. Also, boot without cache using the -f bootflag (not -F with a capital f). -
E6420 El Capitan-Difference between Lo and Hi Res for config./DSDT?
Hervé replied to ssprod's topic in The Archive
@ssprod: I can't explain that weird behaviour other than mis-configured performance tuning (SMBIOS profile, generated SSDT, patched AICPUPM/NullCPUPM). I have not experienced such misbehaviour on my E6220 between Yos and EC and this is roughly the same platform, just a little version of your E6420. -
Are you saying that, in order to obtain proper/full CPU power management on this SandyBridge platform, you have to use an IvyBridge-based MacBookPro10,1 board id alongside the SMBIOS id of an Arrandale-based MacBookPro6,1? I must admit that this sounds kind of strange... Wouldn't the full full SMBIOS of a MacBookPro8,1 or 8,2 work as well? This would be the normal way to enjoy proper CPU power management as long as you've generated the SSDT with the well-know generator tool.
-
Dell Precision M4600 with Nvidia Quadro 1000M - Blackscreen with driver.
Hervé replied to Cyclib's topic in The Archive
PCI root id is usually found right under Device (PCI0) of the DSDT; it's the value assigned to parameter _UID in a line that should look like: Name _(UID, 0xnn) --> where nn = PCI root id in hex By far and large, this value is usually set to 0 but some computer manufacturers opt for a different one. For instance, Dell, on their desktop workstations for which they very often used/use a value of 4. This can be safely replaced by a value of 0 in a patched DSDT. Failing that, you need to add Chameleon boot option PciRoot=x, where x is the decimal value of the number found in the original DSDT. Don't bother with patching AICPUPM for the moment, stick to NullCPUPM until your system is bootable and appears operational; you'll then be in a better position to do the fine tuning. I see you have the nvda_drv=1 boot option active. Try without. Did you set GraphicsEnabler to Yes ? -
Well boot without cache, in verbose mode and 32bit kernel mode to check where things get stuck: -f -v arch=i386
-
You'll find I posted a few D430 packs in the D4x0 section. You'll have to search for it, I can't remember which threads exactly.
-
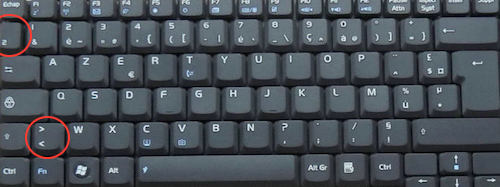
It's been reported many times by folks who use the VoodooPS2Controller kext for keyboard and trackpad: keyboard layout or mapping does not appear fully recognized when typing text. Example on a French AZERTY keyboard: The key is often not properly interpreted when typing and appears to be swapped out with key found right under [Esc]. This problem is usually due to the VoodooPS2Keyboard PlugIn of the VoodooPS2Controller kext not calling on ISO keyboard layout. However, this is configurable through the Info.plist file of the PlugIn where the associated parameter is very often set to false. Turning it to true usually fixes the problem. So, in order to enjoy proper keyboard layout/mapping recognition, try and adjust your Info.plist from this: <key>Use ISO layout keyboard</key> <false/> to this: <key>Use ISO layout keyboard</key> <true/> Hope this helps! I've verified the fix on my E6220 and E6440 so I know it works for the Latitude E Series; no reason why it would not work for other systems too.
-
E6420 El Capitan-Difference between Lo and Hi Res for config./DSDT?
Hervé replied to ssprod's topic in The Archive
To ascertain full graphics acceleration, you can simply open up DVDPlayer (assuming your E6420 does have a DVD Player) and display the "Supported Features" from many "Help". Everything will be supported with full graphics acceleration. -
Keep the vanilla GMA950/graphics kexts.
-
No need to re-install SL: use myHack->Install Extra option.