Hervé
-
Posts
10085 -
Joined
-
Last visited
-
Days Won
569
Content Type
Profiles
Articles, News and Tips
Forums
Everything posted by Hervé
-
Please read existing threads and articles on "performance tuning" or Pokenguyen's AIO guides at IM. https://osxlatitude.com/index.php?/topic/2673-performance-tuning-with-fakesmc/ http://www.insanelymac.com/forum/topic/298027-guide-aio-guides-for-hackintosh/?do=findComment&comment=2019604 Then, there is the existing X201 power management literature on this forum. Eg: https://osxlatitude.com/index.php?/topic/7756-x201-power-managment/ This being said, your CPU speed stepping appears to work Ok since your 1st screenshot shows a CPU speed of 2.0GHz with a x15 multiple (which is a correct speed/multiplier arrangement on your Arrandale CPU) and an average CPU speed of 1.43GHz...
-

Latest Security Update Yosemite 10.10.5 on E6230 Heads Up
Hervé replied to jfmac's topic in The Archive
Nothing new; all security updates are like OS version/combo updates: they re-instate vanilla kexts + kernels. As such all Sandy + Ivy Bridge systems need to repatch/replace AICPUPM and all Haswell systems need to replace the kernel with the patched one after this new security update. -
From what kind of system do you use that Carbon Copy image?
-
You sure it's not the Haswell CPU reset? You need the Haswell-patched kernel...
-
[Solved] I need a Mavericks installation app that will work with MyHack
Hervé replied to SeanOMik's topic in The Archive
Initial issue obviously solved. Please open up a separate thread if you have issues. However, most matters have long been discussed wide and large for these D Series laptops, so please use the Search forum facility and read up existing threads beforehand to try and find an existing solution. -
The old Protector Suite software worked fine with older Latitude D Series + Precision M Series laptop up to Snow Leopard (those laptops use a totally different fingerprint scanner hardware then the E Series though). For Lion and ML, you had to switch to Authentec TrueSuite software. When Apple released Mavericks, TrueSuite support was affected and I remember reading that login through finger scanning no longer worked. Authentec was bought by Apple in July 2012, then all support and software development ceased at the end of that year. I can't say if TrueSuite would install or run in recent OS X versions such as Mav/Yos/EC or if it would support the BCM5880 chip (though I doubt it) but there's only one way to know I guess... http://web.archive.org/web/20130306124038/http://support.authentec.com/Downloads/Mac/TrueSuite.aspx
-
What else but a dark screen would you expect with an unsupported webcam?
-
You should probably generate your own SSDT that suits your own CPU rather than maybe reuse an existing file from somewhere. This will allow you to optimise CPU speed stepping in collaboration with SMBIOS profile and to enjoy better Turbo boost too.
-
Caution: the Chameleon boot plist goes in /Extra, not in /Extra/Extensions...
-
For FaceTime, it'll work (without camera) as long as you have an active en0 LAN interface (whether a real and supported LAN card or the fake Ethernet).
-
If you want to use the power button to put your D630 Hackintosh to sleep, press it down 2 to 3 seconds. The screen will go to sleep, there will be some disk activity for a few seconds, then the laptop will go to sleep and the power LED fade in and out. The alternative to put your D630 to sleep is Fn-Esc or close the lid. This does require that you disable hibernation beforehand (and removing any sleep image from /var/vm is also required to avoid issue on reboot). If your computer is asleep with lid opened, press PWR button to wake it.
-
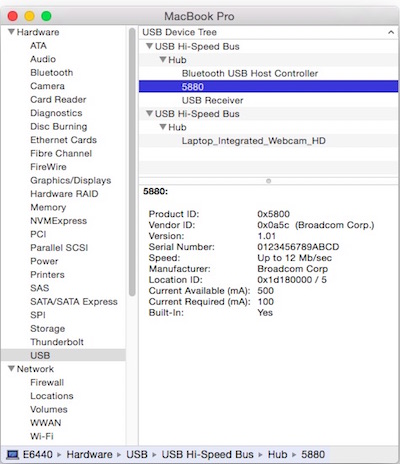
Like for most (if not all) USB devices, there are no kexts for this piece of hardware. If your laptop has a fingerprint scanner based on this device, it can only be used under OS X through a supporting software. Finding such software has remained a problem to this day... NB: Some laptops also have a Broadcom BCM5880 device listed in their USB hardware without necessarily having a fingerprint scanner physically fitted to the computer, it's the built-in Integrated Secure Applications Processor chip:

-
Guys please keep the thread to its topic or create new ones.
-
No that would not work.
-
[Solved] I need a Mavericks installation app that will work with MyHack
Hervé replied to SeanOMik's topic in The Archive
Best thing to download is a legit copy of 10.9.5 off the AppStore. Boot hanging at "Missing Bluetooth Controller Transport..." means your nVidia GPU is not properly recognized with the distro you used, whereas it would be fully recorgnized OOB with a vanilla installer. There is no VT-d BIOS parameter on the Latitude D830, so you can rule that out. Conclusion: avoid using a distro, it's obviously not suitable... -
These integrated webcams are USB devices, so no DSDT patch will do... OS X normally supports UVC-type devices OOB. Not much you can do if yours is not supported, other laptops such as the Latitude E6320 suffer the same problem (well those fitted with a specific model). As suggested right above, you may try macam app, but it probably won't change anything.
-
Afaik, you don't need to press Ctrl at all. To put your D630 to sleep, you press PWR button a couple of seconds or you close the LID or you press Fn-Esc. The laptop will then sleep within a few seconds, provided you've disabled hibernation and removed any sleep image file of course.
-
The command is overall correct, but check that you use the correct path for boot1h file. Plain if=boot1h assumes the file is in the current directory. Ther output file points to the hardware device identified against your "Volumes/" file system in the df Terminal command. In case you did not know it: if parameter of dd command means input file of parameter of dd command means output file
-
SSDT generator tool is of no use on 1st Gen Arrandale "i" Core CPUs, it only applies to SandyBridge and later CPUs. For Arrandale CPUs, AICPUPM is managed in the exact same way as for Core2Duo models.
-
If it does not work OOB, then there is little chance it'll be supported...
-
"boot0:error" is typical 4K sector HDD issue. I would suggest you boot into your USB installer having copied a Chameleon i386 folder (with all boot files) onto it, then unmount your HDD and install the boot1h file to it. You cannot just copy the file to your existing partition. Once you've properly installed the boot1h file, you should then be able to boot your HDD directly.
-
If you downloaded Yos from AppStore before, it'll be available in the list of your previous purchases in AppStore and you'll be able to download it again.
-
Just add the parameter to the Clover boot options. I don't know if Clover support "PciRoot=x" like Chameleon, if in doubt, use PCIRootUID=x.
-
PciRoot=4 basically aligns the bootloader PCI root with the computer's default settings. You can bypass this by patching the DSDT and setting PCI root value to 0. There are several posts on the forum about this.
-
Some questions about installing OS X on Dell Vostro 200
Hervé replied to madorean's topic in The Archive
No need for NullCPUPowerManagement or patched AICPUPM at all...