Hervé
-
Posts
10079 -
Joined
-
Last visited
-
Days Won
569
Content Type
Profiles
Articles, News and Tips
Forums
Everything posted by Hervé
-
Error 77 -> your cache is not rebuilt properly. Redo the touch + kextcache commands or use the following alternative kextcache command: sudo kextcache -system-prelinked-kernel ` Pop-up message about an external USB device would be normal after Sleep/Wake: power is cut off USB ports at Sleep, unless you opt for the option to retain power to USB when computer is asleep but that's usually limited to having the computer plugged to mains.
-
Please post a copy of your DSDT and advise on the SMBIOS profile you use. I'll try and patch your DSDT and create your USB_injector kext accordingly.
-
Updated for latest version of El Capitan and for Sierra after renewed tests. The module being USB internal, ensure your system does support all internal and external USB ports. Patch DSDT to rename EHCx device to EH0x devices and use a USB injector tuned to your SMBIOS profile & USB port numbers as/if required.
-
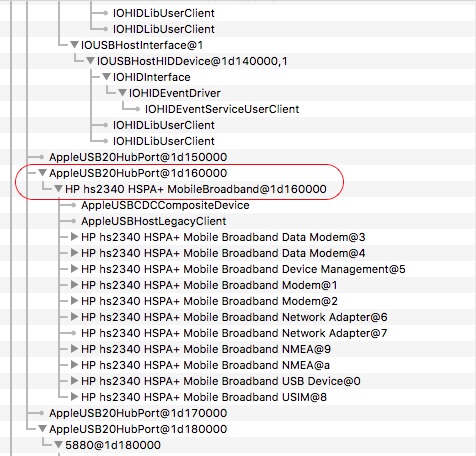
Ok, it's exactly as I thought: the problem is just linked to the new way of handling USB ports introduced with El Capitan. The WWAN module works again with the same patch as described in the guide, provided you adjust your installation to handle USB ports properly. I've just verified this in El Capitan 10.11.6 and Sierra 10.12 on my E6220. I had kept my DSDT with its original EHC1/EHC2 devices on the basis that all USB ports appeared to work Ok with MBP8,1 SMBIOS. However, if the external USB ports were Ok, it was not the same for the internal ones... On checking the IOReg, I found the WWAN module under port #6 of the 1st USB2.0 controller EHC1. As it happens, the MBP8,1 Mac model carries 4 ports on each EHCx controller as standard, whereas on my E6220, the DSDT shows 6 ports per USB2.0 controller. I therefore: patched my DSDT to rename the EHCx devices to EH0x installed a classic USB_injector kext in which I defined 6 ports for MBP8,1-EH01 and MBP8,1-EH02 USB2.0 controllers as per IOReg/DSDT info On reboot, the WWAN module was fully functional again.

-
It works the same in Sierra as in ElCapitan. Check your DSDT and audio patches.
-
Well... You injected the DSM method into RP05.PXSX instead of RP06.SDXC. No wonder it did not work... The attached correct version should fix everything. DSDT-patched_RV.aml.zip
-
Tried the WWAN module on 10.11.6. Indeed, there's a problem as the CellPhoneHelper kext does not load. I need to look into this. It must be a side effect of the changes Apple made with the handling of USB ports/devices since El Capitan.
-

[SUCCESS] Latitude 3470: El Capitan 10.11 / High Sierra 10.13
Hervé replied to marliwahoo's topic in The Archive
Make sure AppleHDA gets loaded as the patches will only apply if the kext is cached. If it gets loaded, rebuild the cache: sudo touch -f /S*/L*/E* sudo touch -f /L*/E* sudo kextcache -Boot -U / ALso, please note that the 8319D411 patch is not valid in Sierra. Target 8A19D411 instead. The others should be Ok. -
Clover on-the-fly patches operate on cached kexts only. It's a mandatory pre-requisite.
-
I've had some doubts about those above AppleHDA patches/patch combination because they've never worked on my E6220. Yet, it's fitted with IDT 92HD90 audio, i.e. the same as the other E6x20 models. I don't use Clover so I patch my AppleHDA kext directly and here are the details of what I use for Sierra: Find: 8B19D411 Replace by: 00000000 (2 occurrences) Find: 8419D411 Replace by: E7761D11 (2 occurrences) I cannot find any instance of 8319D411 in AppleHDA v276.26... For those who want to try, here are the dummy HDA + pre-patched AppleHDA kexts. AppleHDA_IDT92HD90.kext.zip Patched_Sierra_AppleHDA_v276.26.kext.zip
-
Are you sure you patched the right device? Please post your DSDT + IOReg output.
-
Post your laptop specs to be sure but I see you're using MBP11,2 SMBIOS profile so this is probably a Haswell system. 2 things to keep in mind: 1) select KernelPm option (for CPU power management through the kernel); option AsusAICPUPM is for SandyBridge/IvyBridge systems only. 2) make sure you run the vanilla AppleACPIPlatform kext
-
Typo in the code line now fixed (Ericsson ven id is indeed 0x0BDB as listed at top of thread) but it's a pure cosmetic info so typo had no effect whatsoever. DPCIManager only lists devices on the PCI bus so it's perfectly normal that you do not see the WWAN module since it is USB. I still have my module somewhere, so I'll try to dig it out and test again in EC 10.11.6 and Sierra 10.12 (Sierra retained same version v1.4.0 of CellPhoneHelper kext) but I definitely had it going when I tested it under 10.11.2.
-
D830: Can't Download macOS Sierra From App Store
Hervé replied to johnnynmonic's topic in The Archive
Nope, you need a FSB800 CPU. I you install a CPU of higher FSB it may not be supported and if it were, it'd run at reduced speed (200 x multiplier). T8x00 are not great performers due to their smaller 3Mo L2 cache (4Mo on your T7700). T9x00 are much much better with 6Mo. It makes a big difference. -
Maybe something similar to the old RTC issue which reset CMOS. Try and look for the El Capitan RTC patch (DSDT and/or AppleRTc kext).
-
@offficial_florin: no double posts please. And you can't downgrade OS X, you can only re-install from scratch.
-
D830: Can't Download macOS Sierra From App Store
Hervé replied to johnnynmonic's topic in The Archive
Please note that you cannot proceed with Sierra if your D830 is fitted with the Merom T7700 listed in your signature. Sierra needs a CPU with SSE4 capabilities so you'd have to upgrade to a FSB800/SantaRosa Penryn CPU of the T8x00 or T9x00 families. -
Clover will allow you to simply update by running the Sierra installation app. Most things that worked under EC should work under Sierra. There will be exceptions like your audio control buttons for instance. If you only have that machine and cannot sustain to lose it, I would recommend you create a separate partition for Sierra or, should you wish to upgrade your existing setup, make a clone of your existing EC partition. Failing that, update to 10.11.6 and wait until other people report their own Sierra experience on this E5450 model.
-
Webcam is usually USB internal. Check if it's reported in your SysProfiler. If it is, your USB ports are working but the camera may not be supported. As for audio volume and mute buttons not working, it's not something specific to your E7440, it affects all Hackintosh. It obviously results from changes Apple made to ACPI handling in Sierra.
-
You can look up existing guides for this model. Here, here or here for instance.
-
Boot stage graphics glitches get fixed with the following IOGraphicsFamily kext patch: Find: 0100007525 Replace by: 010000EB25 Can be done through binary patching or Clover on-the-fly patch.
-
Means the patch needs to be revised to match your own audio hardware arrangements. You'll have to follow the AppleHDA patching guide (look it up on the forum) and dump your codec data through Linux.
-
This patch should work as is for all E6x20, E6x30, E6x40 and other same generation Latitude laptops. Don't change the PCI ids to your own card reader's, it would not work since you'd be injecting your own existing ids so it'd be like telling your left arm it's the left arm. You must keep pretending to have Apple's own hardware, that the whole essence of the patch. The patch works on my E6220/E6230/E6440.
-
D830: Can't Download macOS Sierra From App Store
Hervé replied to johnnynmonic's topic in The Archive
With Enoch, you'll be to proceed by temporarily setting your SMBIOS to MBP7,1, download Sierra, install it with MPB7,1 SMBIOS and then, once you're finished, set the SMBIOS back to MBP5,1. You may not get graphics acceleration with MBP7,1 SMBIOS but this will be regained after reverting to MBP5,1 SMBIOS. That's my personal experience on my D630. Apparently you cannot use MBP5,1 SMBIOS with Clover so you may want to stick to Enoch on that particular laptop. Edit: You can also permanently retain MBP7,1 SMBIOS by re-tuning your FakeSMC keys to 1.62f6 (keep smc-compatible set to smc-mcp) and the AGPM patch to MBP7,1 model. -
Indeed, it's required on all laptops with Intel 945 chipset, otherwise they KP. But it's not required on laptops with Intel 965 chipset. 'wondering if the OP's clock slippage could be fixed with setting the bus speed to 200000. If D830 is fitted with a Merom CPU, he should also ensure IDA is disabled in BIOS.