Hervé
-
Posts
10077 -
Joined
-
Last visited
-
Days Won
569
Content Type
Profiles
Articles, News and Tips
Forums
Everything posted by Hervé
-

E6230 Catalina 10.15.6 : Freeze after wake up from sleep
Hervé replied to Amaleic's topic in The Archive
Try and switch to sleep mode only rather than hibernation and delete the sleepimage file. All details are posted in our FAQ section. -
Your Broadwell/HD5500 laptop, will run all recent macOS versions, from Mojave to Catalina and future Big Sur. I suggest you consult our threads about OS X/macOS minimum requirements and GPU compatibility for further details.
-
2) Support for Intel cards is fairly new and remains pretty basic. Afaik, there is no native support to date. My advise is that you replace that card with a fully compatible and fully supported Broadcom card. 3) Sounds like you've not setup CPU power management properly, I suggest you consult Jake's own E7470 guide to properly setup your laptop. I very much doubt Windows would allocate 12GB (!!!) of RAM for video/graphics. 1536MB is what you ought to expect under macOS, that's the default VRAM allocation on any MacBook since Haswell generation. The property injection Jake gave you increases this to 2GB. macOS will never use more than that with an iGPU, it's not designed so.
-
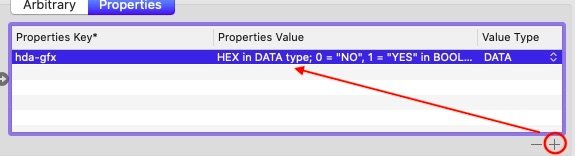
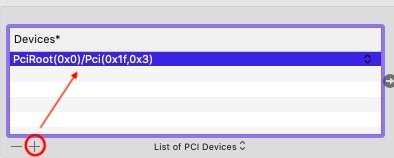
Using Clover Configurator, you need to click the small "+" button under each section to add data/properties. Here, you need to do the following under the Properties tab click on the + button under Devices block; a sample entry appears; just enter the address Jake has given you above click on the + button under Properties Key block; a sample entry appears; just enter the property key, value and type Jake has given you above Then save your config and reboot for the property injection to take effect. Consult the Clover wiki for information and instructions regarding configuration.

-
Tuh tuh tuh... Big Sur was announced compatible with models not older than MacBook Pro late 2013 and MacBook Air 2013. None of these include Ivy Bridge/HD4000 platforms. Expect support to start at Haswell only... https://www.apple.com/macos/big-sur-preview/ This being said, Big Sur beta so far supports Ivy Bridge HD4000 graphics (IntelHD4000 + Capri framebuffer kexts are present) so you should be Ok for the time being. Maybe not when final version gets released at fall.
-
You could work it out, really. It'll be more or less the same pack as, say, Sierra, with the added complexity of: telemetry plugin replacement nVidia Tesla kext installation and workarounds And double check your Embedded Controller of course as per the Catalina requirements thread pinned to "Our Picks" list. Follow what I detailed in my D630 guide.
-
And full of bugs...
-
You probably to redefine your USB ports mapping correctly with Hackintool app.
-
Nope, unsupported; that'll be High Sierra minimum...
-
Make sure you're using a vanilla USB installer, not a distro (for which you'll find no support here). If so, please post your zipped Clover EFI folder. Consult our existing guides related to other Haswell Latitude laptops such as the E6x40 or E7x40 family for guidance. You should also read the existing E5540-related threads.
-
E7240 - Battery drain - IGPU power management
Hervé replied to WhenMusicAttacks's topic in The Archive
Excellent this screw thingie if it weren't laughable! Though not sure this is what the OP was writing about (no mention of poor system performance). As for iGPU idling at 0MHz, I confirm that it's not possible. If using Intel Power Gadget, maybe OP confused OS required graphics frequency and actual iGPU frequency... Here's the registered behaviour of the HD4000 iGPU of the i7-3540M of my idle Latitude E6230 under Catalina 10.15.6: https://ark.intel.com/content/www/us/en/ark/products/71255/intel-core-i7-3540m-processor-4m-cache-up-to-3-70-ghz.html http://www.cpu-world.com/CPUs/Core_i7/Intel-Core i7-3540M (PGA) Mobile processor.html OP did not indicate anything on his E7240 specs or post an IOReg extract, so maybe it's just a matter of having an AMD dGPU fitted but not disabled... Who knows?
-
Please read our Catalina Requirements thread pinned to "Our Picks" list on forum main page. Make sure you've done the necessary re: Embedded Controller.
-
E7240 - Battery drain - IGPU power management
Hervé replied to WhenMusicAttacks's topic in The Archive
No, iGPU does not run at 0MHz when idle; lookup your CPU specs on Ark Intel web site or CPU World. iGPU frequency range is usually detailed. It's a dGPU that you disable if fitted and unsupported. I'd say your battery drain issue has more chance to result from your incorrect CPU power management settings: You have a Haswell platform so all you need is: ACPI tab: Plugin Type set to 1 PluginType enabled Kernel & Kext Patches: KernelPm (you can keep AppleRTC patch of course!) Nothing else. So remove those incorrect SSDT drops (especially as you're not using any CPU-specific generated SSDT) and those C-States you've enabled. Also, what is that SSDT-PNOT table you use? Not necessary to me...
-
Pike R Alpha's well-known ssdt generator script.
-
@Lego, can you please try and write everything in a single post than keep this very annoying trend of posting a new message every 30s? Maybe wait a few mins from now on... Or use the "Edit" button... Thank you.
-
Everything looks good to me now in that IOReg of yours: Can't see why you'd have Bluetooth issues. Try and disconnect that wireless USB adapter just in case it interferes...
-
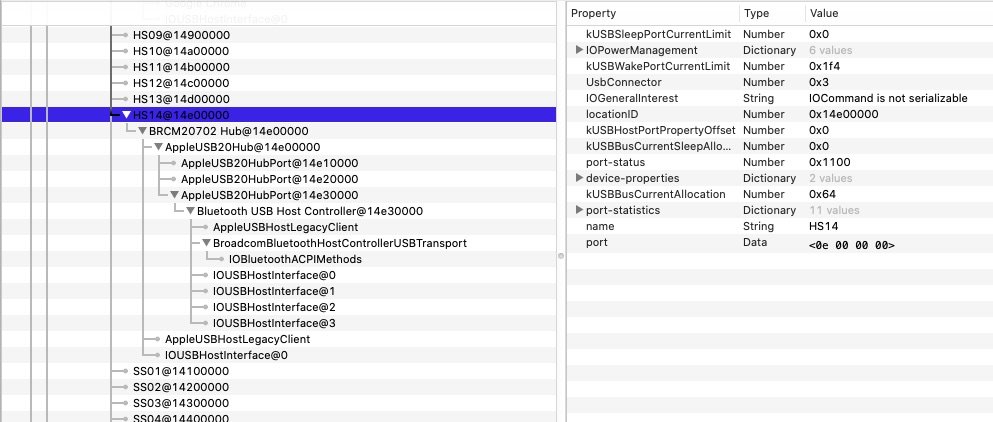
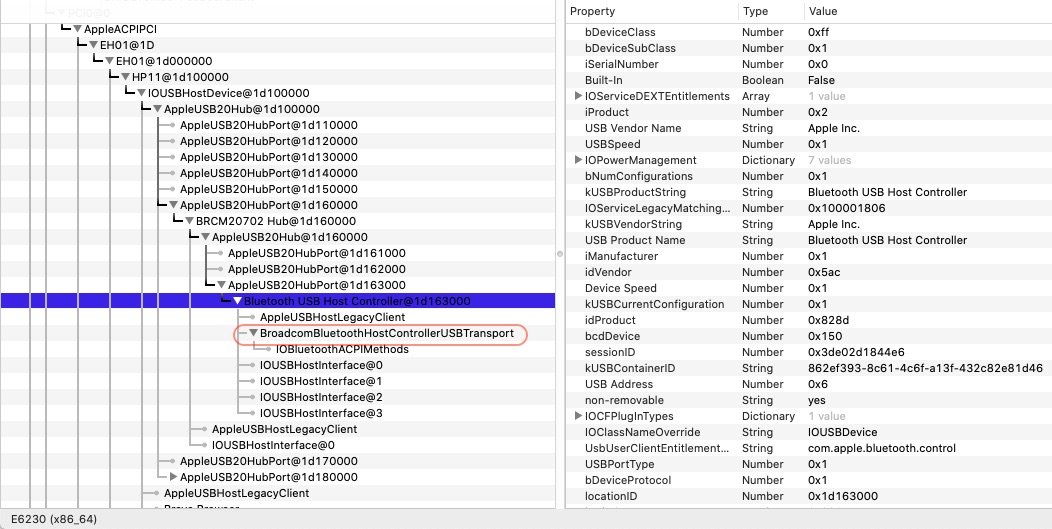
No, Bluetooth chipset BRCM20702 is supported OOB. Do you have any other built-in BT device in that computer? If so, disable Bluetooth in BIOS. Your screenshot does not show any transport controller kext loaded so there's clearly something wrong with the module or, maybe, your OC configuration (can't help you with that)... Did you connect your module to an internal USB port? That's obviously required. Here's what you would normally expect to see in IOReg: I've checked Catalina 10.15.6's BroadcomBluetoothHostControllerUSBTransport kext and it does cover your device (0x821f, i.e. 33311 in decimal) so all is Ok on that side. Could you please post a zipped copy of a saved output?
-
As stated in our wireless cards inventories, BCM43224 (14e4:4353) cards such as your BCM943224PCIEBT2 are subject to whitelisting; so you either patch the associated kext to replace a supporting Mac model by that of your elected SMBIOS model you use or you change your SMBIOS by that of a model supported by the whitelist. Please consult the pinned dedicated patching guide on this matter which is available in this very Wireless & Bluetooth forum section. Re: Bluetooth, same story as for the Wireless,; it's an Apple card so no add-on kext required, it should be natively supported.
-
A zipped copy of your Clover EFI folder for instance... I fear you might be using the i5-5300U CPU power management SSDT posted in my pack rather than your own generated one for your i7-5600U. Make sure your BIOS is also configured as per the recommended settings.
-
Dell E6540 A26 Bios Opencore 0.6.0 Big Sur Beta 3 100%
Hervé replied to Takiller's topic in The Archive
Why don't you write a guide describing the procedure you followed instead? And share a copy of the OC EFI folder you used along the way? -
No! https://en.wikipedia.org/wiki/PCI_Express
-
Model with eDP LCD connector-type it would seem and 3K display. Ace.
-
If you already have High Sierra, then it's a "simple"' matter of following the 1st gen Intel HD guide and adjusting the graphics settings for 10.13 and your screen resolution. Discussions about support for 1st gen Intel HD graphics started on p68 in the bible thread. Read on, I'm sure details are provided throughout the subsequent pages. https://www.insanelymac.com/forum/topic/286092-guide-1st-generation-intel-hd-graphics-qeci/?page=68
-
No such files and/or folders were posted here. Looks like the only proper guide we have for this model is Jake Lo's Mavericks guide which dates back to many years ago. T410s is an ageing laptop with 1st gen Intel HD graphics iGPU or Tesla nVidia graphics dGPU. As you probably know, this iGPU always required specific tuning to be supported on Hackintosh and this support was only under conditions (see Bible on 1st gen Intel HD at InsanelyMac). 1st gen Intel HD graphics are last officially supported in macOS High Sierra; abandoned in Mojave/Catalina due to lack of support for Metal as are nVidia Tesla GPUs and Intel HD3000. There are tricks that can be implemented to obtain partial and OpenGL-only graphics acceleration on those dropped GPUs. My advice would be to go for macOS High Sierra to begin with and build a working Clover setup before you attempt any more recent versions like Mojave or Catalina. Please post your laptops full hardware specs (CPU, graphics, screen resolution, audio, LAN, wireless, etc.) and we'll try and help you build a Clover setup. Is the BIOS legacy only or does it support UEFI mode?
-
No support by PM or via messages on my profile. Please use the forum, that's its very purpose.