Search the Community
Showing results for tags 'clover'.
-
Hi, I'm trying to install macOS Sierra on an fujitsu siemens scaleo p2 g31t-m2. The system have a core 2 quad processor. (= Sandy Bridge) BEFORE: I had an version of snow leopard version 10.6.8 running on the system. I have the system OS upgraded to el capitan on following method. I have el capitan installation file downloaded from the mac app store and an bootable USB stick. I inject NVIDEA. The system I can install with using the following bootflags: dart=0 nv_disable=1 (-x) -v After the installation completed is I have the Clover bootloader installed on the HDD from https://sourceforge.net/projects/cloverefiboot (chameleon, stolen and rebranded)/. The systems was perfectly updated to OS X El Capitan and can now boot without my USB connected and works smoothly. CURRENT: Now I'm trying to update the system to macOS Sierra. I have again an bootable USB stick, again selected for the options usb, sierra and inject nvidea. So far all good.... But now i want to boot from my sierra USB with the same bootflags as before "dart=0 nv_disable=1 (-x) -v" but i can't get to the installation screen. the screen hangs on the apple logo or when i used the bootflag -v the screen hangs on line 1 with plus signs. (see attached picture). How can I solve that problem, so I can install macOS Sierra ? Is it possible for my system/configuration ? Thanks in advance Regards,
-
macOS Sierra seems to run quite well on these notebook, with Clover botloader, and also with Cameleon. All seems to work well except USB 3, and Nvidia 540M. I opened this topic, in the hopes that those, with same laptop (hardware) as mine or like to give their opinion about this build here, about a potential fuctionalitate and rectifications. I forgot to mention that webcam its upside-down! EFI Asus N73SV 2017.zip

-
Hey Folks! Ive got a Lenovo Ideapad System, ive installed sierra 10.12 and it went great but id researched the HD 5500 Graphics and it requires you to change the DVMT Allocation, mine was pre allocated with 128MB of VRAM. I tried to Chage the DVMT using an EFI Shell and the command "setup_var 0x18C 0x3" Which would change the dvmt from 128MB to 96MB but the BIOS' are locked so i cant do that instead I checked for patching methods, I changed the Binaries of the AppleIntelBDWGraphicsFramebuffer Kext I replaced "8945C839C7764F" with "8945C839C7EB4F" and added the MatchOS for 10.12, after that I also set the platform ID to 0x16260002 and then rebooted. It Partially worked as in Verbose mode there were several lines about the IGPU saying it was registering Correctly and there was 3D Acceleration, so its working except it freezes/Hangs at these IGPU Lines and I cant see the login screen. Some others are saying they can see the Mouse and hear the keyboard typing (??????????) I don't see anything other than the Verbose Messages hanging at the IGPU Lines. Has anybody else had this issue and resolved it or any other methods other than Clover Kext Patching and Modifying the BIOS Physically or Via Software!? My Specs are: CPU: Intel Core i3 5005u GPU: Intel HD 5500 RAM: 8GB HDD: 500GB Hitachi Id be Super Super Grateful if anyone would help me out and try to fix this Issue without DVMT or BIOS Modding!
-
 Hello, I used Jake Lo’s El Capitan Latitude/Inspiron/Precision Clover Guide for installing on a Latitude E6230 (clover 3556). Replaced the DSDT from the bootpack with Jake Lo’s DSDT for correcting “instant wake†found elsewhere on this site. Everything is working perfectly. THANK YOU! Prior to this install I’ve used Chameleon on several desktops and a couple of Latitudes. The guides found on this site are always excellent = again Thank you. I see sip/crs is set at 0x67 in the config.plist which completely disables sip. Seems a bad idea to have sip totally disabled? Using Terminal on the mounted EFI partition, I changed the value 0x67 to 0x3 in EFI/EFI/CLOVER/config.plist. upon rebooting the error is “almost word for word†to below: OsxAptioFixDrv: Starting overrides for System\Library\CoreServices\boot.efi Using reloc block: yes, hibernate wake: no Error allocating 0x#### pages at 0x####... alloc type 2 Error loading kernel cache (0x9) Boot failed, sleeping for 10 seconds before exiting... Yes, I do see this error under the Trouble Shooting section, but I have 2 4gb DIMMS… am I missing something here? Also used Clover Configurator to change to 0x3 and just got reboot Question: is it possible to run with clover at crs 0x3? and if yes how? Is it a matter of rebuilding the kernel cache or placing some/all of the kexts in S/L/E or what? Any help much appreciated.
 -
Model: Dell E6220 i7-2620m, 8GB ram, Intel HD 3000 I'm currently following pafkata's guide on running sierra on my e6220 using clover: https://osxlatitude.com/index.php?/topic/9383-dell-e6220-i7-2620m-clover-detailed-guide/ Everything works until the very end of the macOS installer where I get the error "building boot caches on boot helper partition failed". I have tried booting into the SSD anyway but get a boot0af error. Does anyone know how I can resolve this issue? (P.S this is the first time installing Mac on this laptop) Thank you.
-
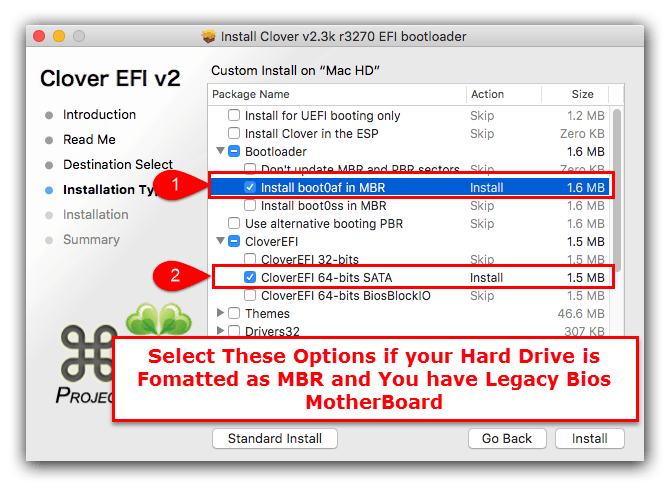
Hello, I'd like to contribute to the forum and I have decided to write a detailed guide how I installed macOS Sierra 10.12.1 on my E6220 with Core-i7 2620m, HD3000, 8GB RAM, 128GB SSD. I have received few personal messages for help, although there’s a perfect Enoch guide by Herve: https://osxlatitude.com/index.php?/topic/7914-dell-latitude-e6220-with-i5-2520m-hd3000-and-1366x768-lcd-mavericksyosemiteel-capitansierra/ and excellent generic El Capitan guide by Jake Lo: https://osxlatitude.com/index.php?/topic/8506-dell-latitude-inspiron-precision-el-capitan-clover-guide/ I will follow Jake’s guide, but I will add more stuff and this guide will be useful for all Sandy bridge E6x20 Many thanks to all OS X latitude forum members, who helped me when I was very new to OS X. Let’s start. You need: 1. E6220 2. 8GB USB or bigger 3. Access to real mac to create install USB or if you have Windows/Linux you can use a virtual machine using virtualbox or vmmare You should update your BIOS to A13 and set it to the following settings : https://osxlatitude.com/index.php?/topic/8281-e6220-bios-settings/ Download macOS Sierra from Apple store. Prepare USB using the following instructions: 1: Prepare Bootable USB Drive This step extracts the OS X Installer contents, then installs Clover bootloader to the USB stick. 1. Insert the USB drive on a running OS X system 2. Open /Applications/Utilities/Disk Utility 3. Highlight the USB drive in left column 4. Click on the Partition tab 5. Click Current and choose 1 Partition 6. Click Options... 7. Choose GUID Partition Table 8. Under Name: type USB (You can rename it later) 9. Under Format: choose Mac OS Extended (Journaled) 10. Click Apply then Partition 11. Go to Applications, right click on “Install macOS Sierraâ€/Show Package Contents/Contents/ SharedSupport 12. Mount InstallESD.dmg 13. Launch ShowHiddenFiles and select “Show Special Files†( app attached at the end of guide) 14. Mount BaseSystem.dmg (hidden) from “OS X Install ESD†15. Use Disk Utility to restore “OS X Base System†to USB (see image below) 16. After restore is complete, USB is now renamed to “OS X Base Systemâ€. Go ahead and rename it to “Install macOS Sierra†17. Go to “Install macOS Sierraâ€/System/Installation and delete the alias “Packagesâ€. 18. Copy “Packages†from root of “OS X Install ESD†to “Install macOS Sierraâ€/System/Installation 19. Copy BaseSystem.dmg and BaseSystem.chunklist (hidden files) from “OS X Install ESD†to root of “Install macOS Sierra†20. Launch ShowHiddenFiles and select “Hide Special Files†21. Download Clover EFI boot loader 22. Open Clover package installer 23. Hit Continue, Continue, Change Install Location... 25. Choose “Install macOS Sierra†26. Hit Continue, then hit Customize. Select these items: • Install Clover in the ESP • Bootloader/Install boot0af in MBR • CloverEFI/CloverEFI 64-bits SATA You can also select a Clover theme. 27. Click Install 28. After installation of Clover, the hidden EFI Partition will appear on the Desktop Now you will need to browse the EFI partition and put the necessary files in the correct locations: DSDT.aml and ssdt.aml should be copied to EFI partition and folders CLOVER->ACPI->patched Important note: if you have different CPU and you use my ssdt.aml - you will get kernel panic. If you have i5-2520M which seems to be the most common - you can get ssdt.aml from the files provided in Herve’s guide - https://osxlatitude.com/index.php?/topic/7914-dell-latitude-e6220-with-i5-2520m-hd3000-and-1366x768-lcd-mavericksyosemiteel-capitansierra/ If you have another CPU - then don’t use ssdt.aml and find NullCPUPowerManagement.kext, which should be added along with the other kexts. As of this writing, I do not know which is the latest such kext working OK with Sierra. If someone is ready to provide it - I can add it to the post. You can use a shell script ssdtPRGen.sh to generate ssdt.aml for your CPU after the install. The script is provided in the Tools zip to this post. You might want to google for a newer version. Kexts should go to EFI/CLOVER/kexts/10.12/ config.plist goes to EFI/CLOVER/ Please use Clover Configurator to generate a new serial. Just start Clover Configurator - File - Open - select config.plist from EFI/CLOVER/ and open it. Then SMBIOS from the left-hand list and click the magic wand and select first laptop picture and from the menu Macbook Pro 8,2 or 8,1 if you have the i5 processor. You can choose year of manufacture and click the buttons ‘shake’ to get different serials generated. When done - click File - Save. Now you can reboot computer and start the installation. You can press F12 before boot and choose USB. If you get kernel panic - one common reason would be if you have empty DIMM A slot, and only 1 RAM stick in DIMM B. Move the RAM to DIMM A and try again. For a new installation of macOS, you MUST erase and format the destination drive according to the following steps before continuing. a. From the menu bar, click Utilities -> Choose Disk Utility b. Highlight your target hard drive for the macOS installation in left column. c. Click Erase tab d. Under Scheme: GUID Partition Map e. Under Name: type Macintosh SSD (You can rename it later) f. Under Format: choose Mac OS Extended (Journaled) g. Click Erase h. Click on Partition Tab to add more partition if you prefer i. Close Disk Utility Click Continue, Continue, Agree Select Macintosh SSD, or name of your existing drive, where you want to install macOS and click Continue Upon completion, system will restart Press the F12 to choose boot device Choose <Your USB Installer device> When Clover boot screen appears, choose Macintosh SSD or name of your existing drive The system will boot into the new drive, and complete the installation… Launch the terminal and enter the following command diskutil list If you something about virtual drive like this: /dev/disk1 (internal, virtual): Please enter the below command if you have only one disk and you are not setting up dual-booting: diskutil cs revert /dev/disk1 Otherwise you have to find out which is the correct ending number from the data you see from “diskutil listâ€. Then create a folder and mount EFI partition: sudo mkdir /Volumes/efi sudo mount -t msdos /dev/disk0s1 /Volumes/efi Now it’s the time to run Clover installer and install on your HDD/SSD in a similar way like when preparing the USB, however please select couple of more options: • Install Clover in the ESP • Bootloader/Install boot0af in MBR • CloverEFI/CloverEFI 64-bits SATA • Install RC scripts on target volume • Install Clover Preference Panel Copy DSDT, SSDT, kexts and config.plist to the EFI partition of your HDD. You can use EFI mounter if for some reason - it is not mounted after Clover install. Now let’s fix the audio: Copy AppleHDA_IDT92HD90.kext to /Library/Extensions Copy AppleHDA.kext to /System/Library/Extensions Repair permission and rebuild cache. Run command from terminal sudo chmod -Rf 755 /L*/E* sudo chown -Rf 0:0 /L*/E* sudo touch -f /L*/E* sudo chmod -Rf 755 /S*/L*/E* sudo chown -Rf 0:0 /S*/L*/E* sudo touch -f /S*/L*/E* sudo kextcache -Boot -U / Make sure to disable hibernation as it's a prerequisite to get sleep & wake to work Ok on a Hackintosh: • sudo pmset hibernatemode 0 • sudo rm -f /var/vm/sleepimage • sudo pmset hibernatefile /dev/null Remove USB and reboot. You system should start fine, but you might notice that if you tap on the touchpad - it does not click. Moreover, Trackpad preference panel may not load. This is easily fixed by deleting: /System/Library/PreferencePanes/Trackpad.prefPane and replacing it with a Trackpad panel from El capitan. Link to download: http://www.megafileupload.com/85j1/Trackpad.prefPane.zip I still had a persisting problem that whatever I set in Trackpad preferences - it’s not saved after reboot, so I used Dr. Hurt's app - Touchpad Settings.app , which I copied to the Applications folder and allowed access from System Preferences - Security & Privacy - Accessibility - Allow the apps below to control your computer and I added Touchpad settings. I really hope that this will be very helpful to people new to hackintoshing and have Sandy Bridge models E6x20. PS. I may have missed something and fix it later. More stuff could be added later, or improve formatting. Feel free to criticize me and point out if I am doing something the wrong way English is not my native language, but I think I have provided clear enough explanations. Tools.zip E6220-i7 2620m.zip
-
I am totally new to the world of hackintosh. I want to get El Capitan on my Latitude e6510 because OS X is needed for many of the things I do but I dont have the money for a macbook. I managed to get clover on a flash drive and boot to clover but I cant boot to OS X. it just shows a circle with a line through it. Ive heard this is because the config settings are wrong. I found the config file and tried editing it with what I thought it should be. No luck. The settings I found online are for the e6410 but supposedly work for the e6510 (just chang resolution to 1920x1080). These are the settings Can someone explain this all this like i'm five or attach a modified config file with all of these settings?
-
Dell XPS 13 L322x El Capitan Clover Guide First of all I'd like to thank Jake Lo and Vlad Ichimescu for sharing their work with me and help me to put this together. Requirements: 1. A downloaded OS X El Capitan Application from the Mac App Store 2. USB flash drive (8GB minimum) 3. A system running OS X to create the USB Installer Overview 1. Prepare a Bootable USB Drive (8GB minimum) 2. Install OS X El Capitan 3. Post Installation Working: Full QE/CI (HD 4000) Keyboard and mouse (multitouch) Audio Webcam Sleep/Wake/Shutdown/Restart USB 3.0 WiFi (replaced Intel Card with DW1510) ** Originally-fitted Wi-Fi and Bluetooth may not work in which case you'll need to replace your card. Since I don't use bluetooth at all, I've replace mine with DW1510 ** 1: Prepare Bootable USB Drive To create the installation disk, follow tutorial below steps "1 - Download OS X El Capitan" and "2 - Create a bootable USB" Tutorial 2: Install OS X El Capitan 1. Turn on the computer with the USB Installer connected 2. Press F2 to configure the BIOS Sata Operaton -> AHCI Secure Boot -> Disabled Boot List Option -> UEFI. Enable Legacy Option Rom Apply and Exit 3. Hit F12 during boot, choose <Your USB Installer device> under UEFI Boot: 4. When Clover boot screen appears, choose Install OS X El Capitan 5. The system will then boot into the OS X Installer 6. Choose your language and hit -> to continue 7. For a new installation of OS X, you MUST erase and format the destination drive according to the following steps before continuing. a. From the menu bar, click Utilities -> Choose Disk Utility b. Highlight your target hard drive for the El Capitan installation in left column. c. Click Erase tab d. Under Scheme: GUID Partition Map e. Under Name: type Macintosh SSD (You can rename it later) f. Under Format: choose Mac OS Extended (Journaled) g. Click Erase h. Click on Partition Tab to add more partition if you prefer i. Close Disk Utility 8. Click Continue, Continue, Agree 9. Select Macintosh SSD, or name of your existing drive, where you want to install El Capitan and click Continue 10. Upon completion, system will restart 11. Press the F12 to choose boot device 12. Choose <Your USB Installer device> under UEFI Boot: 13. When Clover boot screen appears, choose Macintosh SSD or the name of your existing drive 3: Post-Installation Install Clover loader to Macintosh SSD 1. Open Clover package installer 2. Hit Continue, Continue, Change Install Location... 3. Choose “Macintosh SSD†4. Hit Continue, then hit Customize. Select these items: Install for UEFI booting only Install Clover in the ESP Drivers64UEFI\OsxAptioFixDrv-64 Install RC scripts on target volume Install Clover Preference Pane 5. Launch EFI-Mounter v3, select the disk you have OS X installed on (ie. disk0s1) - app attached below 6. Extract attached CLOVER.zip and copy CLOVER folder to /EFI **(replace not merge)** 7. Download KextUtility 8. Extract attached Kexts.zip and drag its content onto KextUtility 9. Restart your computer and boot without cache Restart When you see Clover boot loader icons, press space over your Macintosh SSD Choose "Boot without cache" option 10. Open KextUtility and let it Repair permission and rebuild cache 11. Restart and you're done. This guide will work versions 10.11.1 through 10.11.6 Kexts.zip EFI Mounter v3.app.zip CLOVER.zip
-
i want to install El capitan or Yosemite on my laptop. Not sure which would perform better;sleep usb 3.0, hdmi ETC. Cannot find anything on this to guide, was only able to boot with chameleon and mavericks. I have installed clover builds on HP laptop, optiplex 760/780, vostro 220 Want this thread to help others with this laptop. Ready for a clover build, I can build the USB installer but doesn't boot to installer, instant reboots. Laptop specs: Intel i3-4010U 1.7GHz dual-core Haswell ULV CPU (no Turbo boost) Intel HD 4400 Graphics DW1560 wireless Can provide any other info, thanks in advance!
-
Netflix works well on my Apple Macbook without installing any additional plugins and search results regarding the issue are very unhelpful. Did this issue come about a mistake I made throughout the install process or could it be that my device lacks certain component support (e.g. drivers, software, etc.)? These issues occur while using Safari on El Capitan. The error code I receive while attempting to play Netflix content is S7381-1204. Also, I never receive a prompt when a website attempts to access my microphone or camera making it impossible to use the requested device(s).
-
How could I install Clover on a HDD or SSD via legacy mode without the installer (the manual way)? Is that possible? I have an EFI folder already.
-
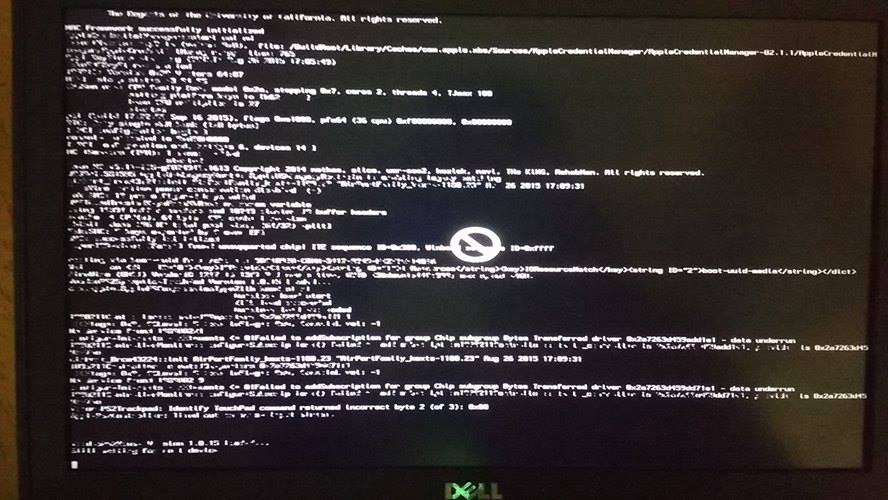
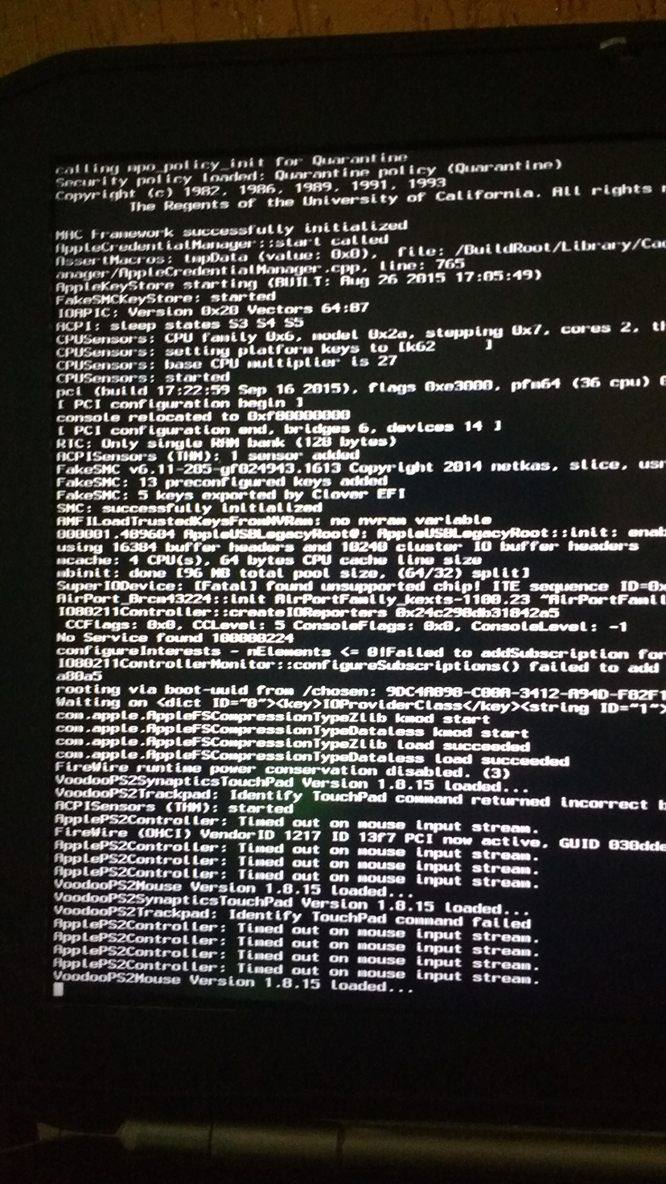
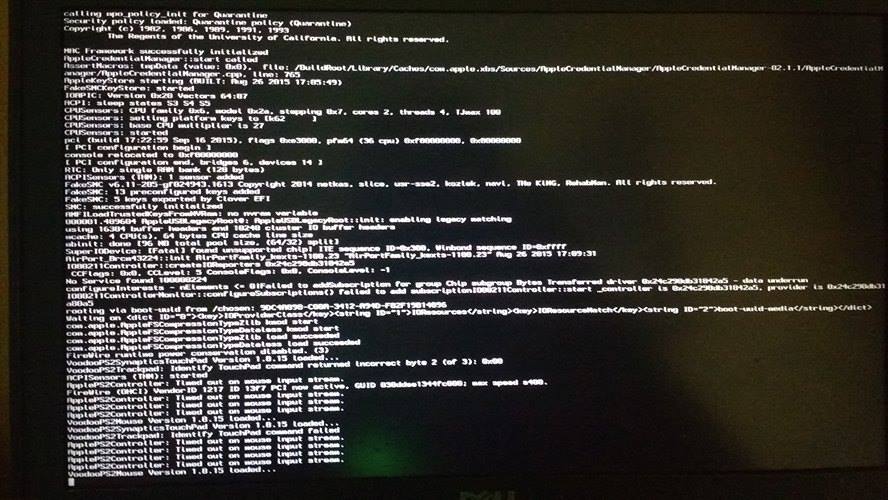
Hello, I've been attempting to get El Capitan installed on my Latitude E7450, and am moments away from just setting it on fire and moving on with life. I have (repeatedly) followed the steps as posted in these two threads: https://osxlatitude.com/index.php?/topic/8514-dell-latitude-e7450-el-capitan-clover-uefi-only/ https://osxlatitude.com/index.php?/topic/8506-dell-latitude-inspiron-el-capitan-clover-guide/ The main differences from my machine and the one in the guide linked above, are: Processor: Intel® Core i5-5300U CPU @ 2.30GHz Memory: 1x 8GB DDR3L 1600 MHz DIMM Following the guide as-is, I end up suffering with the error: OsxAptioFixDrv: Starting overrides for System\Library\CoreServices\boot.efi Using reloc block: yes, hibernate wake: no +++++++++++++++++++++++++++++++++++++++++++++++ This occurs every time. I've tried different USB ports, doesn't matter. Replacing 'OsxAptioFixDrv-64.efi' with 'OsxAptioFix2Drv-64.efi' , with 10 (re)boots (multiple usb ports), I get a mix of: OsxAptioFixDrv: Starting overrides for System\Library\CoreServices\boot.efi Using reloc block: yes, hibernate wake: no +++++++++++++++++++++++++++++++++++++++++++++++ OsxAptioFixDrv: Starting overrides for System\Library\CoreServices\boot.efi Using reloc block: yes, hibernate wake: no Error allocating 0x#### pages at 0x####... alloc type 2 Error loading kernel cache (0x9) Boot failed, sleeping for 10 seconds before exiting... OsxAptioFixDrv: Starting overrides for System\Library\CoreServices\boot.efi Using reloc block: yes, hibernate wake: no Error allocating 0x#### pages at 0x####... alloc type 2 Could not allocate runtime area Boot failed, sleeping for 10 seconds before exiting... Finally, replacing 'OsxAptioFixDrv-64.efi' with 'OsxLowMemFixDrv-64.efi', I simply get: +++++++++++++++++++++++++++++++++++++++++++++++ One thing I see as soon as Clover loads is a circle/icon on the left that says 'Not detected', yet I'm not sure exactly what is not being detected. In an attempt to provide as much information as possible, I've attached the cpuinfo, lspci, and dmesg output of my laptop (undocked, Fedora 23) to give an accurate reading of the hardware. Please send help... Thank you. Edit: I'm using Clover v2.3k_r3354 I've attached my EFI folder as well. The only modification made to 'config.plist' was adding in '-v' to the boot args Clover v2.3k_r3354 cpuinfo.txt dmesg.txt lspci_vv.txt EFI.zip
-
Hello! I have installed El Capitan in my E6420 following Jake Lo's "Dell Latitude / Inspiron El Capitan Clover Guide". (used E6220 bootpack). I still have to fine-tune installation but I have one doubt regarding Clover boot: Why I can only boot legacy? Even enabling UEFI in BIOS I can´t see UEFI boot entry after pressing F12.... My plans are to dual boot Windows 10, so partition must be GPT pure... Thx
- 20 replies
-
- 1
-

-
- E6420
- El Capitan
- (and 1 more)
-
 Got Yosemite installed with everything working on my E5420. Swapped wifi for a DW1510 and used an E5x20 bootpack I found on the forum here. The system boots fine using Clover from my install USB, but not from the hard drive. I have copied the EFI folder from the USB to the FAT32 formatted ESP on my hard drive. Went into BIOS (version A14), switched boot mode to UEFI, and added boot entry for Cloverx64.efi. upon reboot, the laptop boots into Clover just fine, even using the theme i selected, but no bootable partitions are detected. I have Hfsplus.efi in the drivers64UEFI folder, and the whole EFI/Clover folder structure is identical to the one on my USB, which works. Any ideas what could be causing this issue?
 -
I had already installed one time the mavericks is about 5 months and today I decided to try to install el captain, infelimente had trouble climbing the installation. Can someone help me?
-
First off, thanks for providing this amazing resource ladies and gentlemen. It's much appreciated! I'm a long time Linux user and am taking my first step into installing OS X onto older hardware. I've run into some difficulty and am hoping for some pointers. I have a Dell E6420, A21 BIOS, i5-2540M CPU, 4GB RAM, Intel HD3000 graphics, 1600x900 Resolution, 250GB SSD. I followed the wonderful instructions in the following post using the E6220 boot pack: https://osxlatitude.com/index.php?/topic/8506-dell-latitude-inspiron-el-capitan-clover-guide/ However, I get stuck at one of two places: 1) With the stock + E6220 boot pack I get a kernel panic with message "pmLock: waited too long". 2) If I add NullCPUPM kext then I get a black screen that slowly turns all white. I did try to add DualLink into the Clover config. I've been trying different things from the forums, but with less success. I still have yet to see an installer screen. I do appreciate whatever time you can spare to help me get up to speed. I apologize If I'm missing something obvious, but this is all pretty new to me.
-
Hi all Have been reading through the 2 other e5450 posts trying to work out how to get Yosemite up and running properly on my E5450, and have managed to complete the install using Clover. Specs are as follows: DELL Lattitude E5450 i5-5200U Broadwell 2.20Ghz 8GB RAM Intel HD 5500 1080p touchscreen 500GB HDD (not SSD) Using the latest Clover. Installed Clover using Install for UEFI booting only option. Added HFSPlus-64.efi Added FakeSMC.kext, GenericUSBXHCI.kext, VoodooPS2Controller.kext. Added config.plist Set ig-platform-id to 0x16160002 The main issue is that the graphics aren't accelerated and are really slow. It's reporting the Intel 5500 with only 7MB of RAM. Any advice on how to fix it? Thanks
-
Hello, I just read an article about the hp elitebook 8560w with quadro 1000m that can be installed osx 10.9 on it with myHack. I was wandering can this be made with osx yosemite and clover. I really in to buying this laptop but I really want it with osx yosemite! Thank you in advanceHP Elitebook 8560w HP Elitebook 8560w HP Elitebook 8560w
-
Hello all, Trying to install 10.10 on a Dell 6220. It's on the compatibility list, and I have created a clover USB install. The installer successfully boots on other systems, but on the Dell I get a 'Selected Boot Device Failed." The BIOS is the latest A13. In the BIOS I've reset everything to default and set AHCI as recommended. I'm using the Legacy instead of UEFI (also recommended). Any ideas what I am doing wrong? Thanks!
-
Hi, I have a Dell Latitude E7440 with i4300 (i5 processor with Intel 4400) 1920x1080 display, 256GB SSD. Currently using a USB wifi, and on A15 BIOS. In my search for the best tutorial, I've tried the Clover Method, with the tutorial from here and attempted EDP. With all the tutorials out there, it makes it challenging for a newbie to figure out what is best, or where to start. That being said, I see EDP, MyHack, Clover, Chameleon... What really is the best way? Can someone break down the 4 or 5 methods, and explain why one would choose one over the other? It seems like Clover makes the most sense from what I've tried, but not so sure, as I've had my own issues getting things up and running. I'm currently sort of up using Clover with the tutorial from here, but my Graphics is unaccelerated and some sleep issues with audio.. Running Yosemite 10.10.4. Also it's not so clear, do the boot packs have everything you need for 10.10.4, or do you need to apply patches for each to get up to date (eg. apply 10.10.1, then stuff for 10.10.2, etc.) Thanks!
-
Hello everyone, is there any magic way to improve battery life on hackintosh? (e7440 on 10.10.3). On windows I'm getting about 6-7 hours of battery life on hackintosh its one and half. Is it possible to make a energy profile ?
-
I have installed OSX Mavericks and I wanted to run EDP to finish off the install but it simply will not install. The installer says that it finds Clover and Chameleon and thus it cannot continue the install. The boot disk onto which I installed OSX did in fact have clover on it at one time. But I have formatted and removed the EFI partition and so there should be no Clover installed at all. The disk has completely been reformatted. Still, it says it finds clover. Is there any way to fix this? The only thing I haven't done yet but I will soon is simply recreate the installer. Thanks, ISR
-
Unless I disable my 2 NVIDIA 8800 GTX cards with the nv_disable=1 option to Clover 3203, my Yosemite 10.10.3 system immediately crashes and reboots after Clover. I am using DVI output. I installed Yosemite 10.10.3 clean on a Gigabyte GA-Z87X-HD3 mobo and a i7-4771 CPU. To run, my kernel options are "-v nv_disable=1 kext-dev-mode=1 slide=0 " It crashes regardless of setting nv_drv=1. I can run this hackintosh with the i7's built-in gfx. I tried installing WebDriver-346.01.02f04, but that did not help. I have not messed around with other KEXTS, clover's config.plist, other config files, or DSDT/SSDT Injection. I have read through the nvidia guide at http://www.rampagedev.com/?page_id=276 but it is not up-to-date. What must I do to get NVIDIA gfx not to crash? Thanks!
-
Hello Guys, I've been following EMlyDinEsH's Complete AppleHDA Patching Guide, I've managed to get AppleHDA, HDMI and HDMI audio working yesterday. I was so happy that I even might opened up window and screamed out 'shake it baby!'. But that was yesterday. While building my hack, I have tinkered with too much thing and I felt something 'dirty' on the pc (it probably was just me) So I have reinstalled the system. Before I reinstalled it, I have backed up the EFI folder with all kexts, patched DSDT and all that. After reinstallation, I have inhibited the patched kexts (which resides on EFI partition and gets injected by Clover) and restored the EFI partition, everything were working except for the battery meter. That was no problem, I reinstalled the kexts, and all was fine (at least, I was thinking all was fine.) After I reinstalled all apps I use, I hooked up the pc to the lcd tv via HDMI, but BANG! HDMI audio was not working. That was the moment I realized once more that it was the cost wanting all at once. I have gone through the AppleIntelSNBGraphicsFB.kext patching procedure again (even thought it was working fine right before reinstallation), but no luck. HDMI is working, but no HDMI audio. Here are the guides I was using: https://osxlatitude.com/index.php?/topic/1946-complete-applehda-patching-guide https://osxlatitude.com/index.php?/topic/1969-guide-for-enabling-vga-and-hdmi-in-intel-hd3000-gpu/ P.S.: I could not used the mentioned dsdt patch on last link, since it is missing some headers (I think) but that should not be a problem because it was working fine before reinstallation. Besides, it says 'Patched DSDT with platform id OR SMBios of MacBookPro8,1' and my smbios is set to MBP8.1. Details of my system: PC: Acer Aspire 5755G System: Yosemite 10.10.2 Graphics: Intel HD3000 + GT 540M CPU: i7-2670QM/HM65 rev. B2 Botloader: Clover r3193 Here is link to my EFI partition. I didn't know what else can be needed to pinpoint the problem so please let me know what else should I send. https://www.dropbox.com/s/dh26dtwicpgtuou/EFI.zip?dl=1 So, my question is, where should I start looking? Or how do yo even troubleshoot this kind of problem?
-
I want to choose a SMBIOS configuration that is the closest possible to my computer hardware. I found such (MacBookPro11,3), however, I can't find a bootloader that lists it in its premade devices list, much less supports it. I transferred the MacBookPro11,2 configuration that I developed in Clover over to Chameleon. The end result was that Chameleon didn't recognize it (yellow alert icons everywhere), and as soon as I used it in Yosemite, my device was labeled "unrecognized" and I see "DSMOS has arrived" on each boot. So, which bootloader (or branch of one) has the most complete SMBIOS support? Thanks!