Search the Community
Showing results for tags 'dell'.
-
Hello Dell OSX community! First, english it is not my native language, sorry Second, I wanna say thanks for this guide https://osxlatitude.com/index.php?/topic/6372-dell-latitude-5x30-6x30-clover-install-guide/ Third, in this topic I wanna make a perfect Dell E6430->MacBookPro9,2 So, let's begin with El Capitan I have this hardware inside my Dell. At the begin my Dell has bios A16. But I downgraded it for A12 version because graphics artefacts. I replaced DVD with optibay (1 tb hdd inside) I buy MSATA to SATA for my Toshiba Msata SSD 128 Gb For OS X. CPU - Intel Core i3-3110M @ 2400MHz Chipset - Intel Panther point QM77 (Ivy Bridge) GPU - Intel HD Graphics 4000 [8086:0166] (MB GT2) Screen - AU Optronics B140XW01 (Dell GJ475) [14" LCD] 1366x768 Sound - IDT 92HD93BXX - HDAUDIO\FUNC_01&VEN_111D&DEV_76DF&SUBSYS_10280534&REV_1002 WiFi - Broadcom BCM94322MC a/b/g/n 2x2 MIMO 2.4 + 5 GHz 150-300 Mbit/s Lan - Intel 82579LM Gigabit Network Connection Card reader - O2Micro OZ600F/OZ900F Integrated MMC/SD Controller WWAN - Dell Wireless 5630 (EVDO-HSPA) Mobile Broadband Mini-Card (Composite WWAN Device) HDD0 - Toshiba THNSNH128GMTC 500/450 Mb Read/Write HDD1 - WDC WD10JPVT-24A1YT0 USB - USB 3.0 by Intel Bios Revision A12 After a few days I got this stuff working with clover. CPU, Chipset, GPU, WiFi, Lan, Card Reader, Hdd's, USB3. I need help with this stuff: battery, camera, WWAN. Reports: oleksii’s MacBook Pro.ioreg.zip 000_2016-01-11_11-52-43_MacBookPro9,2.zip

-
i am using dell E5420 i3 2nd generation 4 gb ram all working perfect except trackpad plz help me. OS X 10.10.1
-
 There is a lot of Graphics Problems with the DELL Latitude E6220. There seems to be a lot of dashes and marks on the screen when you boot up with the Extra Folder from this website. I think there is a problem with the DSDT file.
 -
Hi, I have a Dell Latitude E7440 with i4300 (i5 processor with Intel 4400) 1920x1080 display, 256GB SSD. Currently using a USB wifi, and on A15 BIOS. In my search for the best tutorial, I've tried the Clover Method, with the tutorial from here and attempted EDP. With all the tutorials out there, it makes it challenging for a newbie to figure out what is best, or where to start. That being said, I see EDP, MyHack, Clover, Chameleon... What really is the best way? Can someone break down the 4 or 5 methods, and explain why one would choose one over the other? It seems like Clover makes the most sense from what I've tried, but not so sure, as I've had my own issues getting things up and running. I'm currently sort of up using Clover with the tutorial from here, but my Graphics is unaccelerated and some sleep issues with audio.. Running Yosemite 10.10.4. Also it's not so clear, do the boot packs have everything you need for 10.10.4, or do you need to apply patches for each to get up to date (eg. apply 10.10.1, then stuff for 10.10.2, etc.) Thanks!
-
I'm currently trying to fully enable the graphics on my Latitude E5520 with HD3000 Graphics. I cannot seem to find the right Framebuffer Kext to enable QE/CI and it's becoming quite frustrating. I'm new to the whole Hackintosh thing so please excuse my ignorance. Any help would be greatly appreciated. Here are my system specs: CPU:Intel Core i5-2520M CPU @ 2.50GHz Chipset: Intel HM65 (Sandy Bridge) Memory:4 GB 1333 MHz DDR3l Graphics: Intel HD3000 (FHD 1920x1080) Let me know what other info I might need to provide. Thanks
-
Hi guys! Im recently new to hackintoshing, one of my friends turned me to this website when i bought a used dell latitude and wanted to turn it into a hackintosh! Just a couple questions about how to do it, since i dont have much access to a mac, is it possible to create a boot installer with USB a different way? and If so could anyone recommend one to use. I read the fourm about how to install it, ive tried using Yosemite-Zones .dmg with no luck i cant get it to boot, and when i get it to the Apple loading screen with the progress bar it loads about halfway and then gets stuck. So i thought about making a new installer following the instructions on this webpage, it looked simple enough! Thanks guys, any comments are welcome!
-
Hi, Wondering if anyone has a Dell Latitude D420 bootpack for Snow Leopard 10.6.3 around, I'm struggling to find one. Many thanks.
-
Hi, I've used the installation guide here: http://www.osxlatitude.com/edp/documentation/on my latitude d420 however once it boots and starts the loading process it hangs on the grey apply screen with OSX LATITUDE logo on. Trying with OS X Lion. I also could not find a bootpack for a d420 so tried with a d620. If anyone could help with this installation that would be great thank you.
-
I recently followed a MyHack tutorial that enabled me to fully boot and run OSX 10.9.5 to my satisfaction, albeit one issue. The problem is I have no Audio over my HDMI connection as my monitor has built in speakers. The strange thing is that i will occasionally get a very brief moment of audio just after boot or when cycling through outputs under the 'System Prefferences > Sound > Output' Section, not just a random sound either, if i open itunes and play a song ill get a moment of audio before it cuts back off. (volume greyed out) Which leads me to believe that audio over HDMI is possible with some changes/Modification. I am using an Nvidia Geforce 8400 gs in my build as the built in graphics in the dell inspiron 530s are incompatible. I am running OSX 10.9.5, and I should note that when i go to 'System Prefferences > Sound > Output' i have the following output options listed: -Digital-out (HDMI) -Digital-out (HDMI) -Digital-out (HDMI) -Digital-out (HDMI) -line-out (Green Rear) -Headphones (Green Front) None of the 'Digital-out' Options listed output sound through my HDMI connection. Any and all help would be appreciated as getting audio to work over HDMI is the one step away from a fully functional build. I will supply any information/pictures as requested about the build. I should also note that this is my first build and that i am, by no means what-so-ever, a professional.
-
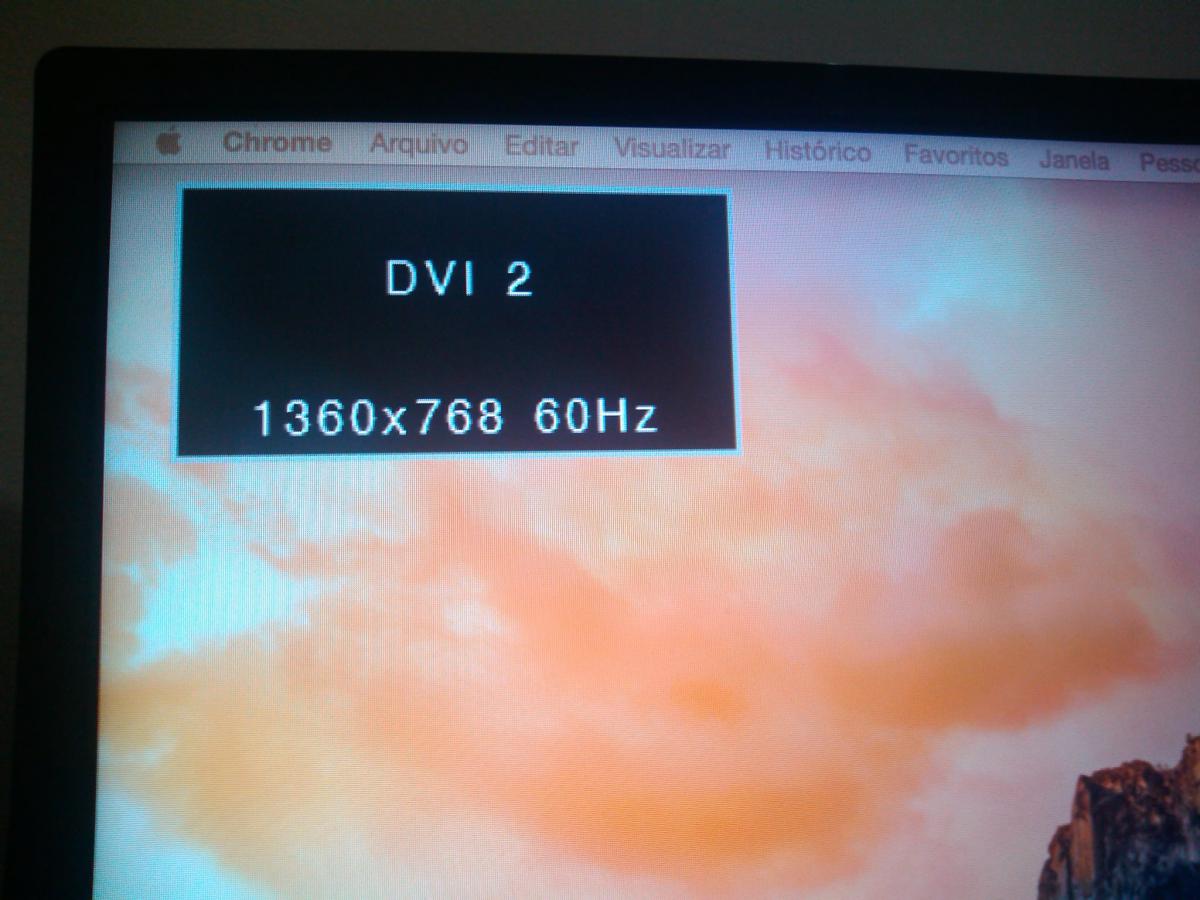
 Good night guys. I have a problem in Yosemite 10.10.2 in my HDMI output, when I connect the Win 8.1 or the Mavericks who had before that instação displayed HDMI on TV now only displays as DVI, HDMI before the audio did not work because I was using VoodooHDA more now that I could configure my AppleHDA for Conexant 20672 SmartAudio HD'm having this problem with HDMI and can not even test if my external audio is working: Detail that before did not apply at Clover Patch for my HDMI work, just installed the AppleIntelFramebufferCapri that comes in the latest Vietnam Tool and it worked using the Mavericks already in need Yosemite apply this patch and the screen is half buggy when you start your Mac with connected HDMI cable: Patch HDMI-DP port HD4000 1600x900 Name: AppleIntelFramebufferCapri Find: 040066010103010100000002 Replace: 040066010102040200000004 Find: 300200000000000001000000400000000000000001000000400000000000000001000000400000000000000000000000 Replace: 300200000205000000040000070400000304000000040000810000000406000000080000060000000000000000020011 It works just like DVI. Already tested several HDMI cables and give the same problem, you may change this Patch solve most do not know what to change it. MY SETTINGS: Dell Inspiron 15r SE 7520 CPU: i7 3632QM 2.2 / 3.2 RAM: 8GB DDR3 1600mhz GPU: HD 4000 2GB (1920x1080 internal LCD) / AMD Radeon 7730m 2GB (I can not turn, but it does not know if you can use it as a discrete GPU al I disabled via DSDT) Sorry my english. Thanks.
-
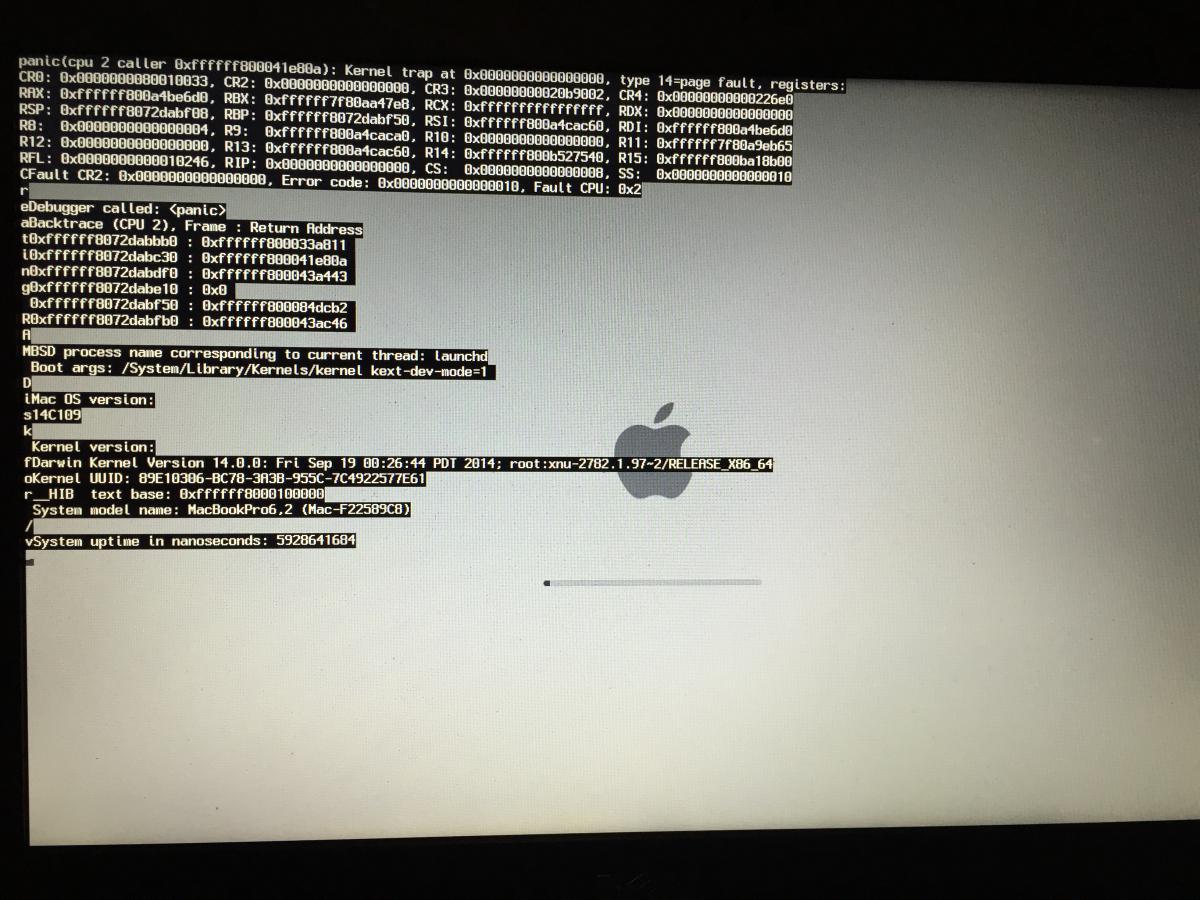
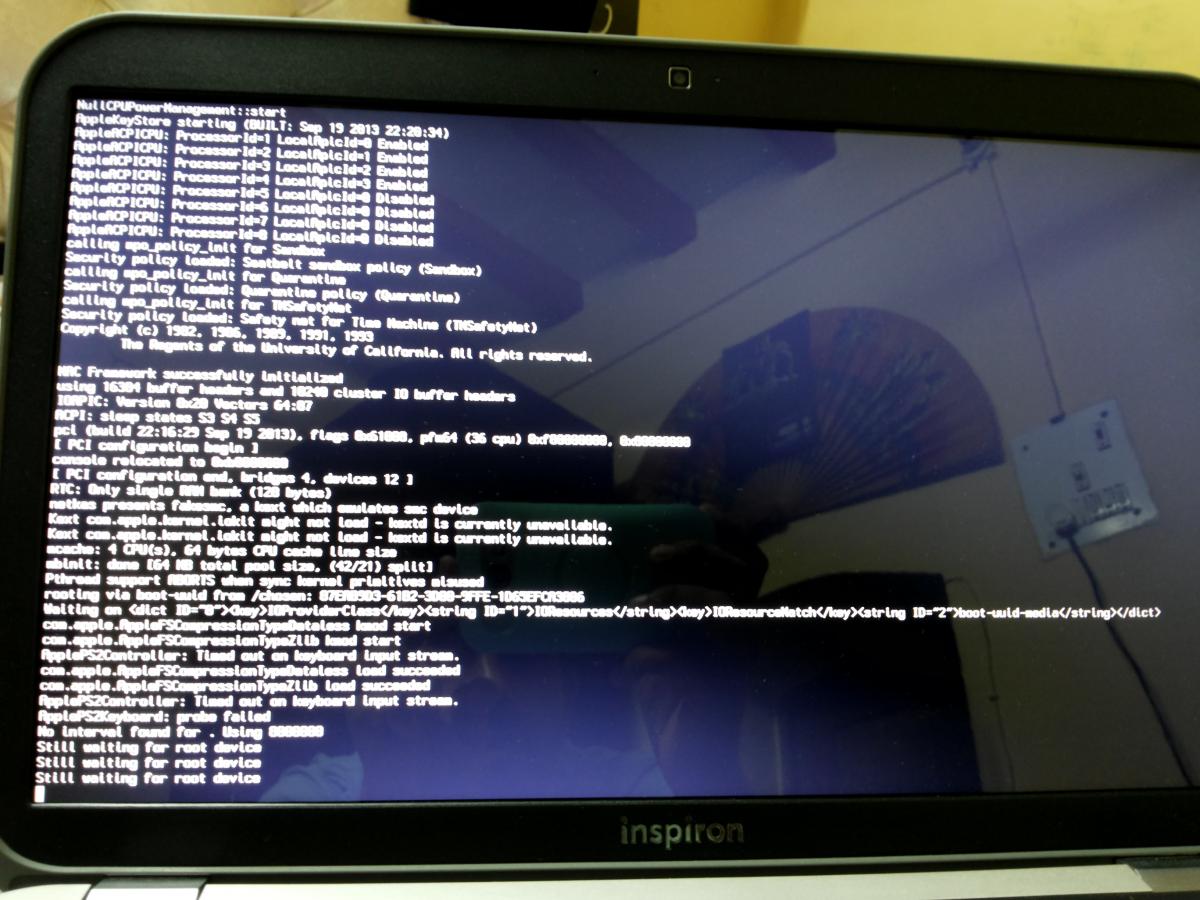
While following https://osxlatitude.com/index.php?/topic/7376-dell-latitude-e6410-yosemite-nvidiaintel/I encountered the following error (see attached). Please let me know how i can fix this
-
Has anyone ever encountered or fixed an issue on some Dell notebook (internal) keyboard which cause the super (windows/command) key to not function properly? I have experienced this on a handful of devices now and it's more than slightly frustrating. When I alter a key-press with command it just inserts foreign characters (ie Command-Q is œ, or Command-W is ∑ ). I have tried the PS/2 keyboard fix int he hopes that this would perhaps have some impact, but it does not. I also tried re-mapping the keys, swapping Command and Control. The effect was the same, but with the control key. I have experienced this issue with both the regular Dell notebook keyboard and the expanded full notebook keyboard (with 10-key pad). This issue does not happen with external USB keyboards. Touchpad and Joystick seem to work as expected.
-
Hello, forum members. I have recently acquired a Dell Vostro A860 and wish to install OS X 10.7 or later i.e Mountain Lion, Mavericks. Specs are as follows: GPU: Intel GMA X3100 (GM965)​ (8086, 2a02) CPU: Intel Core 2 Duo T5470 1.60 GHZ RAM: 4GB LAN: Realtek PCIe FE Family Controller (RTL8103E) (10ec,8136) WLAN: BCM 4312 (14e4,4315) If anyone here has any info on installing any of the above operating systems on the portable, feel free to comment what you know. Thank you.
-
Hi Folks, I was able to get Yosemite up and running on my e6320 and wanted to start a thread to iron out the last few wrinkles and help others get started. If anyone has this laptop and/or can help with the final issues, it would be greatly appreciated. Working: -Ethernet -Sound -Graphics (Display Port via Dock, DVI via Dock, Internal Display) -Sleep -Function Buttons, Trackpad, Volume Keys etc -Wireless (swapped older macbook pro card in) -SD Card Reader (working with patched AppleSDXC) Not Working: -Webcam (This has never worked, i believe it may not ever work) -VGA Output -HDMI Output (HDMI screens are recognized, but will display fully blank) Not Tested: -HDMI Audio To create the installation media, I followed the guide here (summarized below) You will need an 8GB+ flash drive, and an existing OSX installation Open Disk Utility (/Applications/Utilities/Disk Utility) and Partition your flash drive as Master Boot Record, 1 Partition, HFS+ named "Yosemite". Download Install OS X Yosemite.app Right click on the installer (Found in /Applications) > show package contents Navigate to Contents/Shared Support and double click on the InstallESD.dmg (The .dmg should now mount and appear on your desktop) In the terminal issue the following command: open "/Volumes/OS X Install ESD/BaseSystem.dmg" Open Disk Utility and Restore the BaseSystem.dmg to your flash drive Issue the following commands in terminal: cp "/Volumes/OS X Install ESD/BaseSystem.dmg" /Volumes/Yosemite/ cp -a "/Volumes/OS X Install ESD/BaseSystem.chunklist" /Volumes/Yosemite/ rm /Volumes/Yosemite/System/Installation/Packages cp -a /Volumes/OS\ X\ Install\ ESD/Packages /Volumes/Yosemite/System/Installation/Packages Now install Clover to your USB drive. (download it from here) Selecting the options shown in the linked image: http://imgur.com/if2O3hQ Merge all the files in the attached zip into the "CLOVER" folder on your Flash drive (done via terminal command below, if you downloaded the zip to your Downloads folder) cp -R ~/Downloads/CLOVER/* /EFI/CLOVER/ Once you have completed the install, repeat the Clover install and Kext / DSDT copy over to your installed HDD. CLOVER.zip
-
Hello, I'm stuck after step 5 in this procedure . Screen is stucks on Apple logo. Do you have any idea? THX
-
Hi guys i bought this laptop recently.Can i hackintosh it? I would really love to.If it is possible please point me further into the right direction.Thanks in advance. Dell Vostro 2420 Laptop (2nd Gen Intel Core i3 2328M- 2GB RAM- 500GB HDD- Linux- Intel HD Graphics 3000) (Grey) Product Summary of Dell Vostro 2420 Laptop (2nd Gen Intel Core i3 2328M- 2GB RAM- 500GB HDD- Linux- Intel HD Graphics 3000) (Grey) Screen Size: 14-inch Weight: 2.19 kg Colour: Grey Hard Disk Capacity: 500GB Operating System: Linux RAM: 2GB Processor Name: 2nd Generation Intel Core i3 2328M SUPC: SDL780436508
-
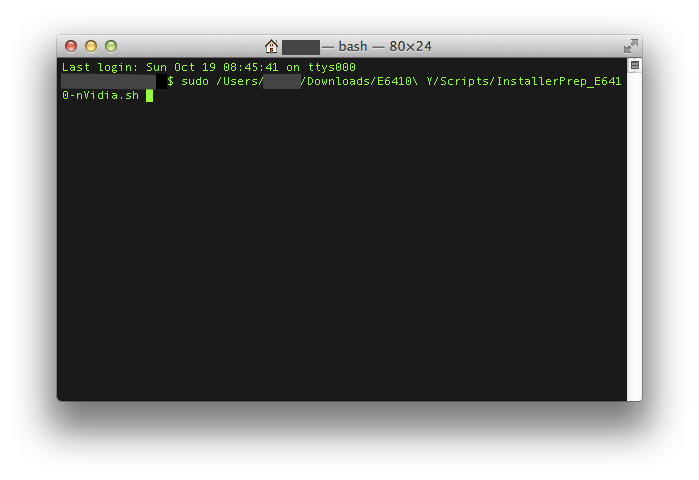
The Guide (DiskMaker X, Chameleon) Hello all, As of last night/this morning, I finally got my E6410 nVidia to work with OS X Yosemite! This is my third guide for the E6410 nVidia (the first one was on Mountain Lion, the second on Mavericks). Since myHack 4.0 is not ready yet, I have written this guide to use DiskMaker X, Chameleon 2.2 r2401, and a couple of shell scripts written by myself. Feel free to examine or modify the scripts to conform to your needs. If you do however, please note any changes you make so we can help you if you need it. If you experience any problems with the guide, please refer to the Troubleshooting section in Post #3. The machine I am working with is a Dell Latitude E6410 with nVidia graphics: 2.53 GHz Intel Core i5 4 GB 1067 MHz DDR3 NVS 3100M 512 MB BIOS version A14 What works: Webcam Trackpad & Nub (thanks to bpedman and yeahoon) Wifi - Dell 1510/Broadcom 4322 (thanks to Darvinko) Ethernet Graphics (1280x800; max resolution for my LCD) Bluetooth (thanks to alerphjuan) Two-Finger Scrolling with Trackpad SD Card Reader Audio What doesn't work: Sleep iMessage/FaceTime Before you begin: If you are new to this, please first read about what a hackintosh is and what creating/using/maintaing one entails (a simple google search for "hackintosh" worked for me) Read through this guide COMPLETELY before beginning This guide assumes that you have backed up all your data (if you need it) and are okay with erasing EVERYTHING on your hard drive I am not responsible if your laptop doesn't turn out as you'd hoped/expected (don't expect everything to work ) Although this guide may look long and daunting, it should only take about 1-3 hours (3.5 hours max). I tried to make it as quick and easy as I could If you have any questions/comments/concerns that you would like to share, please post them in the Help & Support -> Dell Systems -> Latitude E Series -> E6xxx -> E6410 (nVidia/Intel (depending on your graphics configuration)) - Yosemite Help Thread: http://forum.osxlati...forum/51-e6xxx/ If you have agreed with/done the above, you may proceed with the guide... You will need the following: A working Mac/Hackintosh A Dell Latitude E6410 with an nVidia NVS 3100M (the guide assumes you have the NVS 3100M Graphics Card, though it should still work with Intel Graphics, just without QE/CI, or full graphics accelleration), A12 (or greater) BIOS A hard drive that you are okay with erasing completely An 8 GB or greater flash drive that you are okay with erasing A copy of OS X Yosemite from the Mac App Store (It's free!) This zip file:E6410 Y.zip Patience, hope, and a pinch of faith in the guide Once you have those 7 things (the last one especially ), continue... Upgrade/Clean Installs and MBR Support: For those of you coming from any version of Mountain Lion/Mavericks that was previously installed on your E6410 using my old guide, you may skip Steps 19-28 if you would like to perform an "Upgrade" installation. Simply select the partition that you have Mountian Lion/Mavericks on and install. For those of you that never had OS X on your E6410 or those that just want to start fresh, you will need to perform a "Clean" install. Please read through the entire guide and complete all steps for the best results. Also, for those who have MBR Disks, you can install Yosemite by copying the OSInstall.frawework file from the MBR Support folder to "[iNSTALLER ROOT]/System/Library/PrivateFrameworks/" after you finish Creating the Installer. You may be prompted to Overwrite/put your password in. Select yes and input your password when prompted. Creating the Installer Make sure your Yosemite copy is in the Applications folder on your working Mac/Hackintosh Extract the E6410 Y.zip file that you downloaded above to a convenient location. No matter where you do it, just remember the location! Plug in your 8 GB or greater flash drive nowNOTE: If the drive doesn't show up on the desktop/in Finder, make sure it is partitioned/formatted as the following (you may use Disk Utility to do this): 1 Partition, GUID Partition Table, and Mac OSX Extended (Journaled) Open the E6410 M folder and then the Applications folder. Run DiskMaker X 4b4 by double-clicking it and "Open" if asked if you want to open it Click "Yosemite (10.10)" The program should find the copy of Yosemite in your Applications folder as long as you didn't rename it. If it did, click "Use this copy" and proceed. If it doesn't/finds a copy located somewhere else, click "Use another copy" and select the right one. Choose "An 8 GB USB thumb drive" and select the flash drive (NOTE: Make sure you select the correct one if you have more than one connected to your system; the application will erase the selected flash drive) You will then be warned about erasing the disk. If it is the right one, select "Erase then create the disk" Click "Continue" at the next promptNOTE: Try not to do/run any other applications while this is running. It opens windows and modifies things via the GUI. You may also miss certain prompts. If you do, the program has a tendency to timeout, causing you to re-run it and start over. After about a minute, you will receive a prompt to enter administrative credentials. Enter this here and click "Ok" The process will take 20-40 minutes depending on the computer/flash drive being used When it finishes, you will hear a "roar"... at this time click "Quit" to exit or "Make a donation" to support the creator Rename your flash drive to "E6410Y" by finding "Yosemite Install Disk - 10.10" in the Finder sidebar, right clicking it, and then selecting "Rename 'Yosemite Install Disk - 10.10'" Return to the Applications folder inside the E6410 Y folder. Run Chameleon-2.2svn-r2401 by double-clicking it. Click "Continue" (x3) Click "Agree" when prompted Click "Change Install Location ..." Select the E6410Y drive in the list and click "Continue" Next, click "Install" When prompted, enter your administrative password. After about 3-10 seconds, it should finish. Click "Close" when it does. Now, return to the E6410 Y folder and find Scripts. Open it, and find the InstallerPrep_E6410-nVidia.sh and InstallerPrep_E6410-Intel.sh. Keep this window open and move on to the next step. Open up Terminal (Spotlight search for it or navigate to /Applications/Utilities), type in "sudo[sPACE]" (without the quotes) and drag the correct version of the InstallerPrep shell script to the Terminal window. It should look something like this (for nVidia): NOTE: Your window will most likely look different then mine (black text, white background); I just have a different theme enabled. Hit the Enter/Return key and type in your password. You won't see each character show up, but once you're done, just hit Enter/Return and if you entered it correctly, the script will run. When it finishes, press any key to exit the script Eject the Drive and disconnect it from the machine Installation Plug your Installation flash drive into the E6410 Make sure your battery life is greater than 50% if you plan on not connecting to a power source Turn on the laptop and press F12 to enter the "One time boot menu..." Select "BIOS Setup" from the list by using the up and down arrow keys to scroll and the Enter button to select Click on "Load Defaults" and then OK At the warning (If you get one), click OK Then, expand the "System Configuration" settings (in the left pane) by clicking on the red "+" next to it Click on "SATA Operation" (also in the left pane) and select "AHCI" At the warning (If you get one), click OK Expand the "Virtualization Support" settings (in the left pane) Click on "Enable VT for Direct I/O" Uncheck "Enable VT for Direct I/O" Click on "Apply" in the bottom right and then "Exit" Turn the machine back on if it doesn't come up by itself and press F12 again to enter the "One time boot menu..." At the menu, select "USB Storage Device" When you reach the bootloader (the silver screen with different hard drives and flash drives on it), make sure the "E6410Y" is selected and wait for the computer to boot If you (and I) did everything right, the machine should boot up into the installer without a hitch (If it doesn't, refer to the Troubleshooting post below) Select your language and click on the arrow below to continueSTART SKIPPING STEPS HERE FOR UPGRADE INSTALLATIONS At the next screen, select "Utilities" from the menu bar on top Click on "Disk Utility" When it opens, select the hard drive (not the partition; you should see a "Partition" tab to the right; you won't see this if you've selected a partition) you are okay with erasing completely (again, make sure it's the right one) When you've verified you've selected the hard drive, navigate to the "Partition" tab (again, you won't see this if you selected a partition) Select "1 Partition" from the drop-down under "Partition Layout" (unless you're an advanced user; then you can select as many as you need/want) Then, next to "Format", select "Mac OS Extended (Journaled)" Give your partition a name (on a normal mac, the partition is normally labeled "Macintosh HD") Then click on "Options..." and make sure "GUID Partition Table" is selected; if it's not, select it Lastly, click on "Apply" When that finishes, hit Command+Q (or just click the red "X" in the top left of the window) You should now be at the Install OS X screen now; Click "Continue" and "Agree"STOP SKIPPING STEPS HERE FOR UPGRADE INSTALLATIONS Select the partition/disk you would like to install OS X to and click "Install" (and "Continue" if not connected to a power source) The process will take about 20-50 minutes If/when the machine reboots (you may have to hold down the power button to turn it off, and then press it again to turn it back on), press F12 again and boot from the "USB Storage Device" Press a key to interrupt the boot from USB, select the drive/partition on which you installed Yosemite and boot the OS Post Installation Proceed through the Setup process When you reach the Desktop, open up System Preferences and then Security & Privacy in the top row Click the little padlock in the bottom left of the window and enter your password Click the bubble next to "Anywhere" and then click "Allow From Anywhere" when prompted Close System Preferences and navigate to the E6410 Y folder on the flash drive Open up the Applications folder and then run Chameleon-2.2svn-r2401 Click "Continue" (x3) Click "Agree" when prompted Click "Change Install Location ..." if the drive currently selected is not the correct one. If it is, proceed to Step 11. Select the drive/partition you installed drive in the list and click "Continue" Next, click "Install" When prompted, enter your administrative password After about 3-10 seconds, it should finish. Click "Close" when it does. Now, return to the E6410 Y folder and find Scripts. Open Terminal and type "sudo[sPACE]" (without the quotes) and drag the correct version of the PostInstall shell script to the Terminal window. See the above picture... Hit the Enter/Return key and type in your password. You won't see each character show up, but once you're done, just hit Enter/Return and if you entered it correctly, the script will run. When it finishes, press any key to exit the script Eject the Drive and disconnect it from the machine Reboot You should see the bootloader now and it should begin loading Yosemite shortly. Enjoy OS X Yosemite on your E6410! Finally, I would like to thank everyone who has helped make this a possibility (Special thanks to Darvinko, Tengokuu, dafob, jebediah, alerphjuan, jansenspencer, roar2000, Dr. Monkey, and the everyone else over in the Mountain Lion and Mavericks Help threads), bpedman & yeahoon (for the trackpad/trackstick) as well as the creator of DiskMaker X. I couldn't have gotten this working without them. Remember: If you have any questions/comments/concerns that you would like to share, please post them in the Help & Support -> Dell Systems -> Latitude E Series -> E6xxx -> E6410 (nVidia/Intel (depending on your graphics configuration)) - Yosemite Help Thread: http://forum.osxlati...forum/51-e6xxx/
-
OK folks i have a nearly perfect osx 10.9.5 install. the only thing not working that i have found so far is my bluetooth. it says on it BCM92046 and M960G and shows as a USB device which is a Dell 370 but also shows as a bluetooth device: http://www.capital-remarketing.com/dell-latitude-e6500-bluetooth-wpan-wireless-card-m960g-p-409.html the problem is that the bluetooth on/off switches in the OS are greyed out and when i try to connect a device it forever tries to connect but never does., I am using the standard dell 1.2 bluetooth kext and it just isnt there. any suggestions, anyone who has had this problem or know what i need to do? i am thinking maybe i need to edit the info.plist or something like that? any help, i am at my wits end with this thing....its working but not quite working aaarrrggg?
-
My situation is really strange. I installed Windows 8.1 and Mavericks in one hard disk drive with three partitions, one for each operating system and one just for storage purpose. Since my wireless network card (BCM943142HM) is not usable in OS X, I bought a USB Wifi Adapter (TP-LINK TL-WN725N) so that I could access internet. But when I use a lot of internet bandwidth (downloading torrents) the computer freezes completely. So I decided to work heavy internet use in Windows and just specific tasks on OS X. I’ve been using my computer in this way for almost 8 months without any additional issues. But recently I found somewhere that in order to stop the random freezes caused by the high internet’s bandwidth use, I had to disable Spotlight. So I did it, but the freezes continued. However I noticed that I could use the computer for a longer period of time before it froze again. So here is the problem. Yesterday, after some of this freezes I restarted the computer and now it beeps 8 times while booting indicating a display problem according to Dell, and the display shows up like this while booting and in Windows: But inside OS X the screen turns off. When I perform the display test according to Dell (holding down the D key and then pressing the Power button to turn on the computer) it shows solid colours indicating that the display panel is working correctly. Right now I’m using an external monitor connected to the HDMI port which is working correctly in both operating systems. Inside OS X it’s like there is no display panel connected to the graphics adapter, and in Windows it detects the display panel as a generic monitor. I’m really concerned about this. I know this is not a common problem, so I would appreciate any help!
-
I successfully created a bootable USB with MyHack v3.3.1 and the extras for my e6500. The Dell correctly boots into the OSX setup for Mavericks, but does not see the internal HDD. Disk Utility runs, but also does not see the HDD. I have tried reformatting the HDD from a working Mac, both as exFAT with MBR and Mac Journaled with GUID. Makes no difference. What am I missing?
-
 Hi, I was trying to install Mavericks 10.9.0 in my Dell Inspiron 5520 but I am facing the same issue even after changing boot flags. I have used -v -f GraphicsEnabler=No Here is my PC configuration Intel Core i5 processor (i5-3210 M CPU 2.50GHz) 4GB RAM Intel HD 4000 and AMD 7670M video card Each time I am facing same error ...(attached in the image) Please somebody help me, I am stuck on this for long but no success... Thanks in advance
-
NOTE:Modetor/Admin feel free to move this post if it is on wrong place.Thanks Hello everyone,i am trying to install mavericks on my dell 3521 but so far no success at all.i have searched many places for the guide but no good results.so can any of you who have the same laptop as mine please help... someone said i needed the patched dsdt and ssdt but i am complete noob i tried but failed on virtualbox.please help me how to install + need to change my wiif card any cheap card suggestions. OVERVIEW Series Inspiron 15 Model Number 3521 PROCESSOR Processor Name Core i3 (3rd Generation) Variant 3217U Chipset Mobile HM76 Express Clock Speed 1.8 Ghz Cache Memory 3 MB DISPLAY Screen Size 15.6 inch Resolution 1366 x 768 Pixel Screen Type HD LED Display with True Life STORAGE Hard Disk Capacity 500 GB Hardware Interface SATA RPM 5400 MEMORY RAM 4 GB DDR3 Expandable Memory Upto 8 GB Memory Slots 2 (Unused Slot - 0) GRAPHICS Graphic Processor Intel HD Graphics 4000 hoping to get help from the biggest hackintosh community PS:i have dsdt.dsl + dsdt.aml in attachment which i got from ubuntu following a guide...what do i do with this???? thanks in ad. DSDT.zip
-
I have the Optiplex 760 USFF and have it set up with myHack and Mavericks 10.9.3. The only two issues are this: No sound have installed Vodoo HDA. Screen flickers when using Safari and Quicktime. Any help would be great. Optiplex 760 USFF Intel Core 2 (Intel Q43 Express) 4GB Memmory 1TB HD Audio device: Intel Corporation 82801JD/DO (ICH10 Family) HD Audio Controller VGA compatible controller: Intel Corporation 4 Series Chipset Integrated Graphics Controller Display controller: Intel Corporation 4 Series Chipset Integrated Graphics Controller
-
Hi all! Tell me pls, how to enable wifi on my dell inspiron n5050 with os x 10.9.*?
-
I was currently given a Dell E6440 that is no longer needed. I wasn't sure if there was a guide for this system yet. It runs an i5-4300m, Qualcom Wireless chipset, and intel GFX chip. I was looking to get a Hackintosh setup on it but since there doesn't seem to be much in the way of setting one up. I can install whatever OS may be needed in order to get information that the community may need to get this hardware working. Thanks!