Search the Community
Showing results for tags 'Clover'.
-
I am having problem with my lcd brightness value reset to full brightness on everyboot. I am running hackintosh High Sierra on a Lenovo x260. Clover is installed as UEFI only with rc scripts and using EMUVariable driver for nvram emulation. I can confirm nvram emulation is working from the nvram - p output of terminal as below. Right now, all values are retained such as volume level and other ids, except for the lcd brightness value. I am using AppleBacklightInjector kext for my lcd and patched ssdt. I am also attaching my config, kexts,ssd/dsdt in clover. Can anyone advice what should I do? fakesmc-key-BEMB-flag %01 fakesmc-key-RPlt-ch8* j130%00%00%00%00 fakesmc-key-RBr -ch8* 2016mb%00%00 EFILoginHiDPI %00%00%00%00 fakesmc-key-#KEY-ui32 %00%00%00%12 SystemAudioVolumeDB %ee fakesmc-key-BATP-flag %00 platform-uuid %cc%92%87d%d3-%b2%11%a8\%94g%ec%cf'%c0 fakesmc-key-MSTc-ui8 %00 EmuVariableUefiPresent Yes security-mode none fakesmc-key-BNum-ui8 %01 csr-active-config g%00%00%00 fakesmc-key-$Num-ui8 %01 fakesmc-key-MSFW-ui8 %01%00 fakesmc-key-MSPS-ui16 %00%03 fakesmc-key-REV -ch8* %026%0f%00%00%97 fmm-computer-name My%e2%80%99s MacBook Pro backlight-level %1c%00 bootercfg (%00 fakesmc-key-$Adr-ui32 %00%00%03%00 fakesmc-key-EPCI-ui32 %09 %f0%00 bluetoothActiveControllerInfo +%0a%87%80%00%00%00%00`%14%e4%a7%a0%0b%e1%94 fakesmc-key-MSAc-ui16 %00%00 fakesmc-key-MSLD-ui8 %00 SystemAudioVolume ? specialbootdevice %02%01%0c%00%d0A%03%0a%00%00%00%00%01%01%06%00%00%17%03%12%0a%00%01%00%00%00%00%00%04%01*%00%02%00%00%00(@%06%00%00%00%00%00%a8%f7=%09%00%00%00%00%84%8b[%c5%dd%10eA%8b%f5%ba%d1%b1%0ab%84%02%02%7f%ff%04%00 fakesmc-key-RMde-char A fakesmc-key-BBIN-ui8 %01 flagstate %00%00%00%00%00%00%00%00%00%00%00%00%00%00%00%00%00%00%00%00%00%00%00%00%00%00%00%00%00%00%00%00 fakesmc-key-MSWr-ui8 %00 CLOVER.zip
-
Hi, First let me thank everyone for all the guides, notes and contribution. Really thank you. Ok.. I have a Dell E6430 laptop. I changed the Wireless card for one compatible, and installed a 500GB SSD. I'm installing High Sierra. I followed the guide "Dell Latitude / Inspiron / Precision / XPS - Clover Guide" and all the installation process went perfect. I just go trouble to manage to start the mac OS without the Pendrive, but that's working now. Now my problem is the post installation. I followed the rest of the guide but for some reason it's not working. My issues are the following: USB Port not working. (This one is very weird, only the left usb port works. The right ones are not working) Sound is not working. Battery status not working. Webcam is not working. HDMI (not tested yet) VGA (not tested yet) So far my biggest concern is the USB and sound, . I used the E6430_A12.zip. Please find attached a copy of my EFI folder of the USB installer. The same content is in the EFI partition of the laptop. Any help will be truly appreciated. Thanks in advance CloverUSBContent.zip
-
i want to install El capitan or Yosemite on my laptop. Not sure which would perform better;sleep usb 3.0, hdmi ETC. Cannot find anything on this to guide, was only able to boot with chameleon and mavericks. I have installed clover builds on HP laptop, optiplex 760/780, vostro 220 Want this thread to help others with this laptop. Ready for a clover build, I can build the USB installer but doesn't boot to installer, instant reboots. Laptop specs: Intel i3-4010U 1.7GHz dual-core Haswell ULV CPU (no Turbo boost) Intel HD 4400 Graphics DW1560 wireless Can provide any other info, thanks in advance!
-
 My E6230 running High Sierra always recognized External drive on USB2.0 as internal disk. But the drive on the usb3.0 port was recognized correctly as external. How to fix this? External icon patch on AppleAHCIPort applied.
 -
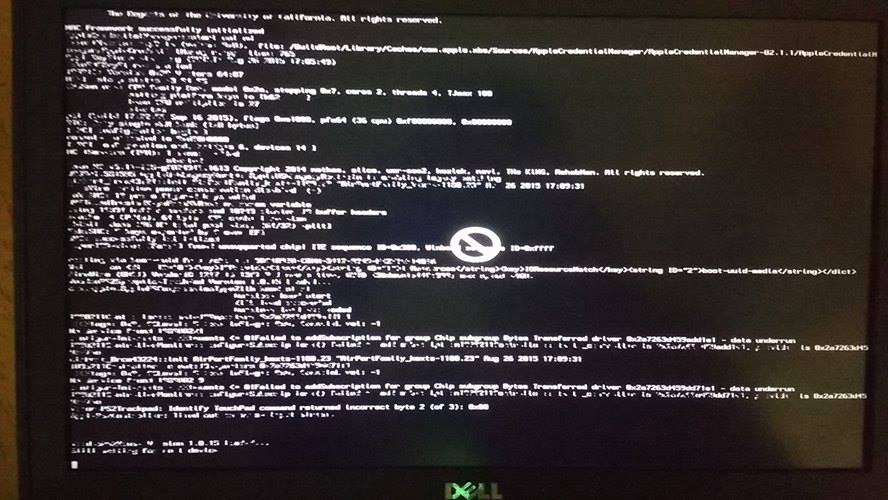
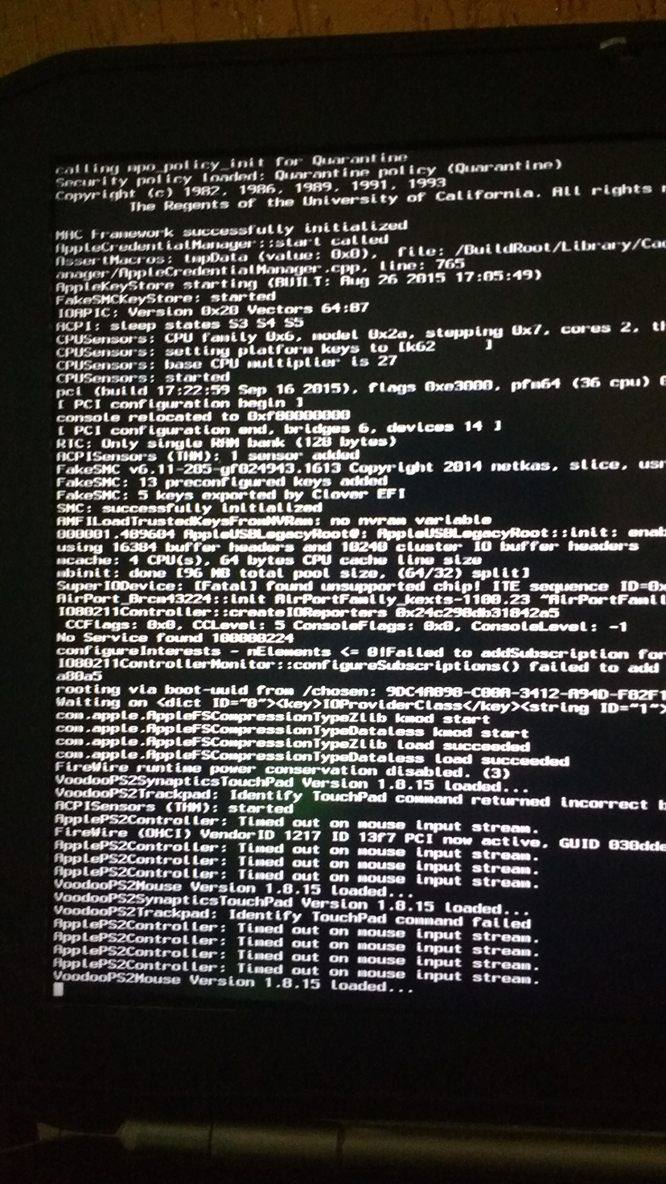
Hi, I'm trying to install macOS Sierra on an fujitsu siemens scaleo p2 g31t-m2. The system have a core 2 quad processor. (= Sandy Bridge) BEFORE: I had an version of snow leopard version 10.6.8 running on the system. I have the system OS upgraded to el capitan on following method. I have el capitan installation file downloaded from the mac app store and an bootable USB stick. I inject NVIDEA. The system I can install with using the following bootflags: dart=0 nv_disable=1 (-x) -v After the installation completed is I have the Clover bootloader installed on the HDD from https://sourceforge.net/projects/cloverefiboot (chameleon, stolen and rebranded)/. The systems was perfectly updated to OS X El Capitan and can now boot without my USB connected and works smoothly. CURRENT: Now I'm trying to update the system to macOS Sierra. I have again an bootable USB stick, again selected for the options usb, sierra and inject nvidea. So far all good.... But now i want to boot from my sierra USB with the same bootflags as before "dart=0 nv_disable=1 (-x) -v" but i can't get to the installation screen. the screen hangs on the apple logo or when i used the bootflag -v the screen hangs on line 1 with plus signs. (see attached picture). How can I solve that problem, so I can install macOS Sierra ? Is it possible for my system/configuration ? Thanks in advance Regards,
-
macOS Sierra seems to run quite well on these notebook, with Clover botloader, and also with Cameleon. All seems to work well except USB 3, and Nvidia 540M. I opened this topic, in the hopes that those, with same laptop (hardware) as mine or like to give their opinion about this build here, about a potential fuctionalitate and rectifications. I forgot to mention that webcam its upside-down! EFI Asus N73SV 2017.zip

-
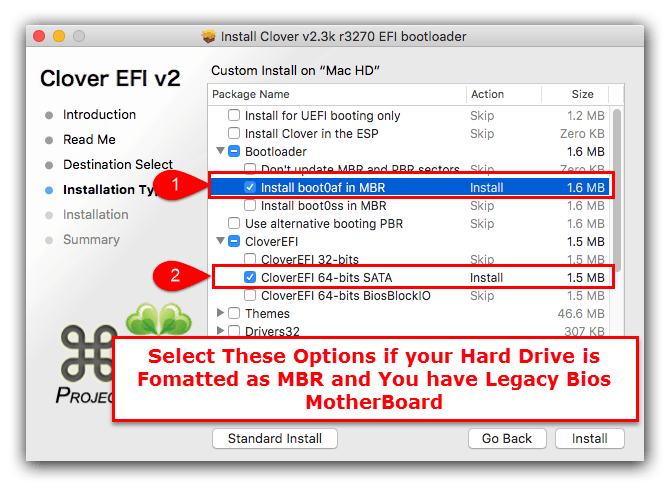
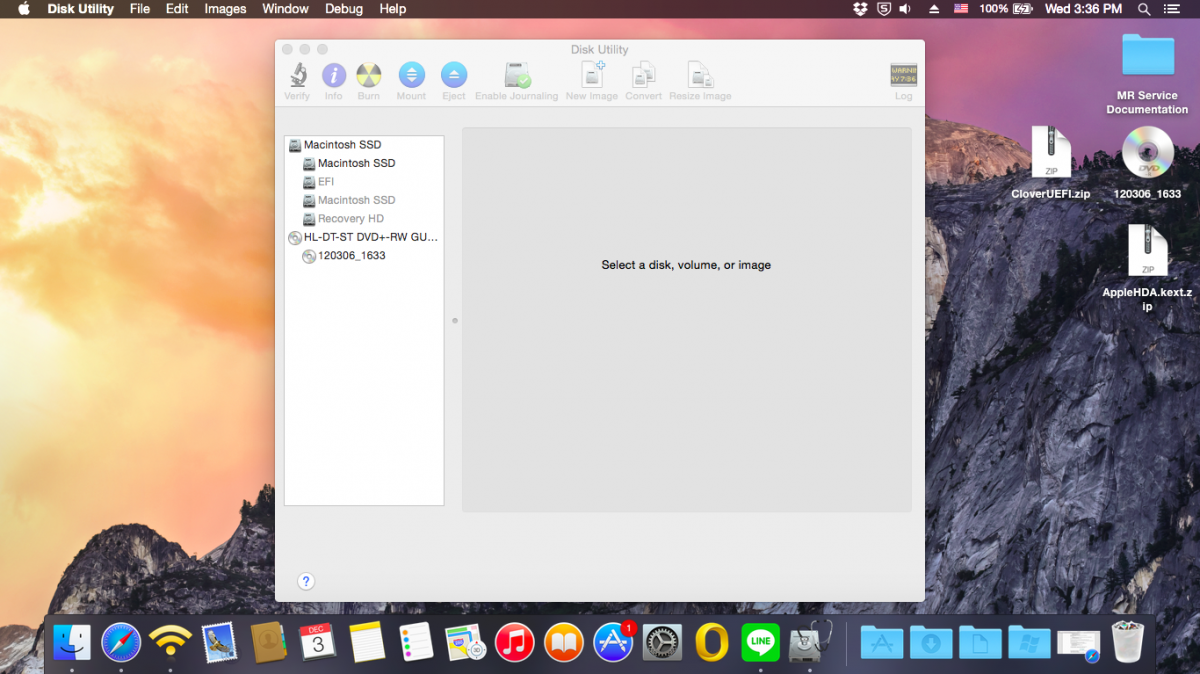
Hello, I'd like to contribute to the forum and I have decided to write a detailed guide how I installed macOS Sierra 10.12.1 on my E6220 with Core-i7 2620m, HD3000, 8GB RAM, 128GB SSD. I have received few personal messages for help, although there’s a perfect Enoch guide by Herve: https://osxlatitude.com/index.php?/topic/7914-dell-latitude-e6220-with-i5-2520m-hd3000-and-1366x768-lcd-mavericksyosemiteel-capitansierra/ and excellent generic El Capitan guide by Jake Lo: https://osxlatitude.com/index.php?/topic/8506-dell-latitude-inspiron-precision-el-capitan-clover-guide/ I will follow Jake’s guide, but I will add more stuff and this guide will be useful for all Sandy bridge E6x20 Many thanks to all OS X latitude forum members, who helped me when I was very new to OS X. Let’s start. You need: 1. E6220 2. 8GB USB or bigger 3. Access to real mac to create install USB or if you have Windows/Linux you can use a virtual machine using virtualbox or vmmare You should update your BIOS to A13 and set it to the following settings : https://osxlatitude.com/index.php?/topic/8281-e6220-bios-settings/ Download macOS Sierra from Apple store. Prepare USB using the following instructions: 1: Prepare Bootable USB Drive This step extracts the OS X Installer contents, then installs Clover bootloader to the USB stick. 1. Insert the USB drive on a running OS X system 2. Open /Applications/Utilities/Disk Utility 3. Highlight the USB drive in left column 4. Click on the Partition tab 5. Click Current and choose 1 Partition 6. Click Options... 7. Choose GUID Partition Table 8. Under Name: type USB (You can rename it later) 9. Under Format: choose Mac OS Extended (Journaled) 10. Click Apply then Partition 11. Go to Applications, right click on “Install macOS Sierraâ€/Show Package Contents/Contents/ SharedSupport 12. Mount InstallESD.dmg 13. Launch ShowHiddenFiles and select “Show Special Files†( app attached at the end of guide) 14. Mount BaseSystem.dmg (hidden) from “OS X Install ESD†15. Use Disk Utility to restore “OS X Base System†to USB (see image below) 16. After restore is complete, USB is now renamed to “OS X Base Systemâ€. Go ahead and rename it to “Install macOS Sierra†17. Go to “Install macOS Sierraâ€/System/Installation and delete the alias “Packagesâ€. 18. Copy “Packages†from root of “OS X Install ESD†to “Install macOS Sierraâ€/System/Installation 19. Copy BaseSystem.dmg and BaseSystem.chunklist (hidden files) from “OS X Install ESD†to root of “Install macOS Sierra†20. Launch ShowHiddenFiles and select “Hide Special Files†21. Download Clover EFI boot loader 22. Open Clover package installer 23. Hit Continue, Continue, Change Install Location... 25. Choose “Install macOS Sierra†26. Hit Continue, then hit Customize. Select these items: • Install Clover in the ESP • Bootloader/Install boot0af in MBR • CloverEFI/CloverEFI 64-bits SATA You can also select a Clover theme. 27. Click Install 28. After installation of Clover, the hidden EFI Partition will appear on the Desktop Now you will need to browse the EFI partition and put the necessary files in the correct locations: DSDT.aml and ssdt.aml should be copied to EFI partition and folders CLOVER->ACPI->patched Important note: if you have different CPU and you use my ssdt.aml - you will get kernel panic. If you have i5-2520M which seems to be the most common - you can get ssdt.aml from the files provided in Herve’s guide - https://osxlatitude.com/index.php?/topic/7914-dell-latitude-e6220-with-i5-2520m-hd3000-and-1366x768-lcd-mavericksyosemiteel-capitansierra/ If you have another CPU - then don’t use ssdt.aml and find NullCPUPowerManagement.kext, which should be added along with the other kexts. As of this writing, I do not know which is the latest such kext working OK with Sierra. If someone is ready to provide it - I can add it to the post. You can use a shell script ssdtPRGen.sh to generate ssdt.aml for your CPU after the install. The script is provided in the Tools zip to this post. You might want to google for a newer version. Kexts should go to EFI/CLOVER/kexts/10.12/ config.plist goes to EFI/CLOVER/ Please use Clover Configurator to generate a new serial. Just start Clover Configurator - File - Open - select config.plist from EFI/CLOVER/ and open it. Then SMBIOS from the left-hand list and click the magic wand and select first laptop picture and from the menu Macbook Pro 8,2 or 8,1 if you have the i5 processor. You can choose year of manufacture and click the buttons ‘shake’ to get different serials generated. When done - click File - Save. Now you can reboot computer and start the installation. You can press F12 before boot and choose USB. If you get kernel panic - one common reason would be if you have empty DIMM A slot, and only 1 RAM stick in DIMM B. Move the RAM to DIMM A and try again. For a new installation of macOS, you MUST erase and format the destination drive according to the following steps before continuing. a. From the menu bar, click Utilities -> Choose Disk Utility b. Highlight your target hard drive for the macOS installation in left column. c. Click Erase tab d. Under Scheme: GUID Partition Map e. Under Name: type Macintosh SSD (You can rename it later) f. Under Format: choose Mac OS Extended (Journaled) g. Click Erase h. Click on Partition Tab to add more partition if you prefer i. Close Disk Utility Click Continue, Continue, Agree Select Macintosh SSD, or name of your existing drive, where you want to install macOS and click Continue Upon completion, system will restart Press the F12 to choose boot device Choose <Your USB Installer device> When Clover boot screen appears, choose Macintosh SSD or name of your existing drive The system will boot into the new drive, and complete the installation… Launch the terminal and enter the following command diskutil list If you something about virtual drive like this: /dev/disk1 (internal, virtual): Please enter the below command if you have only one disk and you are not setting up dual-booting: diskutil cs revert /dev/disk1 Otherwise you have to find out which is the correct ending number from the data you see from “diskutil listâ€. Then create a folder and mount EFI partition: sudo mkdir /Volumes/efi sudo mount -t msdos /dev/disk0s1 /Volumes/efi Now it’s the time to run Clover installer and install on your HDD/SSD in a similar way like when preparing the USB, however please select couple of more options: • Install Clover in the ESP • Bootloader/Install boot0af in MBR • CloverEFI/CloverEFI 64-bits SATA • Install RC scripts on target volume • Install Clover Preference Panel Copy DSDT, SSDT, kexts and config.plist to the EFI partition of your HDD. You can use EFI mounter if for some reason - it is not mounted after Clover install. Now let’s fix the audio: Copy AppleHDA_IDT92HD90.kext to /Library/Extensions Copy AppleHDA.kext to /System/Library/Extensions Repair permission and rebuild cache. Run command from terminal sudo chmod -Rf 755 /L*/E* sudo chown -Rf 0:0 /L*/E* sudo touch -f /L*/E* sudo chmod -Rf 755 /S*/L*/E* sudo chown -Rf 0:0 /S*/L*/E* sudo touch -f /S*/L*/E* sudo kextcache -Boot -U / Make sure to disable hibernation as it's a prerequisite to get sleep & wake to work Ok on a Hackintosh: • sudo pmset hibernatemode 0 • sudo rm -f /var/vm/sleepimage • sudo pmset hibernatefile /dev/null Remove USB and reboot. You system should start fine, but you might notice that if you tap on the touchpad - it does not click. Moreover, Trackpad preference panel may not load. This is easily fixed by deleting: /System/Library/PreferencePanes/Trackpad.prefPane and replacing it with a Trackpad panel from El capitan. Link to download: http://www.megafileupload.com/85j1/Trackpad.prefPane.zip I still had a persisting problem that whatever I set in Trackpad preferences - it’s not saved after reboot, so I used Dr. Hurt's app - Touchpad Settings.app , which I copied to the Applications folder and allowed access from System Preferences - Security & Privacy - Accessibility - Allow the apps below to control your computer and I added Touchpad settings. I really hope that this will be very helpful to people new to hackintoshing and have Sandy Bridge models E6x20. PS. I may have missed something and fix it later. More stuff could be added later, or improve formatting. Feel free to criticize me and point out if I am doing something the wrong way English is not my native language, but I think I have provided clear enough explanations. Tools.zip E6220-i7 2620m.zip
-
Hey Folks! Ive got a Lenovo Ideapad System, ive installed sierra 10.12 and it went great but id researched the HD 5500 Graphics and it requires you to change the DVMT Allocation, mine was pre allocated with 128MB of VRAM. I tried to Chage the DVMT using an EFI Shell and the command "setup_var 0x18C 0x3" Which would change the dvmt from 128MB to 96MB but the BIOS' are locked so i cant do that instead I checked for patching methods, I changed the Binaries of the AppleIntelBDWGraphicsFramebuffer Kext I replaced "8945C839C7764F" with "8945C839C7EB4F" and added the MatchOS for 10.12, after that I also set the platform ID to 0x16260002 and then rebooted. It Partially worked as in Verbose mode there were several lines about the IGPU saying it was registering Correctly and there was 3D Acceleration, so its working except it freezes/Hangs at these IGPU Lines and I cant see the login screen. Some others are saying they can see the Mouse and hear the keyboard typing (??????????) I don't see anything other than the Verbose Messages hanging at the IGPU Lines. Has anybody else had this issue and resolved it or any other methods other than Clover Kext Patching and Modifying the BIOS Physically or Via Software!? My Specs are: CPU: Intel Core i3 5005u GPU: Intel HD 5500 RAM: 8GB HDD: 500GB Hitachi Id be Super Super Grateful if anyone would help me out and try to fix this Issue without DVMT or BIOS Modding!
-
 Hello, I used Jake Lo’s El Capitan Latitude/Inspiron/Precision Clover Guide for installing on a Latitude E6230 (clover 3556). Replaced the DSDT from the bootpack with Jake Lo’s DSDT for correcting “instant wake†found elsewhere on this site. Everything is working perfectly. THANK YOU! Prior to this install I’ve used Chameleon on several desktops and a couple of Latitudes. The guides found on this site are always excellent = again Thank you. I see sip/crs is set at 0x67 in the config.plist which completely disables sip. Seems a bad idea to have sip totally disabled? Using Terminal on the mounted EFI partition, I changed the value 0x67 to 0x3 in EFI/EFI/CLOVER/config.plist. upon rebooting the error is “almost word for word†to below: OsxAptioFixDrv: Starting overrides for System\Library\CoreServices\boot.efi Using reloc block: yes, hibernate wake: no Error allocating 0x#### pages at 0x####... alloc type 2 Error loading kernel cache (0x9) Boot failed, sleeping for 10 seconds before exiting... Yes, I do see this error under the Trouble Shooting section, but I have 2 4gb DIMMS… am I missing something here? Also used Clover Configurator to change to 0x3 and just got reboot Question: is it possible to run with clover at crs 0x3? and if yes how? Is it a matter of rebuilding the kernel cache or placing some/all of the kexts in S/L/E or what? Any help much appreciated.
 -
https://osxlatitude.com/index.php?/topic/6721-dell-inspiron-3x375x377x37-clover-install-guide/ this looks great.... backing up windows partition and will give it a blast on the 7737
-
Model: Dell E6220 i7-2620m, 8GB ram, Intel HD 3000 I'm currently following pafkata's guide on running sierra on my e6220 using clover: https://osxlatitude.com/index.php?/topic/9383-dell-e6220-i7-2620m-clover-detailed-guide/ Everything works until the very end of the macOS installer where I get the error "building boot caches on boot helper partition failed". I have tried booting into the SSD anyway but get a boot0af error. Does anyone know how I can resolve this issue? (P.S this is the first time installing Mac on this laptop) Thank you.
-
 This is a guide on how to install Yosemite on a Dell Latitude E5440 (2014 version) with Intel HD 4400 Graphics, i5 Processor and Clover UEFI as bootloader. Special thanks to Herve, JakeLo, serotizm, and nguyenmac which provided a very useful guide and which this guide takes a lot of info from: Requirements: - Yosemite App downloaded to /Applications directory on your mac - CloverUEFI.zip files located on attachments below - AppleHDA.kext.zip located on attachments below USB Installer Preparation: 1. Prepare a USB with 8GB or more, format by Disk Utility: - Partition Layout: 2 Partitions - 1st Partition: Name CLOVER, Format: MS-DOS (FAT), Size: >300MB - 2nd Partition: Name MacUSB, Format: Mac OS Extended (Journaled), Size: >7GB - Options: Master Boot Record - Download the CloverUEFI.zip files and copy the whole directory into the CLOVER partition in your USB. 2. Create Yosemite Installer partition (need a Mac), - Download Yosemite Install app from AppStore. - Enable Hidden Files to be shown by opening up a terminal and running the following command: defaults write com.apple.finder AppleShowAllFiles YES - Hold 'alt' on your keyboard, then right click on the Finder icon in the dock and click Relaunch. - Right click to Yosemite Install app > Show Package Contents > Contents > Shared Support and open InstallESD.dmg - Open OS X Install ESD partition, open BaseSystem.dmg (hidden file) - Use Disk Utility to clone OS X Base System to MacUSB partition. - Rename the newly created/restored "OS X Base System" partition in your USB to "Install OS X Yosemite" - Go to System/Installation of "Install OS X Yosemite" and delete the alias “Packagesâ€, then go to “OS X Install ESD†partition, copy the “Packages†folder to System/Installation of "Install OS X Yosemite" - Copy BaseSystem.dmg and BaseSystem.chunklist (hidden files) from "OS X Install ESD" to "Install OS X Yosemite" (on your USB) You can hide the hidden files again in your mac by running the following command from a terminal window and relaunching Finder: defaults write com.apple.finder AppleShowAllFiles NO BIOS Preparation - Enable UEFI Boot Option - Set SATA to AHCI - Disable Legacy Boot Option - Disable "Wake on LAN" - Make sure Data Execution Prevention is enabled - Plug your USB to the laptop Yosemite Installation - Upon turning the laptop on, press F12 to enter the one-time boot up menu - Choose to boot from your USB - Once Clover Boot Menu appears, choose "Boot OS X from Install OS X Yosemite" and press enter. Already the config.plist supplied on the zip file is configured with the boot-arguments that worked for me. - Press spacebar if a nagging screen about Mouse/keyboard appears. Install screen will appear, use Disk Utility to format your drive as GPT, create a Mac OS X Extended (Journaled) partition and install Yosemite to your formatted partition. - Restart once the installation finishes - Boot from your USB again. - Once in the Clover Boot Menu, PRESS F4, and then select to boot from the partition you created and installed OS X on the previous steps. - If all is good and the force is strong with you, it should boot up. Now you can create your account and configure the settings. Post Installation For this part we will install the Clover Bootloader on the hard drive where Yosemite is installed, and since the USB you used worked to boot up, its best to use these same files for the permanent bootloader. - Open a Terminal window a run the following command: diskutil list and then take note of the IDENTIFIER of the EFI partition from the main hard drive where Yosemite is installed, and run the following command: newfs_msdos -v EFI -F 32 /dev/rIDENTIFIER using the IDENTIFIER from your EFI Partition. Don't forget the "r" before your IDENTIFIER - Make sure Disk Utility is closed - Open a Terminal Window and run the following command: defaults write com.apple.DiskUtility DUDebugMenuEnabled 1 - Open Disk Utility - You will now see a "Debug" menu in the top menu option - Enable the "Show every Partition" option - Now on the list of partitions you will see an "EFI" Partition under your main hard drive. Right click on it and choose to mount it. - Go to the EFI partition we just mounted and copy all the contents of your CLOVER partition to the root of the EFI partition. - Remove your USB and reboot. - You should now be able to see the Clover Menu without having the USB on your computer. Before selecting to boot up from your partition, PRESS F4 (only this time is needed...), and select your partition and press ENTER. - Yosemite should boot up now. Hope this helps!! Best Regards, jorgexgb AppleHDA.kext.zip CloverUEFI.zip
-
I am totally new to the world of hackintosh. I want to get El Capitan on my Latitude e6510 because OS X is needed for many of the things I do but I dont have the money for a macbook. I managed to get clover on a flash drive and boot to clover but I cant boot to OS X. it just shows a circle with a line through it. Ive heard this is because the config settings are wrong. I found the config file and tried editing it with what I thought it should be. No luck. The settings I found online are for the e6410 but supposedly work for the e6510 (just chang resolution to 1920x1080). These are the settings Can someone explain this all this like i'm five or attach a modified config file with all of these settings?
-
Dell XPS 13 L322x El Capitan Clover Guide First of all I'd like to thank Jake Lo and Vlad Ichimescu for sharing their work with me and help me to put this together. Requirements: 1. A downloaded OS X El Capitan Application from the Mac App Store 2. USB flash drive (8GB minimum) 3. A system running OS X to create the USB Installer Overview 1. Prepare a Bootable USB Drive (8GB minimum) 2. Install OS X El Capitan 3. Post Installation Working: Full QE/CI (HD 4000) Keyboard and mouse (multitouch) Audio Webcam Sleep/Wake/Shutdown/Restart USB 3.0 WiFi (replaced Intel Card with DW1510) ** Originally-fitted Wi-Fi and Bluetooth may not work in which case you'll need to replace your card. Since I don't use bluetooth at all, I've replace mine with DW1510 ** 1: Prepare Bootable USB Drive To create the installation disk, follow tutorial below steps "1 - Download OS X El Capitan" and "2 - Create a bootable USB" Tutorial 2: Install OS X El Capitan 1. Turn on the computer with the USB Installer connected 2. Press F2 to configure the BIOS Sata Operaton -> AHCI Secure Boot -> Disabled Boot List Option -> UEFI. Enable Legacy Option Rom Apply and Exit 3. Hit F12 during boot, choose <Your USB Installer device> under UEFI Boot: 4. When Clover boot screen appears, choose Install OS X El Capitan 5. The system will then boot into the OS X Installer 6. Choose your language and hit -> to continue 7. For a new installation of OS X, you MUST erase and format the destination drive according to the following steps before continuing. a. From the menu bar, click Utilities -> Choose Disk Utility b. Highlight your target hard drive for the El Capitan installation in left column. c. Click Erase tab d. Under Scheme: GUID Partition Map e. Under Name: type Macintosh SSD (You can rename it later) f. Under Format: choose Mac OS Extended (Journaled) g. Click Erase h. Click on Partition Tab to add more partition if you prefer i. Close Disk Utility 8. Click Continue, Continue, Agree 9. Select Macintosh SSD, or name of your existing drive, where you want to install El Capitan and click Continue 10. Upon completion, system will restart 11. Press the F12 to choose boot device 12. Choose <Your USB Installer device> under UEFI Boot: 13. When Clover boot screen appears, choose Macintosh SSD or the name of your existing drive 3: Post-Installation Install Clover loader to Macintosh SSD 1. Open Clover package installer 2. Hit Continue, Continue, Change Install Location... 3. Choose “Macintosh SSD†4. Hit Continue, then hit Customize. Select these items: Install for UEFI booting only Install Clover in the ESP Drivers64UEFI\OsxAptioFixDrv-64 Install RC scripts on target volume Install Clover Preference Pane 5. Launch EFI-Mounter v3, select the disk you have OS X installed on (ie. disk0s1) - app attached below 6. Extract attached CLOVER.zip and copy CLOVER folder to /EFI **(replace not merge)** 7. Download KextUtility 8. Extract attached Kexts.zip and drag its content onto KextUtility 9. Restart your computer and boot without cache Restart When you see Clover boot loader icons, press space over your Macintosh SSD Choose "Boot without cache" option 10. Open KextUtility and let it Repair permission and rebuild cache 11. Restart and you're done. This guide will work versions 10.11.1 through 10.11.6 Kexts.zip EFI Mounter v3.app.zip CLOVER.zip
-
Hello, i want to add a custom entry to clover because Clover doesn't recognize centOS, what i've tried is this: At Clover Configurator>Gui>Custom Entries, i've added an entry -In Volume field i've tried puting these 3 ways: EFI, disk0s1, and UUID, but got no result -In path i've tried these two paths:"/EFI/centos/grubx64.efi" , "EFI/centos/grubx64.efi" , "\EFI\centos\grubx64.efi" but no result -In Type i've tried: Linux, LinuxKernel, LinuxKernelNew, but no result -In VolumeType i've tried: Internal so... i don't know what to do... Here's my boot.log 0:100 0:100 MemLog inited, TSC freq: 2394451304 0:100 0:000 0:100 0:000 Now is 28.1.2015, 23:22:36 (GMT+2047) 0:100 0:000 Starting Clover rev 3128 on INSYDE Corp. EFI 0:100 0:000 SelfDevicePath=PciRoot(0x0)\Pci(0x1F,0x2)\Sata(0x5,0x0,0x0)\HD(1,GPT,41601219-82B4-4AE5-840E-A92B5A37A80B,0x28,0xFA7D8) @715B4318 0:100 0:000 SelfDirPath = \EFI\CLOVER 0:100 0:000 Total Memory Slots Count = 4 0:100 0:000 Type 17 Index = 0 0:100 0:000 Table has error information, checking 0:100 0:000 Found memory information in table 18/0, type=0x3, operation=0x2 syndrome=0x0 0:100 0:000 ...memory OK 0:100 0:000 SmbiosTable.Type17->Speed = 1600MHz 0:100 0:000 SmbiosTable.Type17->Size = 4096MB 0:100 0:000 SmbiosTable.Type17->Bank/Device = BANK 0 DIMM0 0:100 0:000 Type 17 Index = 1 0:100 0:000 Ignoring insane frequency value 0MHz 0:100 0:000 SmbiosTable.Type17->Speed = 0MHz 0:100 0:000 SmbiosTable.Type17->Size = 0MB 0:100 0:000 SmbiosTable.Type17->Bank/Device = BANK 1 DIMM1 0:100 0:000 Type 17 Index = 2 0:100 0:000 Table has error information, checking 0:100 0:000 Found memory information in table 18/1, type=0x3, operation=0x2 syndrome=0x0 0:100 0:000 ...memory OK 0:100 0:000 SmbiosTable.Type17->Speed = 1600MHz 0:100 0:000 SmbiosTable.Type17->Size = 4096MB 0:100 0:000 SmbiosTable.Type17->Bank/Device = BANK 2 DIMM2 0:100 0:000 Type 17 Index = 3 0:100 0:000 Ignoring insane frequency value 0MHz 0:100 0:000 SmbiosTable.Type17->Speed = 0MHz 0:100 0:000 SmbiosTable.Type17->Size = 0MB 0:100 0:000 SmbiosTable.Type17->Bank/Device = BANK 3 DIMM3 0:100 0:000 Boot status=0 0:100 0:000 Clover revision: 3128 running on 20216 0:100 0:000 ... with board VIQY0Y1 0:100 0:000 Clover load options size = 68 bytes 0:100 0:000 Clover started with option to boot boot.efi from Install OS X Yosemite 0:112 0:012 Using OEM config.plist at path: EFI\CLOVER\config.plist 0:112 0:000 EFI\CLOVER\config.plist loaded: Success 0:120 0:008 Found theme directory: bluemac 0:124 0:003 Found theme directory: Mini-B 0:142 0:017 Found theme directory: YosemiteLogin 0:156 0:013 Found theme directory: Mini-G 0:164 0:008 Found theme directory: Mini-O 0:176 0:012 Found theme directory: Mavs Style-2 0:187 0:011 Found theme directory: Mavs Style 0:199 0:011 Loading early settings 0:199 0:000 timeout set to 5 0:199 0:000 Custom boot CUSTOM_BOOT_DISABLED (0x0) 0:199 0:000 ForceKextsToLoad: 1 requested 0:199 0:000 ForceKextsToLoad 0: System\Library\Extensions\IONetworkingFamily.kext 0:199 0:000 KextsToPatch: 6 requested 0:199 0:000 KextToPatch 0: disabled:AppleIntelFramebufferAzul (0x0a260006 9MB cursor bytes patch) Kext bin patch, data len: 20 0:199 0:000 KextToPatch 1: disabled:IOGraphicsFamily (Second Stage Patch 2) Kext bin patch, data len: 5 0:199 0:000 KextToPatch 2: disabled:IOGraphicsFamily (Second Stage Patch 1) Kext bin patch, data len: 5 0:199 0:000 KextToPatch 3: disabled:AppleIntelFramebufferAzul (HDMI-audio, port 0105, 0x0a260005 0x0a260006, 0x0d220003, 0x0a2e000a, 0x0a26000a) Kext bin patch, data len: 12 0:199 0:000 KextToPatch 4: disabled:AppleIntelFramebufferAzul (HDMI-audio, port 0204, 0x0a260005 0x0a260006) Kext bin patch, data len: 12 0:199 0:000 KextToPatch 5: disabled:IOAHCIBlockStorage (Enable TRIM for SSD) Kext bin patch, data len: 11 0:199 0:000 Default theme: YosemiteLogin 0:199 0:000 ** Warning: unknown custom entry Type 'Other' 0:199 0:000 Custom entry boot CUSTOM_BOOT_DISABLED (0x0) 0:199 0:000 ** Warning: unknown custom entry Type 'Other' 0:199 0:000 CustomEDID has wrong length=585 0:199 0:000 LoadDrivers() start 0:200 0:000 Loading EmuVariableUefi-64.efi status=Success 0:200 0:000 EmuVariableUefi Initialize: VariableCommonInitialize = Success, orig services stored, install gEmuVariableControlProtocolGuid = Success 0:200 0:000 Loading FSInject-64.efi status=Success 0:200 0:000 Loading OsxAptioFixDrv-64.efi status=Success 0:201 0:000 Loading OsxFatBinaryDrv-64.efi status=Success 0:201 0:000 Loading PartitionDxe-64.efi status=Success 0:201 0:000 - driver needs connecting 0:201 0:000 Loading HFSPlus.efi status=Success 0:212 0:010 - driver needs connecting 0:212 0:000 2 drivers needs connecting ... 0:212 0:000 PlatformDriverOverrideProtocol not found. Installing ... Success 0:212 0:000 Partition driver loaded: CD disconnect Success 0:212 0:000 HFS+ driver loaded 0:212 0:000 Searching for invalid DiskIo BY_DRIVER connects: not found, all ok 0:488 0:276 LoadDrivers() end 0:488 0:000 EmuVariable InstallEmulation: orig vars copied, emu.var.services installed, CreateEvent VirtualAddressChange = Success, CreateEvent ExitBootServices = Success, set Status=Success 0:503 0:015 SetMaxResolution: found best mode 0: 1366x768 0:503 0:000 - already set 0:503 0:000 Console modes reported: 5, available modes: 0:503 0:000 Mode 1: 80x25 0:503 0:000 Mode 3: 170x40 (current mode) 0:503 0:000 Mode 4: 100x31 0:503 0:000 Mode 5: 128x40 0:503 0:000 reinit: self device path=PciRoot(0x0)\Pci(0x1F,0x2)\Sata(0x5,0x0,0x0)\HD(1,GPT,41601219-82B4-4AE5-840E-A92B5A37A80B,0x28,0xFA7D8) 0:504 0:001 CPU Vendor = 756E6547 Model=306C3 0:504 0:000 The CPU supported turbo 0:504 0:000 BrandString = Intel(R) Core(TM) i7-4700MQ CPU @ 2.40GHz 0:504 0:000 MSR 0xE2 before patch 1E008405 0:504 0:000 MSR 0xE2 is locked, PM patches will be turned on 0:504 0:000 MSR 0xE4 00021814 0:504 0:000 MSR 0xCE 00080838_F3011800 0:504 0:000 non-usable FLEX_RATIO = 50000 0:504 0:000 corrected FLEX_RATIO = 40000 0:504 0:000 MSR 0x1B0 00000000 0:504 0:000 FSBFrequency=100MHz DMIvalue=100000kHz 0:504 0:000 Corrected FSBFrequency=100MHz 0:504 0:000 Vendor/Model/Stepping: 0x756E6547/0x3C/0x3 0:504 0:000 Family/ExtFamily: 0x6/0x0 0:504 0:000 MaxDiv/MinDiv: 24.0/8 0:504 0:000 Turbo: 32/32/33/34 0:504 0:000 Features: 0xBFEBFBFF 0:504 0:000 Threads: 8 0:504 0:000 Cores: 4 0:504 0:000 FSB: 100 MHz 0:504 0:000 CPU: 2400 MHz 0:504 0:000 TSC: 2400 MHz 0:504 0:000 PIS: 400 MHz 0:504 0:000 PCI (00|00:00.00) : 8086 0C04 class=060000 0:504 0:000 PCI (00|00:01.00) : 8086 0C01 class=060400 0:504 0:000 PCI (00|01:00.00) : 10DE 0FCD class=030000 0:504 0:000 Found NVidia model=Lenovo GeForce GT 755M 0:504 0:000 PCI (00|01:00.01) : FFFF FFFF class=FFFFFF 0:504 0:000 PCI (00|00:02.00) : 8086 0416 class=030000 0:504 0:000 Found GFX model=Intel HD Graphics 4600 0:504 0:000 PCI (00|00:03.00) : 8086 0C0C class=040300 0:504 0:000 PCI (00|00:14.00) : 8086 8C31 class=0C0330 0:504 0:000 PCI (00|00:16.00) : 8086 8C3A class=078000 0:504 0:000 PCI (00|00:1A.00) : 8086 8C2D class=0C0320 0:504 0:000 PCI (00|00:1B.00) : 8086 8C20 class=040300 0:504 0:000 PCI (00|00:1C.00) : 8086 8C16 class=060400 0:504 0:000 PCI (00|07:00.00) : 1969 10A1 class=020000 0:504 0:000 LAN 0, Vendor=1969, MMIO=C2500000 0:505 0:000 PCI (00|00:1C.04) : 8086 8C18 class=060400 0:505 0:000 PCI (00|08:00.00) : 8086 0888 class=028000 0:505 0:000 PCI (00|00:1D.00) : 8086 8C26 class=0C0320 0:505 0:000 PCI (00|00:1F.00) : 8086 8C49 class=060100 0:505 0:000 PCI (00|00:1F.02) : 8086 8C03 class=010601 0:505 0:000 PCI (00|00:1F.03) : 8086 8C22 class=0C0500 0:505 0:000 PCI (00|00:1F.06) : FFFF FFFF class=FFFFFF 0:505 0:000 MAC address of LAN #49= 28:D2:44:34:14:79: 0:505 0:000 MAC address of LAN #50= 28:D2:44:34:14:79: 0:505 0:000 MAC address of LAN #51= 28:D2:44:34:14:79: 0:505 0:000 MAC address of LAN #52= 28:D2:44:34:14:79: 0:505 0:000 ScanSPD() start 0:505 0:000 SMBus CmdReg: 0x3 0:505 0:000 Scanning SMBus [8086:8C22], mmio: 0xC2619004, ioport: 0x5040, hostc: 0x11 0:505 0:000 Slots to scan [8]... 0:519 0:014 SPD[0]: Type 11 @0x50 0:528 0:008 Not using XMP because it is not present 0:528 0:000 DDR speed 1600MHz 0:528 0:000 Slot: 0 Type 24 4096MB 1600MHz Vendor=Samsung PartNo=M471B5173QH0-YK0 SerialNo=01040400050A000F 0:548 0:020 SPD[2]: Type 11 @0x52 0:556 0:008 Not using XMP because it is not present 0:556 0:000 DDR speed 1600MHz 0:556 0:000 Slot: 2 Type 24 4096MB 1600MHz Vendor=Samsung PartNo=M471B5173QH0-YK0 SerialNo=01040400050A020C 0:586 0:030 ScanSPD() end 0:586 0:000 Get Acpi Tables List from RSDT: 0:586 0:000 Found table: FACP CB-01 len=268 0:586 0:000 Found table: SLIC CB-01 len=374 0:586 0:000 Found table: UEFI CB-01 len=566 0:586 0:000 Found table: FPDT CB-01 len=68 0:586 0:000 Found table: MSDM CB-01 len=85 0:586 0:000 Found table: ASF! CB-01 len=165 0:586 0:000 Found table: HPET CB-01 len=56 0:586 0:000 Found table: APIC CB-01 len=140 0:586 0:000 Found table: MCFG CB-01 len=60 0:586 0:000 Found table: SSDT CB-01 len=2104 0:586 0:000 Found table: BOOT CB-01 len=40 0:586 0:000 Found table: ASPT CB-01 len=52 0:586 0:000 Found table: DBGP CB-01 len=52 0:586 0:000 Found table: SSDT CB-01 len=1337 0:586 0:000 Found table: SSDT CB-01 len=2776 0:586 0:000 Found table: SSDT CB-01 len=12910 0:586 0:000 Found table: SSDT CB-01 len=14436 0:587 0:000 Found table: BGRT CB-01 len=56 0:587 0:000 Calibrated TSC frequency =2394451304 =2394MHz 0:587 0:000 Loading main settings 0:587 0:000 USB FixOwnership: true 0:587 0:000 Config set Fixes will override FixMask mask! 0:587 0:000 final mask=90000000 0:587 0:000 Config set PluginType=1 0:587 0:000 found 9 volumes with blockIO 0:587 0:000 0. Volume: 0:587 0:000 PciRoot(0x0)\Pci(0x1F,0x2)\Sata(0x5,0x0,0x0) 0:587 0:000 1. Volume: 0:587 0:000 PciRoot(0x0)\Pci(0x1F,0x2)\Sata(0x2,0x0,0x0) 0:587 0:000 found optical drive 0:587 0:000 2. Volume: 0:587 0:000 PciRoot(0x0)\Pci(0x1F,0x2)\Sata(0x5,0x0,0x0)\HD(1,GPT,41601219-82B4-4AE5-840E-A92B5A37A80B,0x28,0xFA7D8) 0:587 0:000 Result of bootcode detection: bootable unknown (legacy) 0:587 0:000 This is SelfVolume !! 0:587 0:000 3. Volume: 0:587 0:000 PciRoot(0x0)\Pci(0x1F,0x2)\Sata(0x5,0x0,0x0)\HD(2,GPT,FE749237-1478-46F2-88A5-CDC490ED10E2,0xFA800,0x14562800) 0:587 0:000 Result of bootcode detection: bootable Windows (vista,win) 0:587 0:000 4. Volume: 0:587 0:000 PciRoot(0x0)\Pci(0x1F,0x2)\Sata(0x5,0x0,0x0)\HD(3,GPT,12386CC1-E66D-416A-811E-A93D6BDB382B,0x1465D000,0xFA000) 0:587 0:000 5. Volume: 0:588 0:000 PciRoot(0x0)\Pci(0x1F,0x2)\Sata(0x5,0x0,0x0)\HD(4,GPT,EC087887-64CA-47C1-86AC-DE19EC3B82DA,0x14757000,0x144FC000) 0:588 0:000 6. Volume: 0:588 0:000 PciRoot(0x0)\Pci(0x1F,0x2)\Sata(0x5,0x0,0x0)\HD(5,GPT,A5A7418F-48B8-4EC5-BF1E-BE74ED11528A,0x28C53000,0x144C18E0) 0:588 0:000 7. Volume: 0:588 0:000 PciRoot(0x0)\Pci(0x1F,0x2)\Sata(0x5,0x0,0x0)\HD(6,GPT,DEB46B3D-48D6-4FAB-9590-4D92BC9BFC2C,0x3D1148E0,0x135F20) 0:588 0:000 8. Volume: 0:588 0:000 PciRoot(0x0)\Pci(0x1F,0x2)\Sata(0x5,0x0,0x0)\HD(7,GPT,70E6E3F3-5C70-437D-AEF3-99755ACADB96,0x3D24A800,0x374BC000) 0:588 0:000 Result of bootcode detection: bootable unknown (legacy) 0:608 0:019 Loading nvram.plist from Vol 'MAC' - loaded, size=703 0:618 0:009 PutNvramPlistToRtVars ... 0:618 0:000 Adding Key: Clover.Theme: Size = 13, Data: 59 6F 73 65 6D 69 74 65 4C 6F 67 69 6E 0:618 0:000 Skipping EmuVariableUefiPresent 0:618 0:000 Adding Key: LocationServicesEnabled: Size = 1, Data: 01 0:618 0:000 Skipping OsxAptioFixDrv-RelocBase 0:618 0:000 Adding Key: backlight-level: Size = 2, Data: FF FF 0:618 0:000 Adding Key: bluetoothActiveControllerInfo: Size = 16, Data: DA 07 87 80 00 00 00 00 70 14 00 C2 C6 0D FD 26 0:618 0:000 Adding Key: fmm-computer-name: Size = 24, Data: 4A 6F 6E 61 74 68 61 6E E2 80 99 73 20 4D 61 63 42 6F 6F 6B 20 50 72 6F 0:618 0:000 Adding Key: security-mode: String: Size = 4, Val = 'none' 0:618 0:000 Using theme 'YosemiteLogin' (EFI\CLOVER\themes\YosemiteLogin) 0:618 0:000 theme YosemiteLogin defined in NVRAM found and theme.plist parsed 0:618 0:000 OS main and drive as badge 0:635 0:017 font font.png loaded from themedir 0:636 0:000 Choosing theme YosemiteLogin 0:636 0:000 Custom entries start 0:636 0:000 Custom entry 0 skipped because it is disabled. 0:636 0:000 Custom entry 1 Title:"CentOS" Path:"/EFI/centos/grubx64.efi" Type:99 Flags:0x0 matching Volume:"/Volumes/EFI" 0:636 0:000 Checking volume "EFI" (PciRoot(0x0)\Pci(0x1F,0x2)\Sata(0x5,0x0,0x0)\HD(1,GPT,41601219-82B4-4AE5-840E-A92B5A37A80B,0x28,0xFA7D8)) ... skipped 0:636 0:000 Checking volume "MAC" (PciRoot(0x0)\Pci(0x1F,0x2)\Sata(0x5,0x0,0x0)\HD(5,GPT,A5A7418F-48B8-4EC5-BF1E-BE74ED11528A,0x28C53000,0x144C18E0)) ... skipped 0:636 0:000 Checking volume "Recovery HD" (PciRoot(0x0)\Pci(0x1F,0x2)\Sata(0x5,0x0,0x0)\HD(6,GPT,DEB46B3D-48D6-4FAB-9590-4D92BC9BFC2C,0x3D1148E0,0x135F20)) ... skipped 0:636 0:000 Custom entries finish 0:636 0:000 Scanning loaders... 0:636 0:000 0: 'Whole Disc Boot' no file system 0:636 0:000 1: 'Whole Disc Boot' no file system 0:636 0:000 2: 'EFI' 0:636 0:000 AddLoaderEntry for Volume Name=EFI 0:636 0:000 Not match custom entry 0: Type: not match 0:690 0:054 3: 'Legacy HD2' no file system 0:690 0:000 4: 'Legacy HD3' no file system 0:690 0:000 5: 'Legacy HD4' no file system 0:690 0:000 6: 'MAC' 0:740 0:050 AddLoaderEntry for Volume Name=MAC 0:740 0:000 Not match custom entry 0: Type: not match 0:784 0:043 Check if volume Is Hibernated: 0:784 0:000 Check sleep image 'by signature': 0:860 0:075 read prefs \Library\Preferences\SystemConfiguration\com.apple.PowerManagement.plist status=Success 0:860 0:000 SleepImage name from pref: ImageVolume = 'MAC', ImageName = '\private\var\vm\sleepimage' 0:882 0:022 Reading first 512 bytes of sleepimage ... 0:894 0:012 OurBlockIoRead: Lba=2A2933C8, Offset=5452679000 (BlockSize=512) 0:894 0:000 sig lion: 0 0:894 0:000 sig snow: 0 0:894 0:000 no valid sleep image offset was found 0:894 0:000 Reading completed -> Success 0:894 0:000 sleepimage offset could not be acquired 0:894 0:000 hibernated: no - sign 0:929 0:034 7: 'Recovery HD' 0:929 0:000 AddLoaderEntry for Volume Name=Recovery HD 0:929 0:000 Not match custom entry 0: Type: not match 0:954 0:024 8: 'Legacy HD7' no file system 0:954 0:000 Custom legacy start 0:954 0:000 Custom legacy end 0:954 0:000 Scanning legacy ... 0:954 0:000 0: 'Whole Disc Boot' (legacy) not legacy 0:954 0:000 1: 'Whole Disc Boot' (legacy) not legacy 0:954 0:000 2: 'EFI' (legacy) not legacy 0:954 0:000 3: 'Legacy HD2' (vista,win) add legacy 0:954 0:000 added 'Boot Windows from Legacy HD2' OSType=2 Icon=vista,win 0:954 0:000 4: 'Legacy HD3' (legacy) not legacy 0:954 0:000 5: 'Legacy HD4' (legacy) not legacy 0:954 0:000 6: 'MAC' (legacy) not legacy 0:954 0:000 7: 'Recovery HD' (legacy) not legacy 0:954 0:000 8: 'Legacy HD7' (legacy) not legacy 0:954 0:000 Custom tool start 0:954 0:000 Custom tool end 0:979 0:025 found tool \EFI\CLOVER\tools\Shell64U.efi 0:979 0:000 Checking EFI partition Volume 2 for Clover 0:979 0:000 Found Clover 0:980 0:000 EmuVariable UninstallEmulation: CloseEvent = Success, original var services restored 0:982 0:001 EmuVariable InstallEmulation: orig vars copied, emu.var.services installed, CreateEvent VirtualAddressChange = Success, CreateEvent ExitBootServices = Success, set Status=Success 0:997 0:015 GetEfiboot (chameleon, stolen and rebranded)DeviceFromNvram: efi-boot-device-data not found 0:997 0:000 Efiboot (chameleon, stolen and rebranded)Volume not found 0:997 0:000 Default boot entry not found 0:997 0:000 EmuVariable UninstallEmulation: CloseEvent = Success, original var services restored 0:997 0:000 DefaultIndex=-1 and MainMenu.EntryCount=10 0:997 0:000 banner file not read 1:279 0:282 GUI ready 25:740 24:461 Boot option Boot0000 not found 25:740 0:000 StartLoader() start 25:740 0:000 Finally: Bus=99768kHz CPU=2394MHz 25:740 0:000 Kernel and Kext Patches: 25:740 0:000 Allowed: y 25:740 0:000 Debug: n 25:740 0:000 KernelCpu: n 25:740 0:000 Lapic: y 25:740 0:000 AICPUPM: y 25:740 0:000 AppleRTC: y 25:740 0:000 KernelPm: y 25:740 0:000 FakeCPUID: 0x0 25:740 0:000 ATIController: <null string> 25:740 0:000 ATIDataLength: 0 25:740 0:000 1 Kexts to load 25:740 0:000 KextToLoad[0]: System\Library\Extensions\IONetworkingFamily.kext 25:740 0:000 6 Kexts to patch 25:740 0:000 KextPatch[0]: 20 bytes, disabled:AppleIntelFramebufferAzul 25:740 0:000 KextPatch[1]: 5 bytes, disabled:IOGraphicsFamily 25:740 0:000 KextPatch[2]: 5 bytes, disabled:IOGraphicsFamily 25:740 0:000 KextPatch[3]: 12 bytes, disabled:AppleIntelFramebufferAzul 25:740 0:000 KextPatch[4]: 12 bytes, disabled:AppleIntelFramebufferAzul 25:740 0:000 KextPatch[5]: 11 bytes, disabled:IOAHCIBlockStorage 25:740 0:000 Loading boot.efi status=Success 26:121 0:380 GetOSVersion: : 10.10.2 26:121 0:000 EmuVariable InstallEmulation: orig vars copied, emu.var.services installed, CreateEvent VirtualAddressChange = Success, CreateEvent ExitBootServices = Success, set Status=Success 26:137 0:015 insert table 9 for dev 0:0 26:137 0:000 insert table 9 for dev 0:0 26:137 0:000 insert table 9 for dev 0:0 26:137 0:000 Channels: 2 26:137 0:000 Interleave: 0 2 1 3 4 6 5 7 26:137 0:000 SMBIOS Type 17 Index = 0 => 0 0: 26:137 0:000 BANK0 DIMM0 1600MHz 4096MB 26:137 0:000 mTotalSystemMemory = 4096 26:137 0:000 SMBIOS Type 17 Index = 1 => 2 2: 26:137 0:000 BANK1 DIMM0 1600MHz 4096MB 26:137 0:000 mTotalSystemMemory = 8192 26:137 0:000 SMBIOS Type 17 Index = 2 => 1 1: 26:137 0:000 BANK0 DIMM1 EMPTY 26:137 0:000 SMBIOS Type 17 Index = 3 => 3 3: 26:137 0:000 BANK1 DIMM1 EMPTY 26:137 0:000 NumberOfMemoryDevices = 4 26:137 0:000 Type20[0]->End = 0x3FFFFF, Type17[0] = 0x1000 26:137 0:000 Type20[1]->End = 0x3FFFFF, Type17[1] = 0x3000 26:137 0:000 RSDT 0x8CFFE124 26:137 0:000 FADT from RSDT: 0x8CFF7000 26:137 0:000 XSDT 0x8CFFE210 26:137 0:000 FADT from XSDT: 0x8CFF7000 26:137 0:000 Xsdt reallocation done 26:137 0:000 old FADT length=10C 26:137 0:000 Found OperationRegion(GNVS, SystemMemory, 8CFBCA98, ...) 26:137 0:000 Found OperationRegion(OGNS, SystemMemory, 8CFBBF98, ...) 26:137 0:000 Found OperationRegion(MCHT, SystemMemory, FED10000, ...) 26:137 0:000 Found OperationRegion(RP_X, SystemMemory, 0, ...) 26:137 0:000 Found OperationRegion(MBAR, SystemMemory, 0, ...) 26:137 0:000 Found OperationRegion(RP_X, SystemMemory, 0, ...) 26:137 0:000 Found OperationRegion(PXVD, SystemMemory, 0, ...) 26:137 0:000 Found OperationRegion(MMMM, SystemMemory, 0, ...) 26:137 0:000 Found OperationRegion(PXVD, SystemMemory, 0, ...) 26:137 0:000 Found OperationRegion(PXVD, SystemMemory, 0, ...) 26:137 0:000 Found OperationRegion(MMMM, SystemMemory, 0, ...) 26:137 0:000 Found OperationRegion(RCRB, SystemMemory, FED1C000, ...) 26:137 0:000 Found OperationRegion(XHCP, SystemMemory, 0, ...) 26:137 0:000 Found OperationRegion(MCA1, SystemMemory, 8FA10000, ...) 26:137 0:000 Found OperationRegion(MCA1, SystemMemory, 8FA10000, ...) 26:137 0:000 Found OperationRegion(MDBG, SystemMemory, 8CFB8018, ...) 26:137 0:000 Found OperationRegion(COMP, SystemMemory, 8CFBEC98, ...) 26:137 0:000 Found OperationRegion(ECMM, SystemMemory, FF000000, ...) 26:137 0:000 Found OperationRegion(ECMP, SystemMemory, FF000000, ...) 26:153 0:015 Apply DsdtFixMask=0x90000000 new way 26:153 0:000 drop _DSM mask=0x0000 26:153 0:000 ========= Auto patch DSDT Starting ======== 26:153 0:000 VideoCard devID=0xFCD10DE 26:153 0:000 DisplayADR1[0] = 0x10000, DisplayADR2[0] = 0x0 26:153 0:000 VideoCard devID=0x4168086 26:153 0:000 DisplayADR1[1] = 0x20000, DisplayADR2[1] = 0xFFFE 26:153 0:000 USBADR[0] = 0x140000 and PCIe = 0xFFFE 26:153 0:000 USBADR[1] = 0x1A0000 and PCIe = 0xFFFE 26:153 0:000 USBADR[2] = 0x1D0000 and PCIe = 0xFFFE 26:153 0:000 first CPU found at 45CC offset 45D0 26:153 0:000 score candidate at 45C8 26:153 0:000 score inserted in acpi_cpu_score _PR_ 26:153 0:000 Found ACPI CPU: CPU0 And CPU1 And CPU2 And CPU3 And CPU4 And CPU5 And CPU6 And CPU7 within the score: _PR_ 26:154 0:000 Found PCIROOTUID = 0 26:154 0:000 OperationRegion (GNVS...) corrected to addr=0x8CFBCA98 26:154 0:000 OperationRegion (OGNS...) corrected to addr=0x8CFBBF98 26:154 0:000 OperationRegion (MCHT...) corrected to addr=0xFED10000 26:154 0:000 OperationRegion (RP_X...) corrected to addr=0x0 26:154 0:000 OperationRegion (MBAR...) corrected to addr=0x0 26:154 0:000 OperationRegion (RP_X...) corrected to addr=0x0 26:154 0:000 OperationRegion (PXVD...) corrected to addr=0x0 26:154 0:000 OperationRegion (MMMM...) corrected to addr=0x0 26:154 0:000 OperationRegion (PXVD...) corrected to addr=0x0 26:154 0:000 OperationRegion (PXVD...) corrected to addr=0x0 26:154 0:000 OperationRegion (MMMM...) corrected to addr=0x0 26:154 0:000 indirect name=SRCB 26:154 0:000 OperationRegion (RCRB...) corrected to addr=0xFED1C000 26:154 0:000 OperationRegion (XHCP...) corrected to addr=0x0 26:154 0:000 indirect name=SRMB 26:154 0:000 OperationRegion (MCA1...) corrected to addr=0x8FA10000 26:154 0:000 indirect name=SRMB 26:154 0:000 OperationRegion (MCA1...) corrected to addr=0x8FA10000 26:154 0:000 OperationRegion (MDBG...) corrected to addr=0x8CFB8018 26:154 0:000 OperationRegion (COMP...) corrected to addr=0x8CFBEC98 26:154 0:000 OperationRegion (ECMM...) corrected to addr=0xFF000000 26:154 0:000 OperationRegion (ECMP...) corrected to addr=0xFF000000 26:154 0:000 ========= Auto patch DSDT Finished ======== 26:154 0:000 Patch table: SSDT CB-01 26:154 0:000 SSDT len = 0x838 26:154 0:000 Patch table: SSDT CB-01 26:154 0:000 SSDT len = 0x539 26:154 0:000 Patch table: SSDT CB-01 26:154 0:000 SSDT len = 0xAD8 26:154 0:000 Patch table: SSDT CB-01 26:154 0:000 SSDT len = 0x326E 26:154 0:000 Patch table: SSDT CB-01 26:154 0:000 SSDT len = 0x3864 26:154 0:000 Drop tables from Xsdt, SIGN=XXXX TableID= Length=0 26:154 0:000 Xsdt has tables count=18 26:154 0:000 corrected XSDT length=180 26:154 0:000 CPUBase=0 and ApicCPUBase=1 ApicCPUNum=8 26:154 0:000 EdidDiscovered size=128 26:154 0:000 00 | 00 FF FF FF FF FF FF 00 30 E4 B3 03 00 00 00 00 26:154 0:000 16 | 00 16 01 03 80 1F 11 78 EA 4B B5 94 58 56 91 28 26:154 0:000 32 | 1F 50 54 00 00 00 01 01 01 01 01 01 01 01 01 01 26:154 0:000 48 | 01 01 01 01 01 01 12 1B 56 68 50 00 12 30 20 20 26:154 0:000 64 | 35 00 36 AE 10 00 00 19 00 00 00 00 00 00 00 00 26:154 0:000 80 | 00 00 00 00 00 00 00 00 00 00 00 00 00 FE 00 4C 26:154 0:000 96 | 47 20 44 69 73 70 6C 61 79 0A 20 20 00 00 00 FE 26:154 0:000 112 | 00 4C 50 31 34 30 57 48 32 2D 54 4C 53 31 00 21 26:154 0:000 NVidia GFX injection not set 26:154 0:000 Intel Intel HD Graphics 4600 [8086:0416] :: PciRoot(0x0)\Pci(0x2,0x0) 26:154 0:000 Intel GFX revision =0x6 26:154 0:000 HDA Controller [8086:0C0C] :: PciRoot(0x0)\Pci(0x3,0x0) => detected codec: 8086:2807 26:154 0:000 USB Controller [8086:8C31] :: PciRoot(0x0)\Pci(0x14,0x0) 26:154 0:000 USB Controller [8086:8C2D] :: PciRoot(0x0)\Pci(0x1A,0x0) 26:154 0:000 HDA Controller [8086:8C20] :: PciRoot(0x0)\Pci(0x1B,0x0) => detected codec: 10EC:0282 26:154 0:000 LAN Controller [1969:10A1] :: PciRoot(0x0)\Pci(0x1C,0x0)\Pci(0x0,0x0) 26:154 0:000 USB Controller [8086:8C26] :: PciRoot(0x0)\Pci(0x1D,0x0) 26:154 0:000 stringlength = 3246 26:154 0:000 CurrentMode: Width=1366 Height=768 26:154 0:000 FSInjection: using kexts path: 'EFI\CLOVER\kexts\Other' 26:158 0:003 MSR 0x1B0 set to 00000000 26:158 0:000 Force kext: System\Library\Extensions\IONetworkingFamily.kext 26:254 0:095 Force PlugIn kext: System\Library\Extensions\IONetworkingFamily.kext\Contents\PlugIns\AppleBCM5701Ethernet.kext 26:293 0:039 Force PlugIn kext: System\Library\Extensions\IONetworkingFamily.kext\Contents\PlugIns\AppleIntel8254XEthernet.kext 26:327 0:033 Force PlugIn kext: System\Library\Extensions\IONetworkingFamily.kext\Contents\PlugIns\AppleIntelI210Ethernet.kext 26:345 0:018 Force PlugIn kext: System\Library\Extensions\IONetworkingFamily.kext\Contents\PlugIns\AppleUSBEthernet.kext 26:365 0:019 Force PlugIn kext: System\Library\Extensions\IONetworkingFamily.kext\Contents\PlugIns\AppleUSBGigEthernet.kext 26:385 0:019 Force PlugIn kext: System\Library\Extensions\IONetworkingFamily.kext\Contents\PlugIns\AppleYukon2.kext 26:404 0:019 Force PlugIn kext: System\Library\Extensions\IONetworkingFamily.kext\Contents\PlugIns\Intel82574L.kext 26:431 0:026 Force PlugIn kext: System\Library\Extensions\IONetworkingFamily.kext\Contents\PlugIns\IOEthernetAVBController.kext 26:432 0:001 Force PlugIn kext: System\Library\Extensions\IONetworkingFamily.kext\Contents\PlugIns\mDNSOffloadUserClient.kext 26:455 0:022 Force PlugIn kext: System\Library\Extensions\IONetworkingFamily.kext\Contents\PlugIns\nvenet.kext 26:478 0:022 Preparing kexts injection for arch=x86_64 from EFI\CLOVER\kexts\Other 26:478 0:000 Extra kext: EFI\CLOVER\kexts\Other\AtherosE2200Ethernet.kext 26:494 0:016 Extra kext: EFI\CLOVER\kexts\Other\FakeSMC.kext 26:496 0:001 Extra PlugIn kext: EFI\CLOVER\kexts\Other\FakeSMC.kext\Contents\PlugIns\ACPISensors.kext 26:497 0:001 Extra PlugIn kext: EFI\CLOVER\kexts\Other\FakeSMC.kext\Contents\PlugIns\CPUSensors.kext 26:498 0:000 Extra PlugIn kext: EFI\CLOVER\kexts\Other\FakeSMC.kext\Contents\PlugIns\GPUSensors.kext 26:499 0:001 Extra PlugIn kext: EFI\CLOVER\kexts\Other\FakeSMC.kext\Contents\PlugIns\LPCSensors.kext 26:505 0:005 Extra kext: EFI\CLOVER\kexts\Other\VoodooPS2Controller.kext 26:506 0:001 Extra PlugIn kext: EFI\CLOVER\kexts\Other\VoodooPS2Controller.kext\Contents\PlugIns\VoodooPS2Keyboard.kext 26:509 0:003 Extra PlugIn kext: EFI\CLOVER\kexts\Other\VoodooPS2Controller.kext\Contents\PlugIns\VoodooPS2Mouse.kext 26:511 0:001 Extra PlugIn kext: EFI\CLOVER\kexts\Other\VoodooPS2Controller.kext\Contents\PlugIns\VoodooPS2Trackpad.kext 26:513 0:002 Extra kext: EFI\CLOVER\kexts\Other\FakePCIID_HD4600_HD4400.kext 26:514 0:000 Extra kext: EFI\CLOVER\kexts\Other\FakePCIID_Intel_HDMI_Audio.kext 26:514 0:000 Extra kext: EFI\CLOVER\kexts\Other\FakePCIID.kext 26:515 0:000 Extra kext: EFI\CLOVER\kexts\Other\VoodooHDA.kext 26:519 0:003 Extra kext: EFI\CLOVER\kexts\Other\ACPIBatteryManager.kext 26:525 0:005 Removed efi-boot-device-data variable: Not Found 26:525 0:000 Custom boot is disabled 26:525 0:000 Closing log
-
Netflix works well on my Apple Macbook without installing any additional plugins and search results regarding the issue are very unhelpful. Did this issue come about a mistake I made throughout the install process or could it be that my device lacks certain component support (e.g. drivers, software, etc.)? These issues occur while using Safari on El Capitan. The error code I receive while attempting to play Netflix content is S7381-1204. Also, I never receive a prompt when a website attempts to access my microphone or camera making it impossible to use the requested device(s).
-
Hello! I have installed El Capitan in my E6420 following Jake Lo's "Dell Latitude / Inspiron El Capitan Clover Guide". (used E6220 bootpack). I still have to fine-tune installation but I have one doubt regarding Clover boot: Why I can only boot legacy? Even enabling UEFI in BIOS I can´t see UEFI boot entry after pressing F12.... My plans are to dual boot Windows 10, so partition must be GPT pure... Thx
- 20 replies
-
- 1
-

-
- E6420
- El Capitan
- (and 1 more)
-
I had already installed one time the mavericks is about 5 months and today I decided to try to install el captain, infelimente had trouble climbing the installation. Can someone help me?
-
How could I install Clover on a HDD or SSD via legacy mode without the installer (the manual way)? Is that possible? I have an EFI folder already.
-
First off, thanks for providing this amazing resource ladies and gentlemen. It's much appreciated! I'm a long time Linux user and am taking my first step into installing OS X onto older hardware. I've run into some difficulty and am hoping for some pointers. I have a Dell E6420, A21 BIOS, i5-2540M CPU, 4GB RAM, Intel HD3000 graphics, 1600x900 Resolution, 250GB SSD. I followed the wonderful instructions in the following post using the E6220 boot pack: https://osxlatitude.com/index.php?/topic/8506-dell-latitude-inspiron-el-capitan-clover-guide/ However, I get stuck at one of two places: 1) With the stock + E6220 boot pack I get a kernel panic with message "pmLock: waited too long". 2) If I add NullCPUPM kext then I get a black screen that slowly turns all white. I did try to add DualLink into the Clover config. I've been trying different things from the forums, but with less success. I still have yet to see an installer screen. I do appreciate whatever time you can spare to help me get up to speed. I apologize If I'm missing something obvious, but this is all pretty new to me.
-
Hello, i have successfully installed Windows 8.1 + Linux CentOS 7 + OS X Yosemite on a single HDD of my laptop, but now i'm facing a problem... after i installed OS X i installed clover to the HDD partition where OS X was installed i didn't get the boot loader when rebooting, i still get centOS GRUB2 menu, i can only boot in OS X when using the usb. How do i set Clover over Grub2 ?, do i have to delete grub2 boot loader? Other problem i'm facing is that Clover doesn't recognise CentOS in the boot menu... how do i add it?
-
 Got Yosemite installed with everything working on my E5420. Swapped wifi for a DW1510 and used an E5x20 bootpack I found on the forum here. The system boots fine using Clover from my install USB, but not from the hard drive. I have copied the EFI folder from the USB to the FAT32 formatted ESP on my hard drive. Went into BIOS (version A14), switched boot mode to UEFI, and added boot entry for Cloverx64.efi. upon reboot, the laptop boots into Clover just fine, even using the theme i selected, but no bootable partitions are detected. I have Hfsplus.efi in the drivers64UEFI folder, and the whole EFI/Clover folder structure is identical to the one on my USB, which works. Any ideas what could be causing this issue?
 -
Hello everyone, is there any magic way to improve battery life on hackintosh? (e7440 on 10.10.3). On windows I'm getting about 6-7 hours of battery life on hackintosh its one and half. Is it possible to make a energy profile ?
-
I am glad to introduce my successful bootpack for a Latitude E5520 Could be used for E5420 too. My configuration : dell Latitude E5520 i3-2310M 2.1GHz, 4Gb Graphics HD3000 LCD 1920x1080 Not working : SDcard (not event tested) boot UEFI (buggy Dell firmware) Working : boot UEFI Everything else: display, VGA and HDMI/sound outputs, HDA sound, buttons, trackpad, multitouch, sleep, battery monitor, speedstep,... Wifi (OOB using a replacement DW1510 / BCM94322HM8L) Use any retail/clover installation guide. Install Clover on the disk and copy the EFI from this kit (merging mode). Upgrade to 10.10.x with combo update. Copy the few kexts from EFI/CLOVER/OEM/Latitude E5520/kexts/Others/ to /S/L/E/ as usual. Custom EDID and slide=0 options added to Clover's config.plist to get rid of the HD3000 artifacts. Thanks to this forum and many contributors here and there. Good hack E5520-kit.zip Edit: guess what ? I could add entries for UEFI boot with an EFI partition formatted with FAT16 ! Incredible, the last Dell firmware do not recognise FAT32 ! You need to reformat the EFI partition : sudo newfs_msdos -v EFI -F 16 /dev/rdiskXs1 Reboot OSX, mount EFI , copy EFI folder into. Reboot again and hit F2 to enter bios setup. Add an entry into UEFI boot menu (name OSX or anything, path to EFI/BOOT/BOOTX64.EFI. Edit2: remaining minor issues. No logo and no verbose log on screen during UEFI boot. I use CustomLogo option in config.plist as a workaround. No variables from NVRAM after UEFI reboot. EmuVariablesUefi-64.efi does not work (crash on boot). No way to deactivate Bluetooth (grey biutton) The known patch to inject DW375 device (413c:8187/16700:33159) in a plugin in IOBluetoothFamily.kext doesn't correct the problem. No functionnal MIC (internal or jack). Works once but not after unplug/plug (use VoodooHDA to solve the pb). Edit3: Adding OsxAptioFixDrv-64.efi in Drivers64UEFI solved many issues. No more artifacts/glitches, no CustomEDID needed, no slide=0 param, Apple boot logo OK. NVRAM is now persistent. I can use "sudo nvram Clover.MountEFI=yes" to automount EFI The above uploaded archive is modified.
-
Hi all Have been reading through the 2 other e5450 posts trying to work out how to get Yosemite up and running properly on my E5450, and have managed to complete the install using Clover. Specs are as follows: DELL Lattitude E5450 i5-5200U Broadwell 2.20Ghz 8GB RAM Intel HD 5500 1080p touchscreen 500GB HDD (not SSD) Using the latest Clover. Installed Clover using Install for UEFI booting only option. Added HFSPlus-64.efi Added FakeSMC.kext, GenericUSBXHCI.kext, VoodooPS2Controller.kext. Added config.plist Set ig-platform-id to 0x16160002 The main issue is that the graphics aren't accelerated and are really slow. It's reporting the Intel 5500 with only 7MB of RAM. Any advice on how to fix it? Thanks